


Tutorials – VTX Lighting
About : This tutorial is aimed at explaining the basic idea of vertex lighting and how to make sure your meshes can be lit well in the editor or the game of your choice. Vertex lighting is a pretty cheap technique. Cheap because it requires little CPU power but also because it doesn’t always look good. This tutorial is aimed at explaining how to improve the results you can get with vertex lighting..
Target Audience : Everyone – Basic skill required
Platform :Unreal Engine 2 and 3, Half Life 2, other games.
Last Update : August 2006
Vertex Lighting
Like the name explains vertex lightning uses the vertices of a mesh for the lighting. It is a type of automatic vertex color. A 3D engine that uses vertex lighting will calculate how much light a single vertex receives. The only spots where a mesh can determine if there is light or not are its vertices.
A simple example:

Number one and two are two lights. The green dots are obviously vertices. The two lights light up two of the three vertices of the mesh and the light will fade out to the third vertex. If light one has brightness 200 the engine will create a gradient between the upper left vertex and the right vertex that gradually changes from brightness 200 to zero. It will not care if the radius of light one can actually go halfway the triangle or not. The only thing it looks at when calculating the lighting are the vertices.
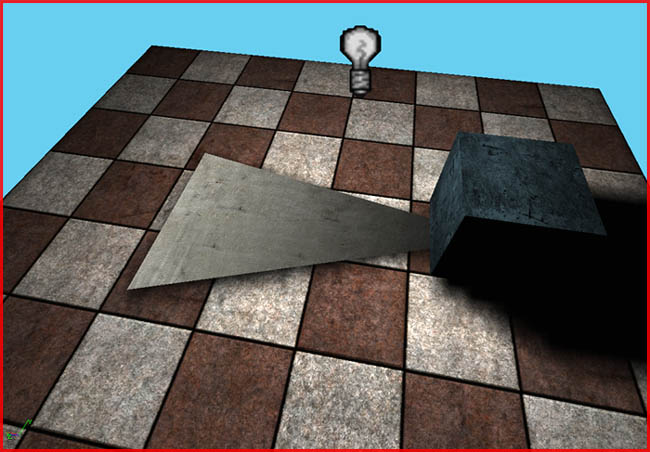
In game that translate to a situation like this:
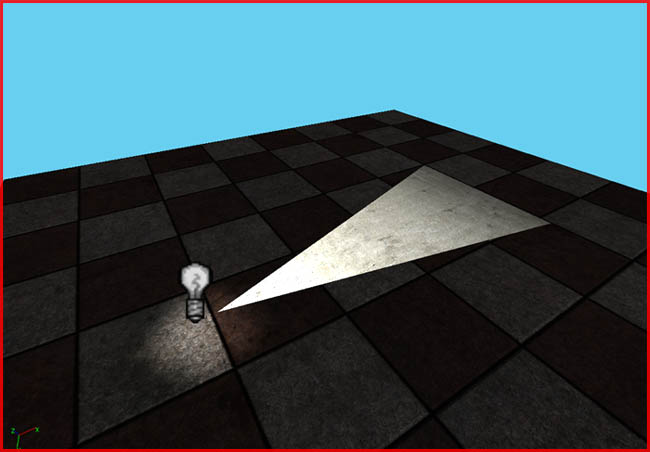
As you can see on the floor the light only has a very small radius yet it still manages to illuminate the entire triangle. This is because the small light radius touches a vertex of the triangle mesh.
Now the potential problem of this whole system is that if a light is not able to reach one of the vertices the mesh will not react to the lighting. This in game picture shows that problem:
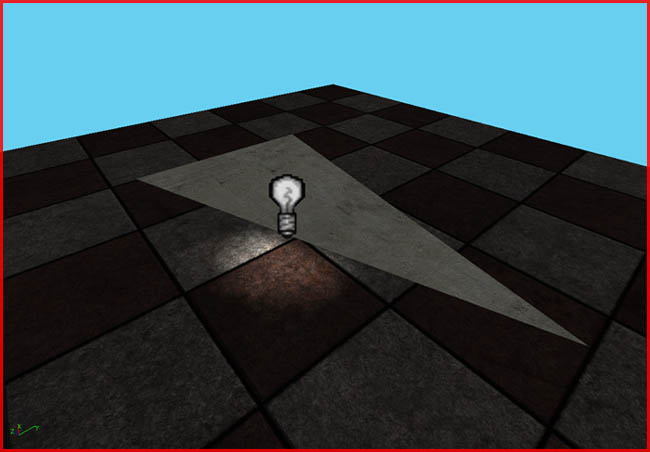
While the light does touch the mesh it doesn’t influence it at all. This is especially an issue with long, big and stretched meshes such as the pipe in following picture.
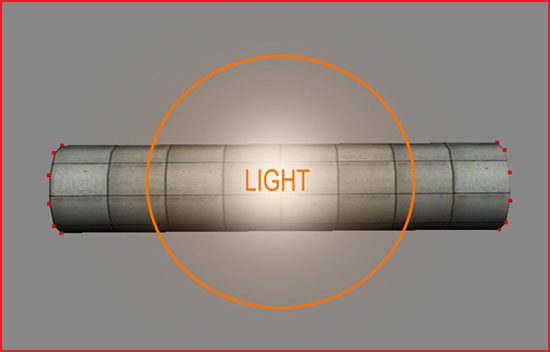
The light in the middle is not able to reach the vertices at both sides. If this would be an ingame situation this pipe would become pitch black.
This would also be true when the ends are stuck in to other geometry and therefore can’t be touched by the lighting either.
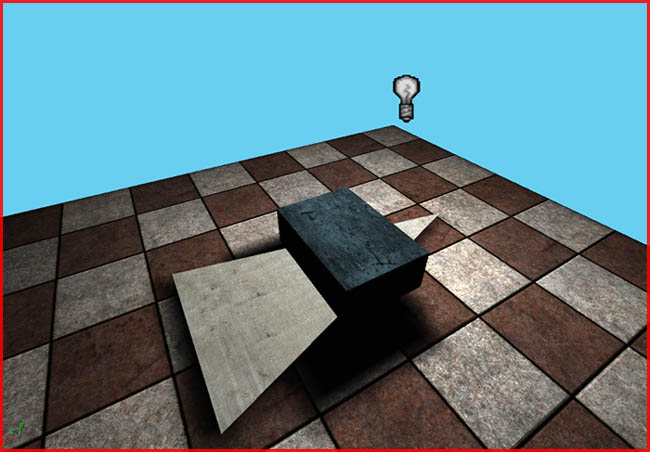
Shadowing a vertex lit mesh is another issue. Lets take this triangle for example. The cube that’s above the triangle should cast a shadow on the triangle but as you can see it does not. The result is unrealistic.
However if the cube is moved over one of the vertices the triangle does receive shadow, too much even.
The solution to all of these problems is to tessellate your geometry.

The two meshes on the left have no tessellations. These meshes might become completely black ingame for previously explained reasons. The right two meshes however are tessellated and will react better to lighting because they contain more vertices. The lighting can be more precise and it is less of an issue if parts of the meshes are stuck in other geometry.
Attaching meshes can also cause trouble for vertex lighting.
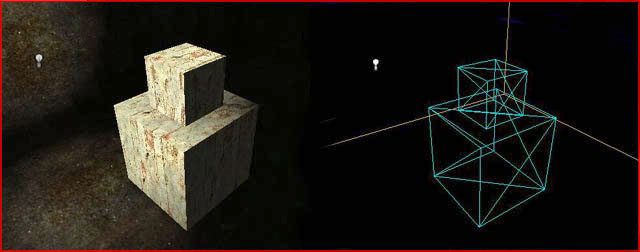
In this example the small cube was simply placed on top of the big cube which results in an unrealistic look once lighted. The top face of the big cube will not keep the smaller cube in mind and it will not receive shadow of the small cube.
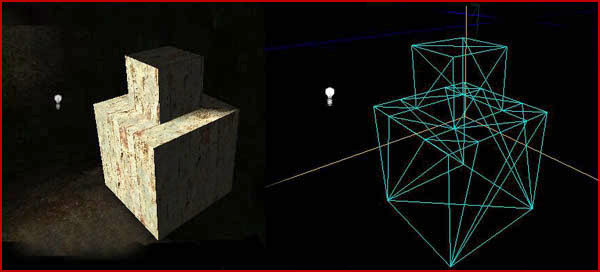
To counter this you must model certain elements together. In the following picture the same cube was not just placed on top of the big cube but actually modeled in one piece with the big cube. The extra vertices available allow the small cube to cast a shadow on the big one.
Another issue is triangulation. While you might not see any difference in an unlit viewport mode the way a poly is divided into triangles does matter a lot for vertex lighting.

The left example is bad because all the triangles point to a single vertex. The right example is good because the triangles are more evenly spread and thus all the triangles have more regular shapes. You want to prevent very thin stretched triangles like in the left example. Imagine what would happen when a light hits one of those vertices and the light brightness is applied as a gradient over such a very thin triangle? Exactly, the triangle would look weird and it might even result in some weird type of line showing up in a lit textured viewport mode. If the triangles are too thin flip them!
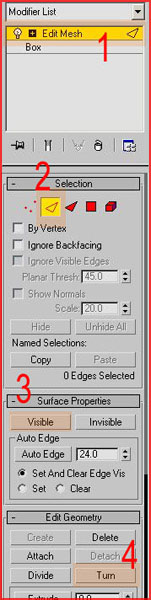
Flipping triangles in 3DSMax is easy. Simply apply an Edit mesh or an Edit Poly modifier and follow the 1 2 3 4 of following picture.
Unreal Engine 2
There are a few tricks available in Unreal Engine 2 to workaround vertex light issues.
When a mesh really doesn’t lit up and you want a fast solution you can turn off staticlighting. It’s in the properties of a mesh > Display > bStaticlight True/False.
Without staticlight a mesh will be brighter, and ignores if a light is blocked yes or no, so it will still accept lightning on it’s vertexes even if those vertexes are inside another mesh. This might fix the blackness, though the light will be pretty blurry, but it could be really horrible to see, so use with caution and preferably only for rather small deco things.
Scaleglow might also be of use. Section Display in the properties has a property Scaleglow. 1.00000 is the maximum so don’ try to get it brighter this way, you can only use it to downgrade the brightness of a mesh.. Make the number 0.6 or whatever fits the situation.
And lastly there are the options Ambientglow, bUnlit, and bShadowcast, all under display again.
Ambientglow gives an overall brightness to the mesh, might be useful for too dark meshes.
bUnlit makes the mesh look like in texture mode and not accept any lighting.
And bShadowcast is logical too. The mesh won’t block lighting so no shadows.
Good use of projectors can also do miracles. You can use little projectors to add circles of lights around lightsources.
Unreal Engine 3
Vertex Lighting in Unreal Engine 3 automatically subdivides surfaces to improve the quality of vertex lighting. Therefore, a long mesh without any tessellation, will lit up in UE3, even if its sides are inside other geometry. However, even while it would lit up, the lighting quality wouldn’t be great, and it still wouldn’t be able to display well defined shadows. Even in UE3, it usually is a good idea to manually tessellate meshes, especially if they are large. For example, the iron bars of a fence would probably do just fine without any manual tessellation, where as a tall pillar would still benefit from manual tessellation. Or simply lightmap them…