Tutorials – UE3 Sound
About : Quick and simple introduction to the sound system used of UE3.
Target Audience : Unreal Engine users – Very basic skill required
Platform : Unreal Engine 3
Last Update : December 2010
Introduction
There are Sounds and Sound Cues. Sound Cues are basically what a Material is to a Texture. It takes a Sound, and it modifies it further. Both Sounds and Sound Cues can be used, but many actors and properties are specifically made for either of the two, and will not accept the other type.
Sound Cues can be modified through the Cue Editor. The Cue Editor lets you basically mix and alter sounds through a node based setup, similar to the Material Editor or Kismet. The Cue Editor is great to create complex audio samples with. For example, to mix a looping wind sound with the howling of a wolf every 30 seconds.
If you only wish to play a single sound, it is usually the easiest to use a Sound and not a Sound Cue, as that saves you time setting up the Cue. The advantage of a Cue is however that the same Cue is used across the game, and that by modifying the Cue, it will affect the entire game. Lets say you have a lot of torches in your game, say 50 a level, and your game is 10 levels large, then that comes down to 500 torch sounds. If you use regular Sounds, and you find out at some point that the torch sounds are too loud, or use the wrong sound, you are going to have to update all 500 sounds by hand. That is not cool. If those 500 torch sounds were to use a Cue, you’d only have to modify the Cue they use to update all those torch sounds instantly. So my basic rule is, if a sound is used in only a few rare places, and/or if the radius/volume/pitch of the sound varies wildly per location, then I use a normal sound. If the sound if used regularly in very similar situations, like the torch example, then I use a Sound Cue.
Furthermore, all sounds referred to by Unrealscript always need to be Sound Cues. All sounds in Kismet always need to be Sound Cues. All Sounds used by InterpActors always need to be Sound Cues. Basically only certain actors that are placed in the level can use normal Sounds.
All sounds placed in levels can be played in the editor by pushing the little joystick button at the top left of every viewport, or for newer versions (Since around summer 2010) of the engine by clicking the Speaker button in the top toolbar.
The Basics
Importing sound is really simple. Sounds must be wav files, and must be 16 bit mono or stereo. The frequency doesn’t really matter but 22k or 44k Hz could be considered standard. UnrealEd does not like file names with spaces in so be careful with that.
In the Editor go to the Content Browser and click the Import button bottom left, select the wavs, and import them. UnrealEd will display a dialog box asking for the package, group, filename, and a number of other options.
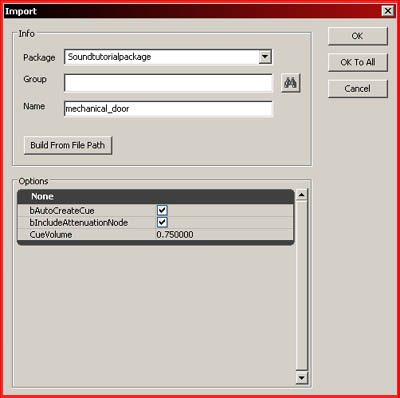
Names may not contain spaces. You do not need to enter a Group name.
Of the options Auto Create Cue is of most importance. If you don’t want a Sound Cue you might want to make sure this is disabled, to prevent cluttering your packages with unnecessary assets. You can always manually create a Cue for the sound later on if it turns out you do need one.
Once imported you can play the files by double clicking them in the Content Browser.
AmbientSoundSimple
AmbientSoundSimple actors use Sounds, not SoundCues. These actors can be used to place looping ambient sounds in levels. In the Actor Browser navigate to Keypoint – Ambientsound – AmbientSoundSimple. Do not expand AmbientSoundSimple further, just use the main class. Then, in the level rightclick a surface and pick Add AmbientSoundSimple. You may need to have the Sound you want to use selected in the Content Browser while going through these steps.
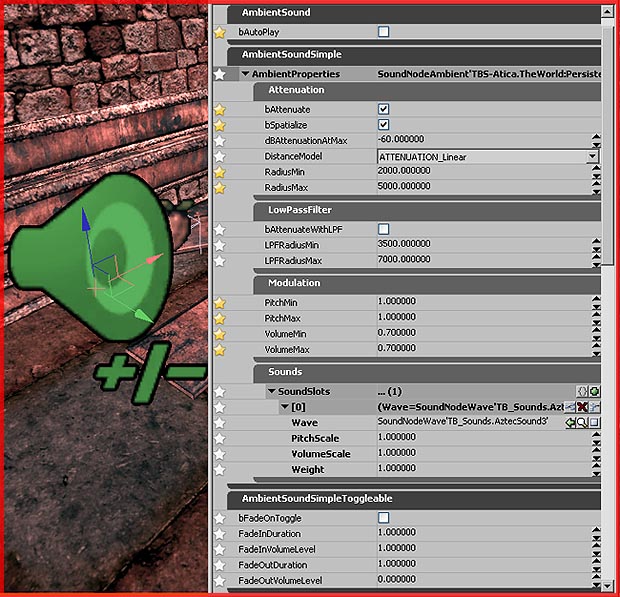
Open its properties and navigate to the AmbientSoundSimple section, and enter the wav sound, if it hasn’t done so already.
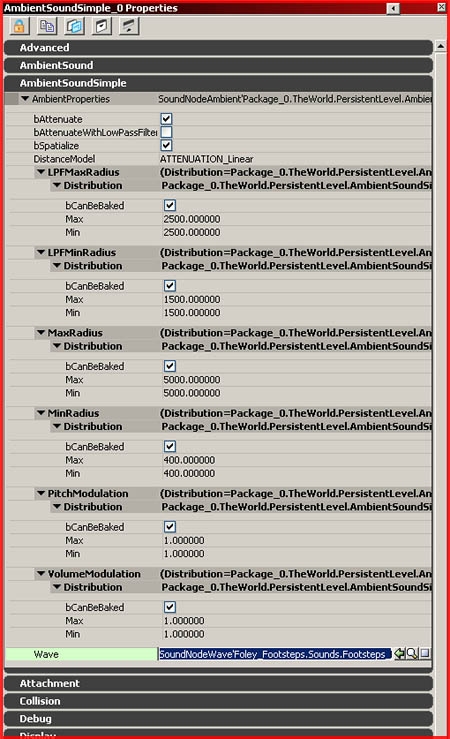
Options given:
bAttentuate – If enabled the sound will fade out dependent on the distance to the player. If this is False the sound will be heard over the entire level at a constant volume.
bSpatialize – Required for positioning. If this is True then the sound will sound more positional. Ideal for things that have a very obvious source such as alarms. I normally don’t use this for ambient sounds such as wind.
DistanceModel – How to fade out the sound. Fast, slow, sudden, and so on.
MaxRadius – How far the sound can be heard, bAttentuate must be enabled for this to function.
MinRadius – When inside this radius, the sound will be played at full volume.
PitchModulation – How fast the sound is played, great to give some variation to the sound.
VolumeModulation – Likewise, adds variation to the volume of the sound.
LPF Min and Max Radius – Low Pass Frequency. Mutes the sound the further away the player is from the source. An example of this is an explosion heard from a long distance. It loses its high frequency sounds waves, and all you’d hear from a distance would be a rumbling. The low frequency sound waves that survived the long distance. LPF Min and Max Radius simulates this effect.
AmbientSound and the Sound Cue Editor
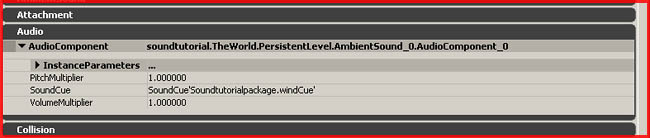
Another type is the AmbientSound actor. AmbientSound Actors use Sound Cues, whereas AmbientSoundSimple actors use just Sounds. To place an AmbientSound actor drag a Sound Cue from the Content Browser into the viewport, or right click somewhere in the viewport and pick it from the menu.
As you can see in its properties the AmbientSound has a whole less options available than the AmbientSoundSimple actor, not even the radius can be set. The actor relies entirely on the information that is contained in the Sound Cue.
To open the Sound Cue Editor, go to the Content Browser, rightclick the Sound Cue, and pick Sound Cue Editor at the top of the right click menu.
By right clicking new “blocks” can be added to further alter the sound. Blocks can be moved by holding Ctrl and dragging the mouse, connections can be made by dragging from one little black square to another. Alt clicking a connection will disconnect it. This is similar to Kismet and the Material Editor.
These blocks are available:
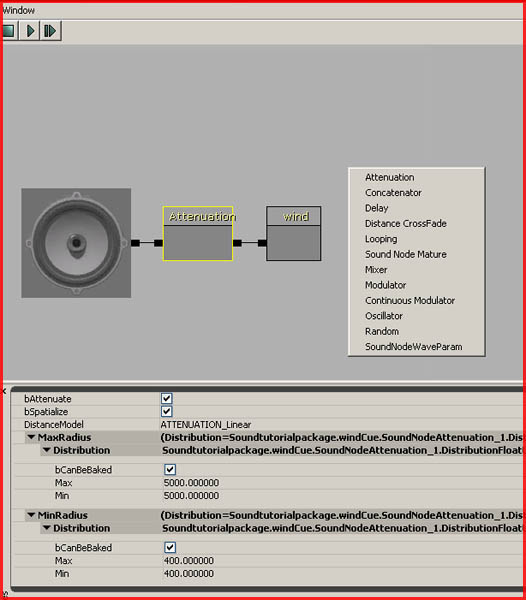
Attenunation – This sets the radius of the sound. Similar to what it does in AmbientSound Simple
Concatenator – Adds two sounds together, but it will only play the second sound after the first one is finished, and vice versa.
Delay – A pretty obvious block, it will delay a sound with a random X number of seconds, dependent on the minimum and maximum
Distance CrossFade – Fades two sounds dependent on distance. The closer you get, the less you’ll hear of one sound and the more you’ll hear of the other.
Looping – Continuously loops a sound. Variables are available to set the maximum number of loops permitted.
SoundNodeMature – Pretty useless for regular use. Used to make the game filter out inappropriate language when mature content is disabled.
Mixer – Mixes two or more sounds together. It also offers variables to determine the strength of every input.
Modulator – Modifies Pitch and Volume.
Continuous Modulator – Similar to Modulator, only this one allows the Pitch and Volume to be altered in real time. This needs to be used in combination with UnrealScript.
Oscillator – Likewise, this modifies the Pitch and Volume real time, but can be used without UnrealScript code. Can alter the sounds to add in some more variation.
Random – Rather obvious, it randomly uses one of its inputs.
SoundNodeWaveParam – Similar to the Params in the Material system. Allows the Sound Cue to be accessed via UnrealScript.
To add another sound to the Sound Cue editor, select the Sound (not another Cue!) in the Content Browser while having the Sound Cue editor open, and then right click in the Sound Cue editor. It should now display an additional item in the rightclick menu, allowing you to add another sound.
Following setup mixes a door sound with a wind sound.
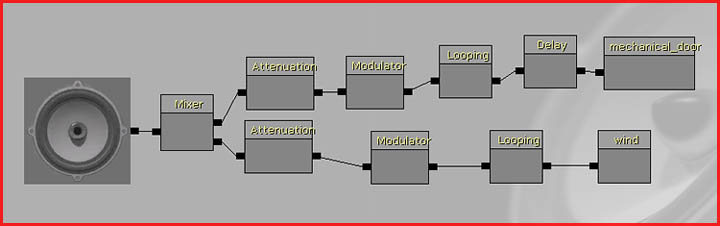
Two sounds, a door and a wind sound. The wind is set to loop by the Looping blocks, it’s pitch and volume is modified by the Modulator, and it is given a radius by the Attenuation. Likewise for the door sound, except for the Delay, which causes the door to only play every few seconds. The result is then mixed together.
By adding the Looping after the Delay, the sound loops with a pause. Adding the Looping in front of the Delay would result in a sound that would only be delayed the first time, but continuously loop afterwards without taking the Delay block into account.
Triggering Sounds
Here too you can follow two different routes. The Sound Cue route requires you to add a Play Sound action to Kismet. Right click in Kismet – Action – Sound – Play Sound, or hold “s” on the keyboard and click somewhere, and in its properties enter the desired Sound Cue. Also, you must set an actor as the target for the sound, or it wouldn’t know where it needs to be located. Failure of specifying an actor, while it will work, can lead to problems later on. Playing too many sounds on the same actor can also lead to problems. Select the actor you wish to use, in my example it was an emitter, and right click in Kismet and pick New Object Var Using "NameOfActor", and connect it to Target. You’re done. There’s not more to it than that.
Following setup plays a sound once a Matinee sequence (could be an elevator or a door) has completed, it uses an emitter as its source/target.

Alternatively, you can also trigger a normal Sound via Kismet. To do so add an AmbientSoundSimpleToggleable, found under AmbientSoundSimple in the Actor Browser. Add it to the level, and add the sound you want to play to its properties.
A number of new properties are available in this actor:
bAutoPlay – Whether the sound should start by itself or not.
bFadeOnToggle – Whether the sound should fade in and out.
Fade Duration and Volume – How fast it should fade in and out.
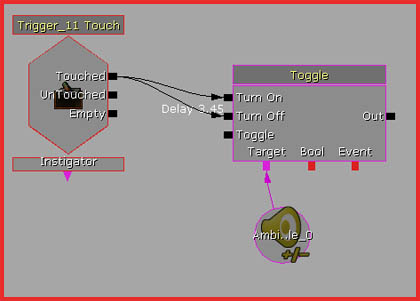
Next, open Kismet, and add a Toggle action. New Action – Toggle – Toggle, or hold “t” on the keyboard and click somewhere. Define the AmbientSoundSimpleToggleable as the Target, and toggle it on, and off. If you don’t toggle it off the sound will continue to play, so toggle it off. If the sound is 3.45 seconds long for example, toggle it off after 3.45 seconds.