


Tutorials – UE3 Preparing A Level
About : This tutorial aims to explain the level designer how to set up the music and preview screenshot, configure the ini file for his UT3 level, and create a readme..
Target Audience : Unreal Engine 3 users – Beginners
Platform : Unreal Tournament 3
Last Update : January 2008
The Music
It is really essential to add music to the level. Music nowadays, is also responsible for certain gameplay sounds, such as the tune played when someone captures the flag, so it is really essential that you set it up or the game would sound very dull.
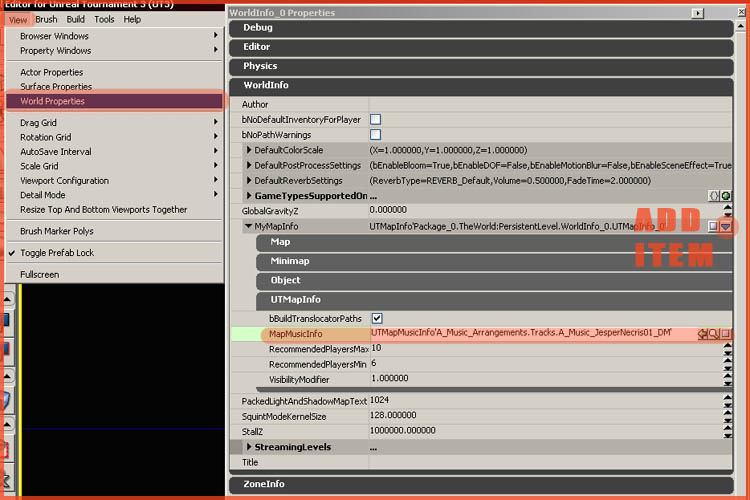
Music isn’t just a single track anymore in UT3. You actually assign about ten sound samples to the level, each for other circumstances. These ten or so samples, are hold by a ‘music arrangement’ asset. It is that music arrangement that you assign to a level, and not the individual tracks.
Go to the Generic Browser, and open the package A_Music_Arrangements.upk found in the folder UnrealTournament 3\UTGame\CookedPC\Sounds. Pick the one you like most, and while having it selected in the Generic Browser, go to the top menu of the editor View – World Properties. Extend WorldInfo in the window that pops up, and add an item to MyMapInfo using the blue arrow on the right. Enter the desired music set to the MapMusicInfo property.
Preview Screenshot
To add a preview screenshot to your level, take a screenshot of your level and crop/resize it to a resolution of 512 pixels width, 256 pixels high. Save it as a TGA file, preferably name it ‘Screenshot’, and import it into the MyLevel package of your level. The MyLevel package is always the exact same name of your level. So if your level is named DM-Carfar_Beta_4, you import the screenshot into a package named DM-Carfar_Beta_4 , exactly like that!
Even if you intent to rename your level to DM-Carfar later, you still import into a package with its current name! The package will automatically rename itself whenever you rename the level (the package and the level are actually one and the same file, rename one, and the other will follow suit).
Once your screenshot has been imported, create a material for it. The material can be extremely simple. Just add the screenshot as a TextureSample, and link it up to diffuse. Done! See my Material Tutorials for additional information on how to deal with materials.
The point of the material is to simply enable you to assign the material somewhere in the level. If you do not use whatever there is in the MyLevel package of a level, it will automatically remove the thing from the package. So to prevent that from happening, you need to make it a material, and assign the material to anything within your level, just to make sure it is "used" within the level. Assign it to a backface of something, or some other area players will never be able to get to.
Once done, remember the name of the Screenshot (it is convenient if you were to just stick to the name ‘Screenshot’ for any level you ever create), because you will need to link the ini file to the screenshot. We will get back to this in the next section.
INI File
The ini file contains important information regarding the level. It holds the description, name, path to the preview screenshot, and advisable playercount. The ini file is not essential, the level will run without it, but a correctly configured ini file will make your level look so much more professional.
The ini file is generated by the game the first time you boot the game up while having the level in the Published directory. You can also simply create one yourself right away. Either way works.
Open the NameOfLevel.ini file either the game, or you created, using standard Notepad, and enter following information. If there already is text in the file, generated by the game, just copy paste this text over it, and customize it.
[CTF-ExampleLevelName UTUIDataProvider_MapInfo]
MapName=CTF-ExampleLevelName
FriendlyName=ExampleLevelName
NumPlayers=8 to 12 players Author: Your Name
PreviewImageMarkup=<Images:CTF-ExampleLevelName.AGroupName.Screenshot>
Description=Describe your level here. Background story, theme, anything.
Replace CTF-ExampleLevelName by the name of your own level. If your level is named WAR-ThreeTrees, the top line would say: [WAR-ThreeTrees UTUIDataProvider_MapInfo]. Be sure to also set the NumPlayers, which is the advisable playercount for your level, the description, the author, and the preview screenshot we discussed before.
The author property must be on the same line as the NumPlayers property. The game technically does not support displaying the author’s name in the menu. By typing the name inside the NumPlayers property, we can trick the game into displaying it anyhow, as it thinks it is part of the playercount.
In PreviewImageMarkup, you enter the name of your level ‘dot’ the name of the group (optionally) ‘dot’ the name of the preview screenshot. Be sure to enter the name of the screenshot texture and not the material!
So for example, CTF-Pinda and a screenshot named PreviewpicPinda, would result in: PreviewImageMarkup=<Images:CTF-Pinda.PreviewpicPinda>
Readme File
All levels should be accompanied by a readme file.
A readme should:
Additionally, a readme can also
contain some notes regarding the creation of the level, like how long you worked on it, or what programs you’ve used in the process, and basically anything else you want to talk about.
Readmes should always be simple txt’s.