


Tutorials – UE3 Texture Optimization
About : How to minimize the memory footprint of your textures as much as possible.
Target Audience : Intermediate/Advanced
Platform : Unreal Engine 3
Last Update : April 2011
Introduction
With a couple of clever tricks, and conscious decisions it is possible to strip quite a lot of data out of most 2D assets. To my experience most beginning artists are mostly concerned with how pretty what they’ve made looks, and much less so about how optimized and efficient it is what they have made. And in game development, that is equally important really. The more optimized the art is, the more and higher quality art can be used, eventually leading to a better looking overall product, which is exactly what an artist strives for in the first place: great looks.
Pixel Density
Starting simple: pixel density. Basically how many pixels of a texture cover how much space in the game. For example you could say every meter in the game is equal to about 64 pixels on the texture. By ensuring that all textures stick to this rule it is ensured that there aren’t any huge textures being used for tiny objects. Not only will that make the standard textures look blurry (if you allow people to compare between the two they will notice the standard ones are quite blurry – if you stay consistent and keep everything “blurry” it will be much less obvious), it also wastes a lot of memory. The chances are that you can’t even spot the fine detail that was put in the huge texture anyway.
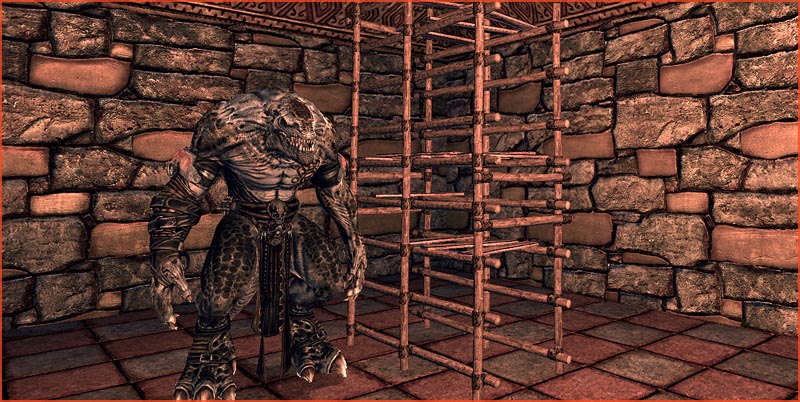
In this example scene we have a monster, a piece of scaffolding, and the surrounding room.
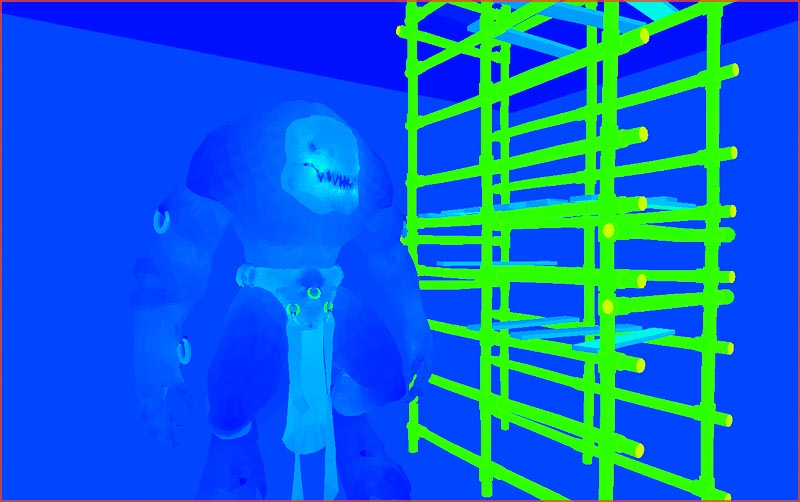
Now switch to Texture Density mode.

When you switch to Texture Density viewport mode you can see that almost everything is blue except the scaffolding. The idea is to get everything covered in a uniform color. The color stands for how dense the texturing is. The monster for example has a slightly brighter face, that is correct. The face should have more detail than the body. You can also see that all surfaces in the surrounding room match each other’s scale/density/color, as does it match the density of the monster. The scaffolding on the other hand is green. The ends of each wooden beam are yellow even. This means those pieces are textured a lot more densely than the surfaces that have the standard blue color.
The resolution of the scaffolding texture should therefore be lowered. You can compare these two shots.
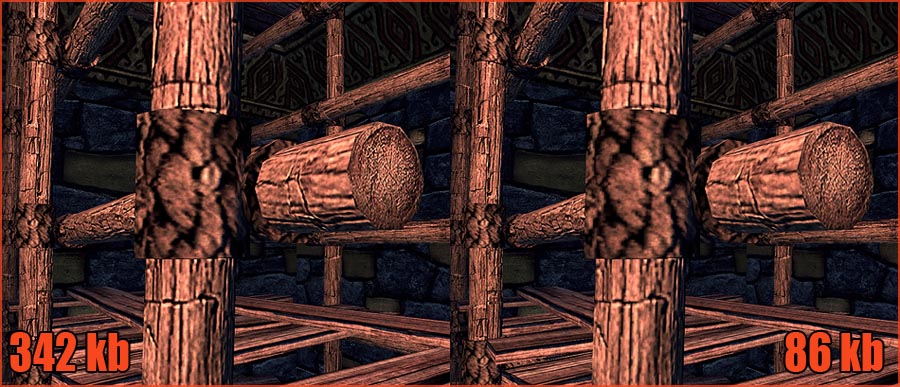
The left shot is the original much too dense version. The texture here amounts to 342 kb of data, using a 512×1024 texture. The right shot shows a 256×512 texture. This dropped the memory from 342 kb to just 86 kb. The visual difference between the two will never be spotted by the player.
Alpha
It happens often that TGA files get saved in 32 bit, even though they don’t actually contain any useful Alpha information. That is very bad. All textures that get imported into Unreal get compressed with DXTC, and the engine will then usually pick up this useless alpha (it may automatically remove flat white alphas though), and resort to DXTC 5 compression rather than the standard DXTC 1. DXTC 5 is used for textures that contain an alpha channel. Alpha however, is almost not compressed at all by Unreal Engine 3, therefore a useless or not so important alpha channel in a texture will have a huge memory impact. You should make extensive use of the Texture Stats window to find these, and other problems.

You can see in this example that a 1024 texture with no alpha is using DXTC1 and is 683 kb large. The identical 1024 texture with an empty white alpha channel uses DXTC5 and is 1366 kb large. The difference between these two near identical textures is literally half. For the price of one 1024 texture with alpha you could load in two 1024 textures without alpha. If you are going to have an alpha channel, you better make sure it is worth doubling the cost of the texture for!
Merge Maps
Continuing on that, it is usually simply a bad idea at all to make use of alpha channels, even when you do actually need an alpha image. Given that alpha channels are barely compressed it is usually better to add the alpha into the regular RGB channels. That allows you to add 3 separate alphas into one single texture, one in Red, one in Green, one in Blue. This is called a merge map.
In this texture you can see that there is one alpha in each channel. In Unreal these can then be extracted again and used for various materials.

In the following example we have on the one hand 3 1024 textures that all have their own alpha channel. And on the other hand we have 3 1024 textures without an alpha channel plus a fourth 1024 texture that carries the 3 alphas in its RGB channels.

The three textures that contain alpha amount to a total of 4098 kb. The 4 non alpha texture have a total of 2732 kb. The result is near identical, the difference in memory is significant. Within The Ball almost all alpha are inside Merge Maps except a rare few that showed too obvious compression artifacts, and were therefore moved back into a proper (near uncompressed) alpha channel.
Specularity Generation
I often see no or very little reason to use a proper specularity texture. The character on the left uses an actual specular texture. The character on the right uses a generated specular. I made it quite shiny to make sure the specular is obvious.
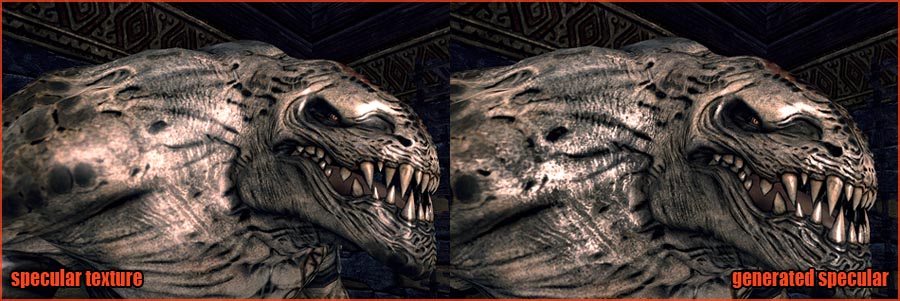
The difference between these two does not in any way warrant doubling the memory footprint from 2731 kb (one 2048 texture) to 5462 kb (two 2048 textures). The price is much too high for the visual return.
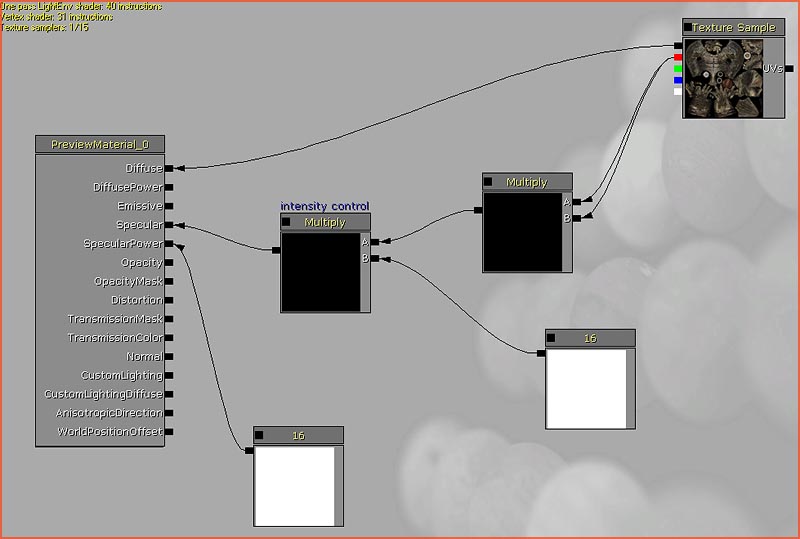
Here is the material setup for the generated specular. It simply raises contrast on the diffuse by multiplying it by itself, then bumps up the intensity a bit.
In The Ball 90% of all textures use generated specular. This is one of the things that contributed to the fact that the entire game is only little over 1 gb large even while it has many hundreds of high res environment and character textures.
Advanced Specular Optimization
Even when a material does need a unique specular texture, and the same goes for an emissive map, then it is still possible to greatly optimize this. In the case of the monster we are using, it has steel rings around his arms. You would obviously want these steel rings to have more specularity than the skin, something that is rather hard to do by generating the specularity. In the following example a low res 256 specular texture is blended together with the high res 2048 diffuse texture. It blends the detail of the diffuse together with the brighter regions defined in the small specular texture.
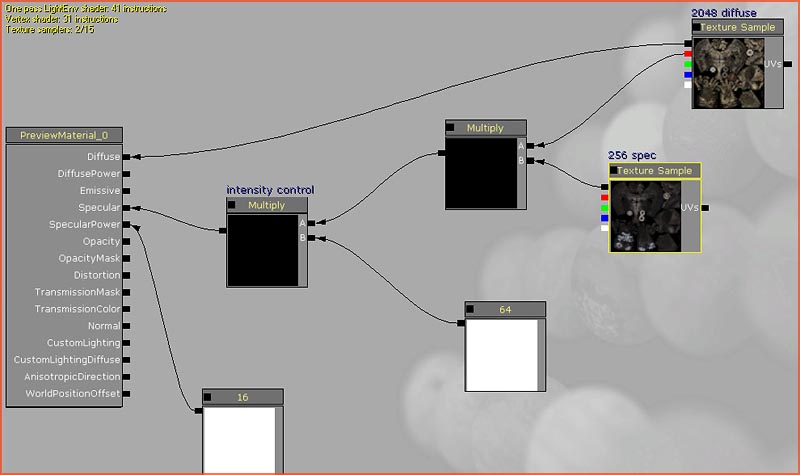
The cost of a single 256 texture is much smaller than that of a unique 2048 specular texture.
Normal Map Abuse
In a normal map it is quite easy to remove the blue channel entirely, and then use the red and green channel to figure out what the missing blue channel was like. This allows you to use that blue channel for something else. Like an emissive or specular texture.
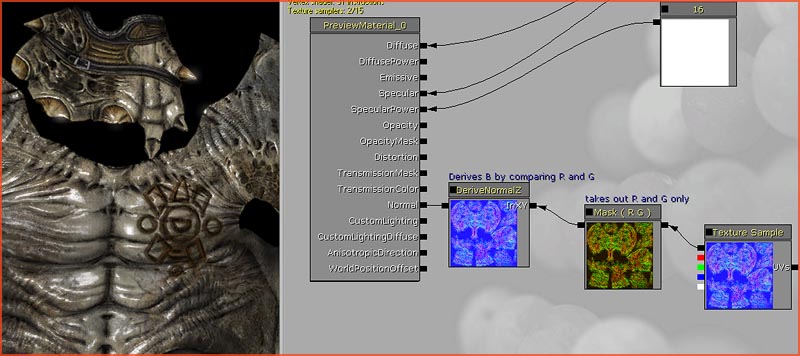
It should be noted however that Normal Map compression will darken the blue channel. If something is embedded into the blue channel it should therefore be multiplied by about 14 again before it is put to use.
Some More Tricks
Removing mipmaps from a texture shaves off a few kb. Some textures such as interface textures, do not need mipmaps. You can turn these off in the texture properties.
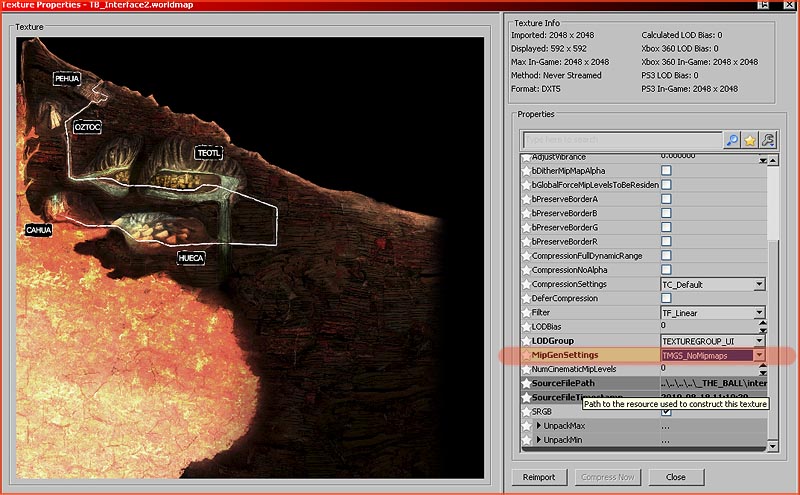
This large 2048 interface texture (with alpha) went from 5462 kb to 4096 kb by removing the unused mipmaps.
You can preview what a texture looks like when it is X times smaller by modifying the LODBias setting.
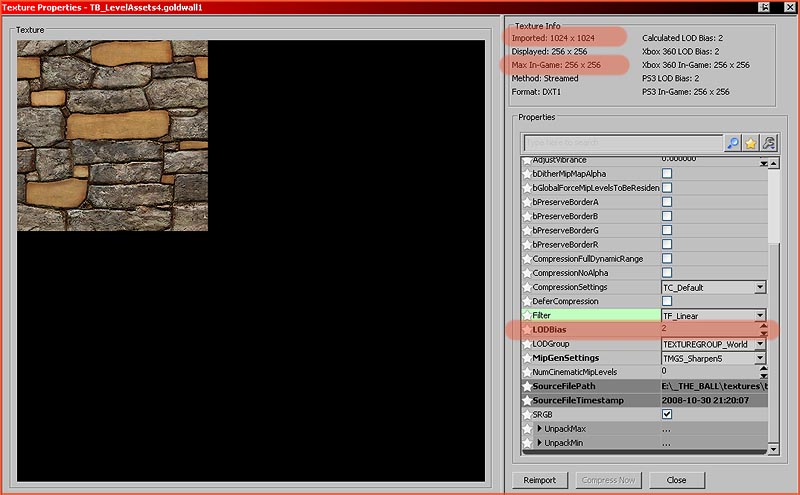
This is essentially the same the game does when you set Texture Detail to low in the settings menu. It does +1 (or +2, +3, etc.) on all LODBias values on all textures. 0 Is default and the original size. 1 Brings it down one step. 2 Another. And so on. The engine does not actually load in the full resolution texture when you use LODBias 2 for example, so this does actually save memory without having to change the texture in Photoshop.
This value is clamped by a minimum allowed size, defined in UDKEngine.ini. Because of that, even if you enter a value such as 5 or 6, there will be no visual difference anymore. You can lower the minimums further in the ini file if you wish.
Conclusion
As a comparison, lets say we have our monster. If it were to use a normal setup of one 2048 diffuse texture, a 2048 specular texture, and a 2048 normal map texture. The diffuse texture holds an alpha channel with an emissive texture. Then the total memory footprint would be 2 x 2731 kb + 1 x 5462 kb (the diffuse with alpha) = 8193 kb for the monster.
On the other hand if it were to generate specular using the diffuse, and embed its emissive map into the blue channel of the normal map, then the monster would use just one 2048 diffuse texture and one 2048 normal map (with embedded emissive). This would amount to 5462 kb.
The difference between these two would be hard to spot, yet it would be 2731 kb smaller. Now lets say there are 20 monsters/weapons/characters in this game. If this were done on all of those that would bring a saving of 53 mb. Now throw away the mipmaps of textures that don’t need them. Generate specularity on a 100 world textures. Use Merge Maps where needed. And we can easily be talking about hundreds of mb saved over an entire game.