


Tutorials – UE3 Modeling 1
About : This tutorial will explain the reader how to import a model into Unreal Engine 3, and how to set up a number of important properties. Note how this tutorial will only focus on the creation of static meshes, and not on animated meshes, which is a wholly different process.
Target Audience : Beginner
Platform : Unreal Engine 3
Last Update : November 2010
What it can and can’t do
Importing a model into the engine and configuring its flags is very easy and takes less than 10 seconds once you know what to do. We’ll start this tutorial with a shortlist of the things the engine supports and offers, and the things it does not.
Can do
Can’t do
This tutorial will focus on how to export a mesh from 3DSMax and Maya. No plugins are required.
Setting up a model, exporting, and importing
Your 3D package should preferably use a type of Generic Units as grid size. The actual unit size doesn’t really matter in the end though, as whatever unit you had in the 3D package will simply translate as 1 unit in Unreal. 400 Units width in the 3D package means 400 units in Unreal. Usually the player size is between 80 and 250 units. This depends from game to game, as the size of a character is freely customizable. The UDK uses about 96 for its player.
# 3DSMax – ASE
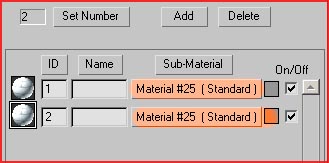
We start off with 3DSMax – ASE exporting. Make or get an existing model, and make sure it preferably has UV coordinates and smooth groups. If you want to use more as one texture on the model, you need to create a Multi/Sub Object material in the material editor, and assign a number of sub materials to it by using the Set Number button.
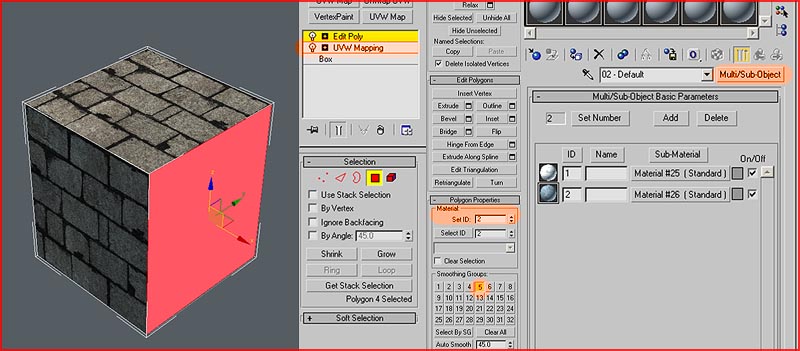
These materials can be set to the mesh by using the Set ID feature in the Edit Poly and Edit Mesh modifiers.
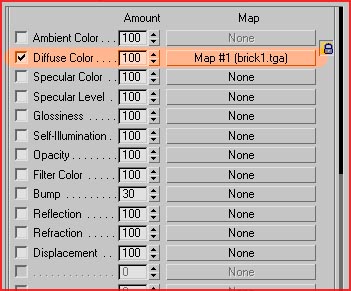
Materials need a bitmap in the Diffuse Color slot to export correctly. You may add additional maps to all the other material slots, but those won’t import and are thus only useful for previewing things in 3DSMax.
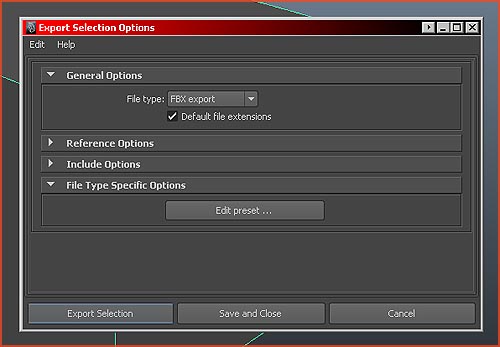
Once your mesh is ready, make sure it is positioned on coordinates 0, 0, 0 as the world’s center will become the pivot of the object once exported. Export the mesh by going to the top menu of 3DSMax File – Export Selected – Select ASE as type.
Following menu will pop up:
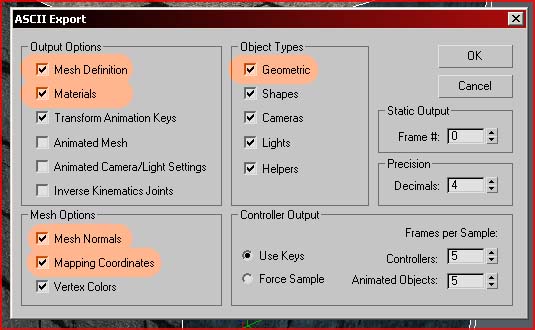
The settings marked must be enabled. Anything else is optionally and won’t make a difference to the engine.
Note that models cannot be exported together. Every model needs to be a separate ASE file.
Once the model has been exported, open up the editor, and go to the Content Browser. If it isn’t open already, you can open it by the button on the top toolbar (marked on the upper left of the screenshot).
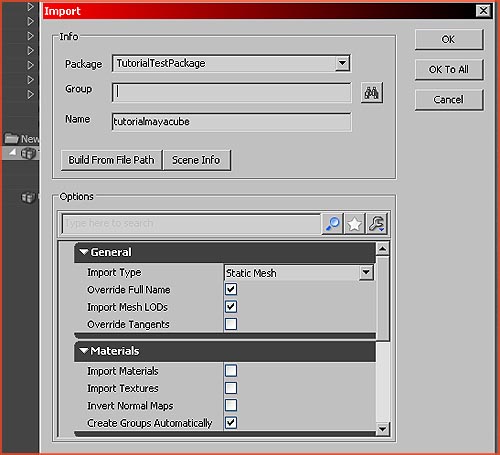
In the Content Browser, at the bottom left, click Import – and select your file. Once you ok’ed the import dialog, a new window will pop up.
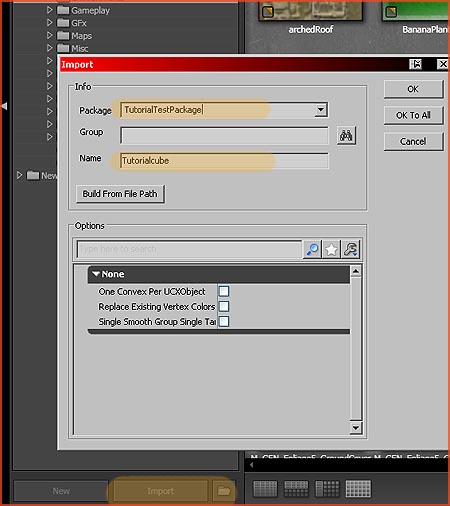
This new window allows you to set a name for the object, and a name for the package. Optionally you can also set a Group name if you desire so. Be sure to not use spaces in names, nor any non standard characters. Note: If you receive an error along the lines of “Generated/Imported vertex count ratio exceeds…”, don’t worry. You can ignore it. It has to do with the number of hard edged polygons.
Once imported, you should browse to the package, and double click your mesh. The Static Mesh Editor window will open.

Expand the LODInfo to add your materials to the mesh again. If done correctly, the mesh will have exactly as many material slots as you added to the Multi Sub Object in 3DSMax.
Optionally you can also configure the Lightmap information. For more information refer to my Lightmap tutorial.
You’re done! Add the staticmesh to the world by dragging it into the scene, or by holding S on the keyboard and clicking somewhere, and be sure to save your package.
# Maya – FBX
Pretty much the same thing in Maya. Start off by making a mesh, or get an existing mesh from somewhere and make sure it preferably has UV coordinates and smoothing set on its edges.
Export Selected – and select FBX as the export format.
You don’t need to modify any settings in the export dialog, but you may need to set Maya’s upper axis to Z rather than the default Y. This can be done in Maya’s preferences.
Import the mesh into Unreal and leave all the import settings at their default settings.
Import Materials and Import Textures is quite nice though. If you enable those Unreal will automatically import the textures you assigned to the model in Maya (or Max for that matter), create materials for those textures, and assign all that to the mesh.
Collision
By default your model will have no collision, you must set it manually. Three different types of collision exist:
Usually only large and complex meshes have their collision made in external packages. Anything that will do with cubes, cylinders and similar shapes is usually done in the editor. Large natural objects such as caverns often use per poly collision.
# Collision made in an external package
All you need to do is to give the mesh you wish to use as collision the prefix UCX. Example: if the regular mesh is named Tree, the collision for Tree should be named UCX_Tree. Select both, and export both together into the same file. Upon import the engine will recognize the UCX mesh, and assign it as collision model. It will not show up in the Generic Browser.
# Collision generated by the editor
Three subtypes exist: DOP models, generated convex models, and BSP made collision. You are free to use whatever type you want, although usually DOP models are the easiest to apply.
DOP collision models are simple shapes like boxes and cylinders. 6DOP for example is simply a box which transforms the bounding box into a collision model. Experiment with the DOPs to see what each one does.
Note that you can preview collision by enabling the marked button.
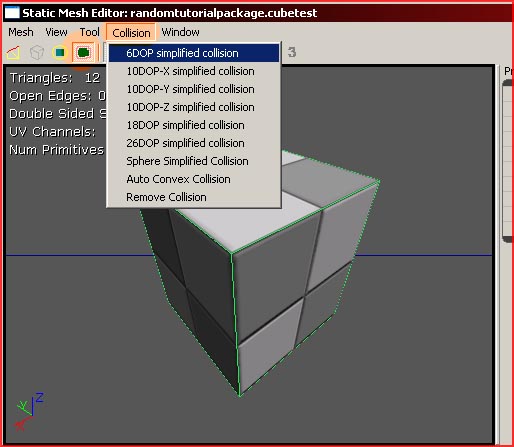
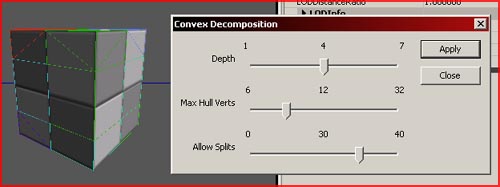
Convex collision creation allows you to generate a collision model that fits your model better than standard DOP models. It can be accessed in the same menu as displayed in the DOP collision image (Collision – Auto Convex Collision).
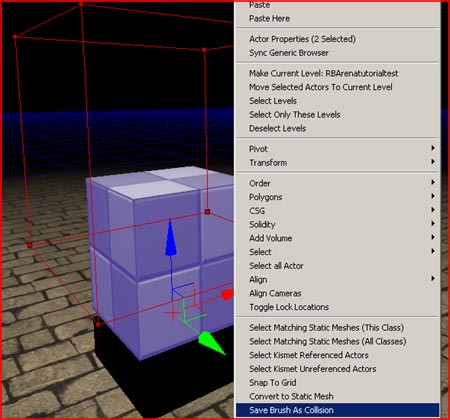
It is possible to use the shape of the red builder brush as collision model. This allows you to create quite complex collision models without the need of creating those in an external application.
To assign the shape of the brush to the model, place the brush where you want the collision to be, and select both the brush as the model and rightclick them. Select Save Brush As Collision to assign it.
# Per-poly collision
In the properties of a staticmesh, simply turn off the two settings marked to force per-poly collision. UseSimpleBoxCollision and UseSimpleLineCollision. Optionally you can also turn off UseSimpleRigidBodyCollision so physics too use per-poly collision.

Batch exporting
By using KeensBatchExport script for 3DSMax, you can mass export dozens of meshes within a second, dramatically speeding up the process.
Bind it to a button on a menubar or on the keyboard, and then open it.
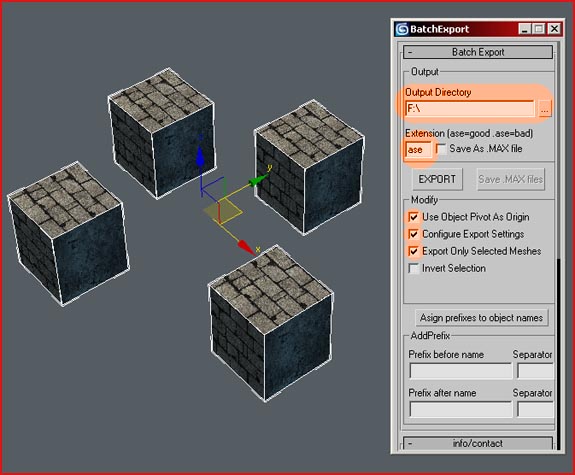
Be sure to enter an output directory, and "ase" as extension. The three other necessary options speak for themselves.
This script will automatically place all meshes on location 0, 0, 0 before exporting, and it will place all meshes back on their original location after the export. This way you can easily have dozens of meshes in the same Max file, and easily transform their own pivots into the in-game pivots.
It automatically names the ase files with the names the meshes have in the Max files.
Common problems
Some materials in 3DSMax may be sharing names, thus confusing the engine. Fix it by renaming offending materials. In this example both materials share the same name (Material #25), even while they do have different textures assigned.
You might have forgotten to save the package! If that is not the solution to the problem, you might be using shared package names. Package names must be unique and may not contain spaces and similar non standard characters. Unreal does not see file extensions so a package named Dog and a level named Dog are identical to the engine. Also, be sure that the package inside the Content directory. The engine will not be able to locate the file anywhere else.