


Tutorials – UE3 Kismet Interface
About : Creating Kismet driven HUDs and menus.
Target Audience : Unreal Engine 3 users – Beginners and Intermediates.
Platform : Unreal Engine 3
Last Update : January 2012
Foreword
I never got the hang out of Scaleform. I am sure it is nice if you are after a complex interface or if you have the budget to get yourself a dedicated Flash designer, but for small productions and hobbyists it is total overkill. Doing something as simple as rendering a line of text on the screen should not require you to get and learn an entire new program and scripting language! The original UIScenes systems was pretty much just as bad. While it at least handled interface creation internally within the engine, it was just like Scaleform unnecessarily complex and just like Scaleform, it also required someone to study the system extensively before being able to get some results out of it.
So when James Tan put down the foundations of a Kismet based UI system a couple of months ago it really caught my interest. Being able to create interface elements entirely through Kismet? Awesome! Problem was though, his Kismet Actions didn’t had anywhere near enough options and parameters to be really useful in production…. Until Marko Permanto came to the rescue!
What Marko has done is extended James’ code with dozens of features that were missing in James’code, turning the Kismet UI system into a production ready Kismet UI system. The system was built for, and will be used to handle all the HUD and menus of the the UDK game Unmechanical – http://unmechanical.net/, a game that me and Marko are working on. Join us on Facebook!
Installation
Get the UnrealScript source files.
As with any bit of Unrealscript, extract the directory SimpleExtHud to your UDK\Development\Src folder, and then go to UDK\UDKGame\Config and open DefaultEngine.ini. In the section [UnrealEd.EditorEngine] add +EditPackages=SimpleExtHUD to the end of the list. Save the file, delete UDKEngine.ini (so that the game will generate a new one based on the modified DefaultEngine.ini), and now start the editor. It will ask you to recompile the script, to which you answer yes. You are now good to go.
The package with the materials used in this tutorial can be found here. This was requires the September 2011 build or newer. The package is not essential to the tutorial, it just contains the textures/materials used in the examples.
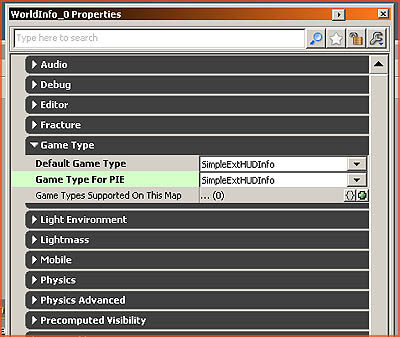
The Gametype
For the new Kismet to work, it has to be allowed to do its thing by the gametype. Included in the UnrealScript is a gametype, if you want to use this in your level/game you must set your level/game to use this gametype, or alternatively merge the relevant code into your own gametype.
So before you begin, go to WorldInfo, and set the gametype to SimpleExtHUDInfo. or alternatively UTGameExtHUDInfo.
A Line of Text
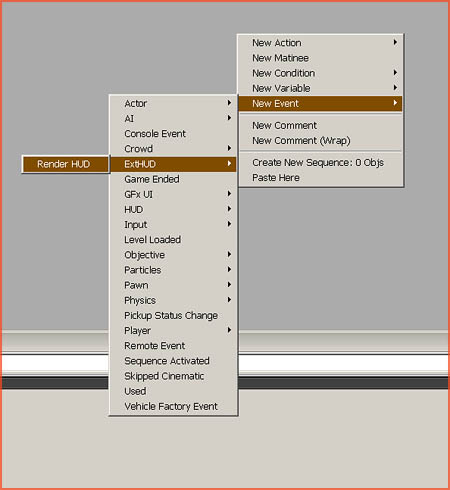
Open Kismet, right click, and add New Event – ExtHUD – Render HUD.
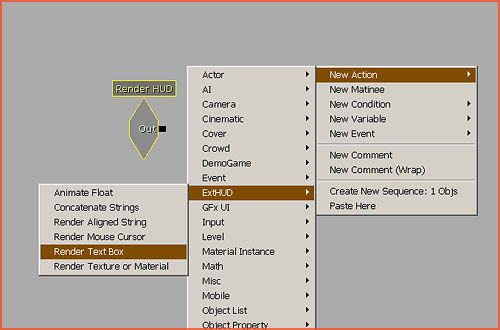
Next, add New Action – ExtHUD – Render Text Box. Connect these two.
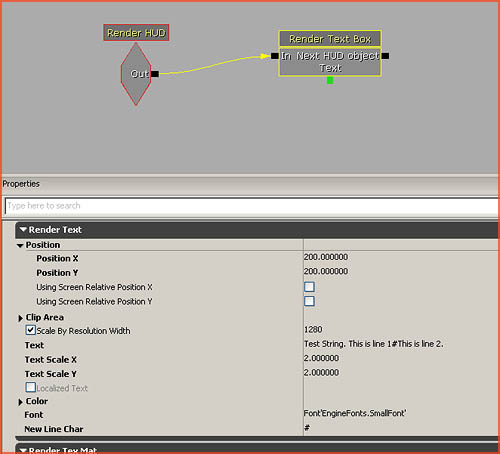
Click Render Text Box and set the following properties:
-
Position – X and Y to 200 to display the text 200 pixels below and right of the very top left of the screen (= X 0, Y 0). Alternatively you can enable Using Screen Relative Position, and then enter Position X and Y 0.2 or such. When Relative is enabled, it becomes percentage based (So between 0 and 1). 0.5 = in the middle of the screen.
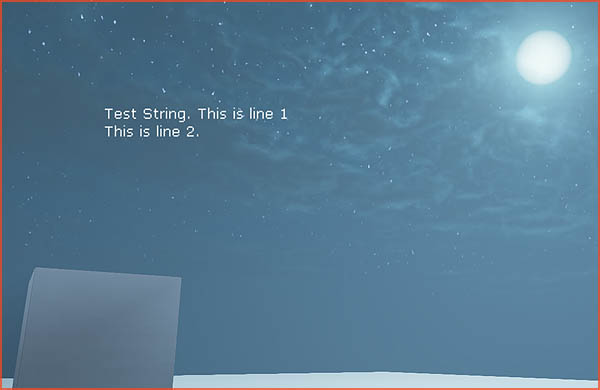
Text - Type your text string here. For example “Test String. This is line 1#This is line 2.”
New Line Char – This character will break up the lines in your Text string. I’ve gone for “#”. This way you can add in line breaks/enters.
Font - The font to use. I am using Font’EngineFonts.SmallFont’
Text Scale X and Y – The scale. Do not scale this up too much though as it’ll result in blurry text. Rather use a font with larger characters.
Scale by Resolution Width – This should always be set to the resolution you are testing the game on. So set this to the resolution you are running the game width! Failure to do so may cause the text to render wrong on different resolutions.
As you can see, you’ve now got text displayed on the screen!
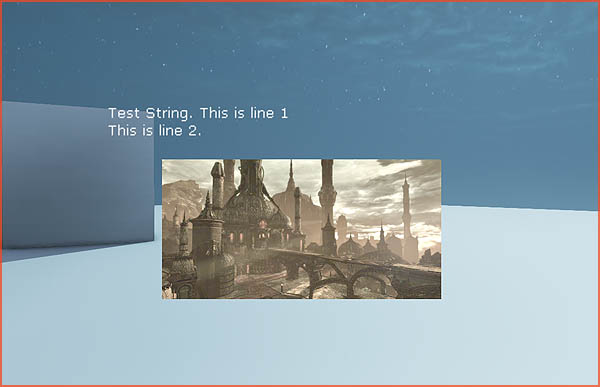
An Image
Rendering an image is very similar. Instead of adding a Render Text Box, add a Render Texture or Material and connect it to Render HUD, or the previous HUD element, such as the Render Text Box from the previous example.

Set following properties:
-
Texture/Material – The asset to use. I am using Texture2D’UI_FrontEnd_Art.MapPics.___map-pic-vctf-necropolis’
Size and Position – The size and position in pixels, or in percentage. Similar to Position of the Render Text Box.
Scale by Resolution Width – Same as Render Text Box!
A Checkbox or Button
Now lets add some interactivity. This example shows a checkbox, but would work exactly the same for a regular button also.
First of all we need to get a mouse cursor in. Add New Action – ExtHUD – Render Mouse Cursor.
Set following properties:
-
Texture/Material - The texture that contains your mouse cursor. In my example this is Material’MenuTest.mousecursor_mat’
Cursor Size – The size of the cursor.
Then, add a Render Texture or Material action, as explained in the previous topic. Notice how this has a Mouse Left Down, and Mouse Left Up output. We can expose more mouse events by right clicking the Render Texture or Material and going to the section Expose Output.
Try in-game if your mouse cursor appears in front of the image. If not, change their order around. Have Render HUD first activate Render Texture or Material and only then Render Mouse Cursor.
Now, right click Render Texture or Material, and Expose Variable – Texture/material. Create a new empty Object through the right click menu New Variable – Object – Object, and connect this to Texture/Material. Add the empty checkbox material to this object. In my example that is Material’MenuTest.Checkboxoff_mat’.
Then add a New Action – Set Variable – Set Object, and connect it to Mouse Left Down. Connect the first Object, the one holding the current material, to Target, and add a new empty Object under Value. Add the second material to this one, Material’MenuTest.Checkboxon_mat’.
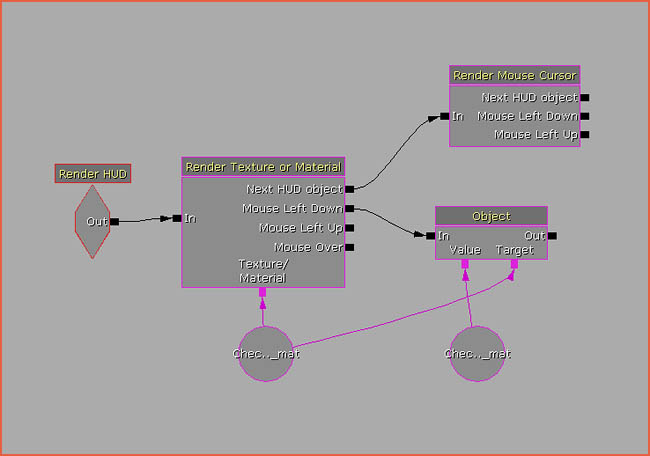
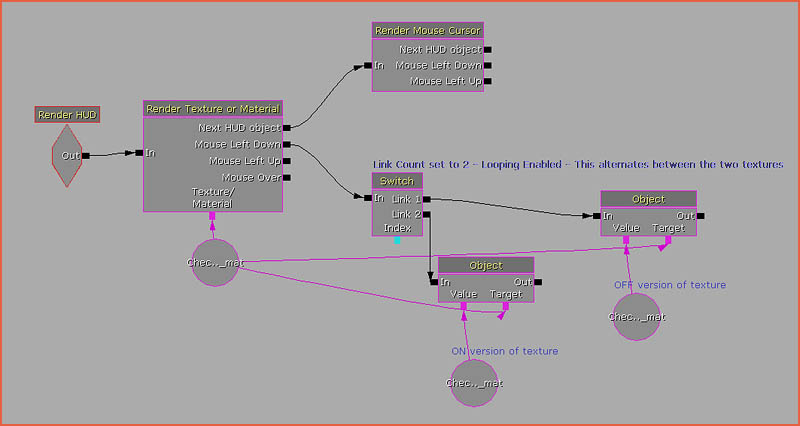
What will happen is that as soon as you left click the image, it will replace the material with the checked version of it. By adding a New Action – Switch – Switch in between these too, it would act as a true checkbox, as every second click it would switch to the alternate texture.
The same setup can be used to make the checkbox lighten up as soon as the mouse cursor passes over its surface, by connecting a Set int to Mouse Over, which then alters the color int values of the Render Texture or Material. Note that you can only alter the color and opacity if a texture is assigned to it. A material cannot have its color and opacity changed during the game, but you could use a Material Instance and a Matinee instead if you wish.
Scrolling Credits
Animating elements is easy. Lets create scrolling credits, by animating a Text Box.
Set up a Text Box and add all the names as one long string, separated with the New Line Char. If you require a double break, make sure you add a space in between two New Line Chars, for example:
-
Artists#John#Danny#Linda# #Programmers#Mike#Jake#Steven# #Senior Executive Producers#Peter#Oliver#Jack#Harry#Charlie#Joshua#James#George
Now right click Render Text Box, and Expose Variable – Position Y. Add a New Variable – Float – Float to this new connector. And then add a New Action – ExtHUD – Animate Number. Connect OutFloat to the Float you just made. Connect Start to some event, for example New Event – Level Loaded.
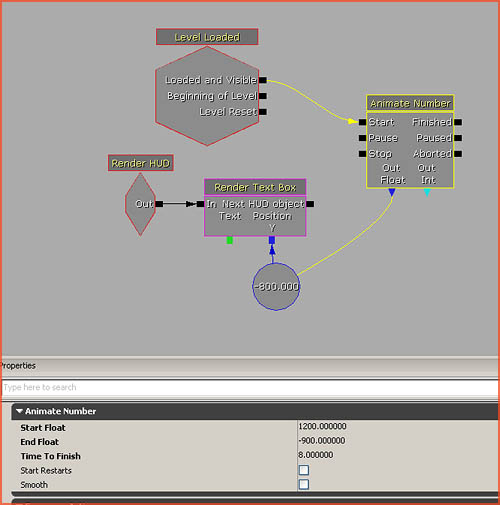
Set the Start Float and End Float values to 1200 and -900 or so (depends on how you set up the Render Text Box + your screen resolution), and change Time to Finish to how long it should take to scroll through.
You can use this exact same method to animate things like Color and Size also, allowing you to fade in parts of your interface, have elements grow, and so on.
Toggling on parts
You can easily toggle on or off parts of your interface by toggling (using a standard Toggle – New Action – Toggle – Toggle) the Render HUD event at the very beginning.

If you require only parts of your interface to toggle on/off, add those to a new Render HUD event, and toggle just that one.
Other Properties
Some of the other properties and actions not explained elsewhere in the tutorial:
Internal Position Anchor – Allows for moving the pivot point of the texture
Screen Alignment – Where it aligns to. Left, Right, Center, Top, Bottom
Coords – Useful for when all interface elements are merged into a single texture. This allows you to use only parts of a larger a texture.
Clip Area – Sets an area for text. Text wordwraps when it reaches the end of this area. Useful for restricting text to a certain part of the screen, for example for a dialog window.
Render Aligned Strings – A text string that can be centered and aligned to the screen at will. Good for things like titles, but does not support line breaks.
Concatenate Strings – Merges two strings into one.