


Tutorials – UE3 Cutscenes
About : This tutorial will explain to the reader how to make a basic cutscene that utilizes two cameras, fades in and out, and triggers an event along the way.
Target Audience : Unreal Engine 3 users – Intermediates
Platform : Unreal Engine 3
Last Update : June 2009
Introduction
In this tutorial we will set up a basic cutscene with two different cameras, an event triggered along the way, and a fade in and out.
This tutorial requires basic knowledge of the editor and Matinee. Besides standard knowledge of the editor you must also know how to make basic
moving geometry in Matinee. If you don’t, have a look at my mover tutorial first.
The First Camera
Go to the Actor Classes browser, and find the CameraActor at the top of the list. Place this actor in your level on the desired location. It is a good idea to point it into the right direction already, though you could also do this later.
Once the CameraActor has been placed, open Kismet, and add a Matinee.

Open that Matinee by double clicking it. Make sure the CameraActor is selected in the viewport when you do this.
Right click the dark gray space, and pick New DirectorGroup.
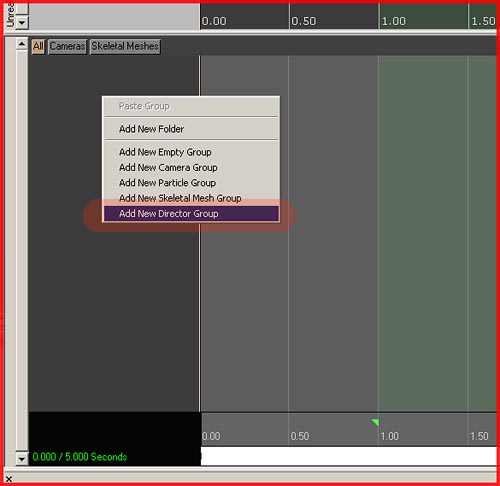
Now right click the dark gray space again and pick New Camera Group. You now have two items in Matinee.

The Camera Group controls the camera. Each camera will have its own group. The Director controls when which camera is active. So the first thing we should do is tell the Director to start using your single camera. To do this, make sure the timeline is currently set at 0.0 (which is the case by default), click on Director so it turns orange, and then click the Add Key button at the top left.
It then pops up a box that asks you what to cut to. Select your camera group.

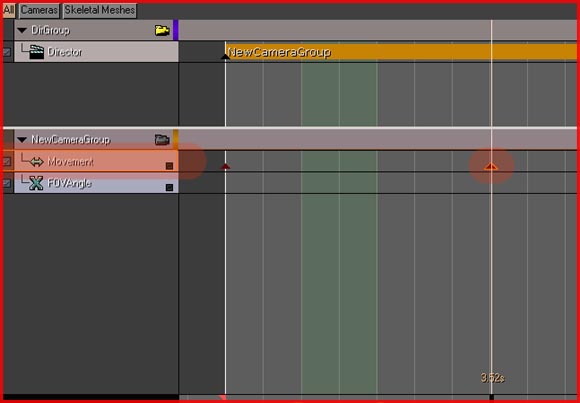
Next we want to animate the camera itself. Click on Movement which is part of your camera group, and then click the Add Key button once more, to add a first position/key to the timeline.
Matinee should now preview the position and angle of the camera in your viewport. If it does not cut to the camera in your viewport, it may help to close matinee and open it again. Alternatively you can mess with the little camera button on the right of DirGroup, which actually toggles viewport camera previewing on and off.
When Matinee previews your camera in the viewport, it will also record your moves in it. This way you can position cameras by simply adding a key, and then fly or rotate the camera how you want in the viewport, and it will remember this. It will however not remember the path you took to fly to that location, only the final position.
And that is what we are going to do. So make sure the viewport previews the camera and add another key to the Camera Group. Make sure you have Movement select in the Camera group, put the timeline on some other time, and hit the Add Key button again.
Without doing anything else, fly the camera in the viewport to where you want it to go (while keeping matinee open!), and when you are done put the timeline in Matinee back to 0.0 and hit Play. The cutscene should now preview in the viewport.
Close Matinee, and in Kismet add an New Event – Level Startup, and connect it to Play of the Matinee.
You now have a very basic cutscene that starts as soon as the level starts!
Second Camera
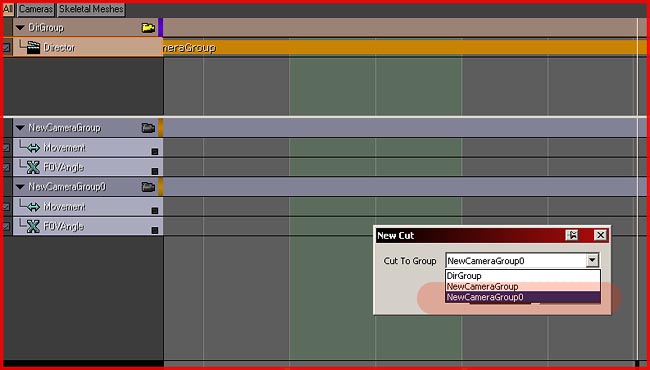
Go to the Actor Classes browser again and add a second camera actor. Continue by opening Kismet and then Matinee again, and add a New Camera Group below your first one.
Then, select the Director, and put the timeline to when you want the Director to switch to the second camera. Add a key and be sure to select the second camera group in the menu that pops up.
Animate this camera as well, and you are done! You now have a basic cutscene that makes use of two different cameras.
More on Cameras
If the camera rotates strangely while flying around select the Movement track of that camera in Matinee, and have a look at the properties that show up at the bottom of the window. Enable bUseQuatInterpolation.
There are some other interesting properties there as well. The ones I personally use most are LinCurveTension and AngCurveTension. They control how smooth the camera flies through the world. A value of 1.00000 would create very blocky yet precise movement where as the default value of 0.000000 smoothens the movement out, but may because of that also cause the camera to fly through geometry every now and then.
As those two settings still offer only limited control over how the camera moves, it it well recommended to manually tweak the paths of your cameras. To view the paths disable Camera Previewing in the viewport by clicking that little (yellow) camera on the right of the Director Group.
You should now see colored lines with little dots on. This is the path it follows. Now if you click on a key in Matinee, you will see that two white lines show up, one on either side of the position. These control the curves.
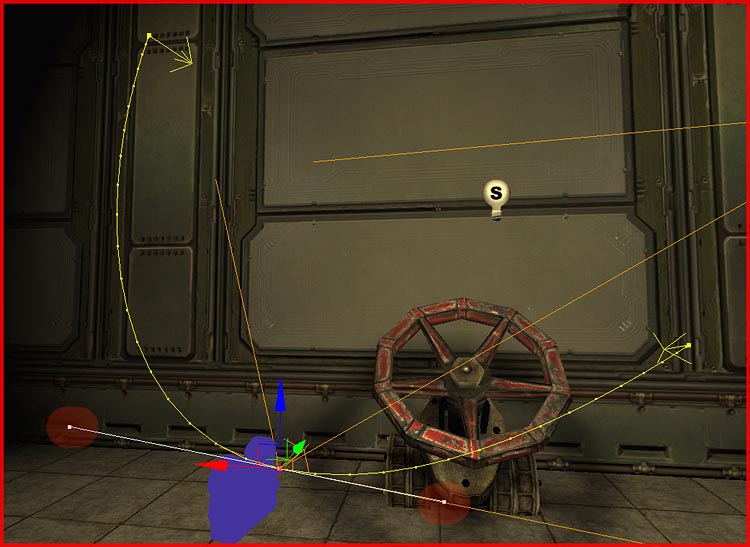
Click on the little square at the end of one of these lines, and drag it. Notice how the entire line changes. You can also hold both mouse buttons to drag it around as that gives more freedom of movement. It is a bit cumbersome to tweak the paths like this, but if done right it will greatly improve the quality of your cutscene.
Lastly, in the regular properties of your Camera Actor itself (Regular properties being the F4 one), you are able to configure the AspectRatio and the Field Of View in the section CameraActor. If you Disable bConstrainAspectRatio it will not render these black borders. These black borders only show up when the ratio of the screen does not match the AspectRatio set there. And as you can see you are also able to change the Post Process settings here, on a per camera basis.
Fading And Events
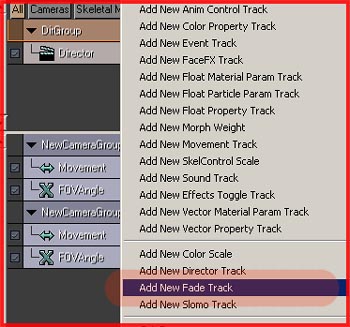
Adding a fade in and out is fairly easy. In Matinee, right click DirGroup and pick Add New Fade Track.
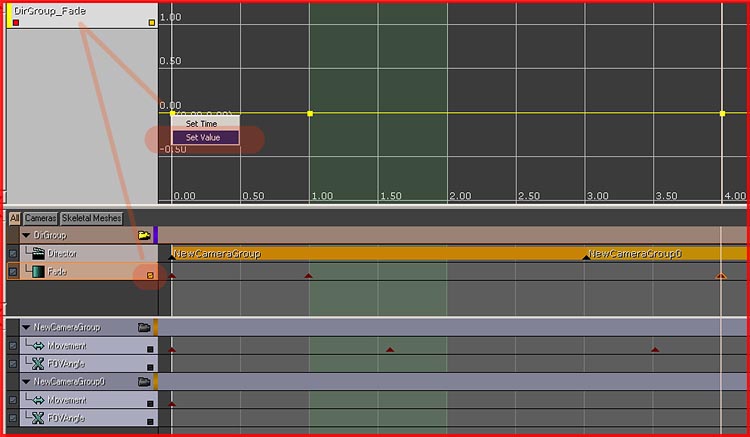
Now add keys where you want a fade to start and where it should end. If we want to have a fade in and out we would thus have to have 4 keys.
Add a key at 0.0, a key at 1.0, and a key 1 second before the end of your cutscene, and finally the last key at the very end of your cutscene.
Then, click the tiny black square on the right of Fade.
This adds the fade track to the curve editor at the top of the window. In the curve editor you are going to create the curves that control the fading. You should now see a horizontal line in that window, with four squares, corresponding the locations of your keys. Right click the first square, and select Set Value. Enter 1.0.
1.0 is black or thus fully faded out. 0 Means no fade at all. You thus want the first and the last key to be 1, and the ones in between 0. Now set the last square to 1.0 as well.
Your curve may be going below 0 in the middle and thus be negative. To fix this select the second square, and hit the button with the diagonal line at the top.
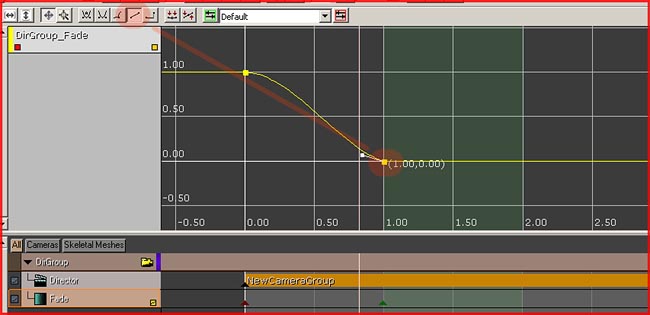
You are now done with the fading part.
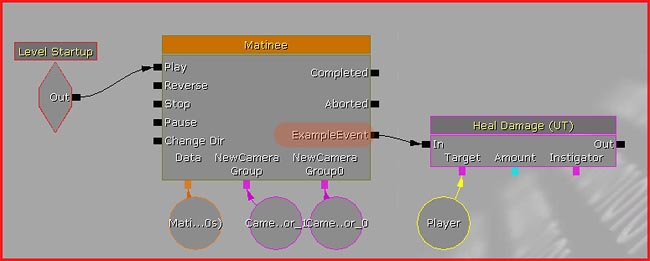
If you want to trigger an external event during the cutscene you can add an Event track. On this Event track every key represents an event that can trigger something else in Kismet. To add one, right click DirGroup again, and pick New Event Track this time. Now add a key for it somewhere and enter the name.
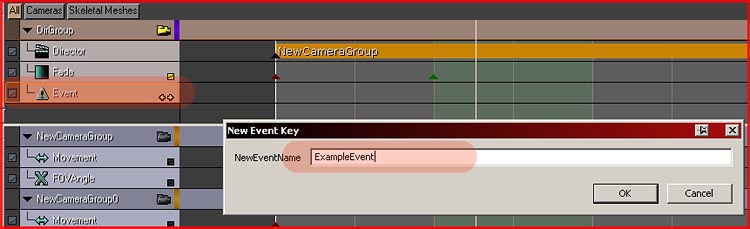
Exit Matinee, and you should see that the Event showed up on the Matinee node in Kismet. You can now hook that one up to whatever you want, in my case it is healing the player.
You are now finished! You have a basic cutscene with two cameras, an event along the way, and fading. Head over to my UIScene tutorial next if you also want to add text to your cutscene.