Tutorials – UE3 Water Indoors
About : An in depth Unreal Engine 3 material tutorial that focusses on how to create a material a small shallow indoor water surface. This tutorial has become slightly outdated since the arrival of Fluidsurfaces, but can still be interesting for those who wish to get deeper into the material editor. Also it could be combined together with a Fluidsurface.
Target Audience : Unreal Engine users – Intermediate to Advanced
Platform : Unreal Engine 3
Last Update : October 2007 – Quick note added April 2011
Introduction
The biggest difference with the outdoor water from the first tutorial is the use of additive blend in this one. Where as the outdoor water used Opacity rendering and a DepthBiasblend to fade its edges out, we’re taking another route this time. Additive is preferred over Opacity because we want to have very clear and near invisible water for this one, something easier to accomplish with Additive blend.
Again, the water will use a single image as its reflection and similar to the first tutorial, the single image could be replaced with a cubemap or a real time reflection if desired, it wouldn’t dramatically alter the material setup.
Water
In order to create water you need a number of basic bitmaps. Click the image to download the zip with the required images inside, and import those into a package in the editor.

If you’ve already downloaded these files for the first tutorial, don’t bother clicking the link. It are the same files. For this tutorial you only need “Reflec” and “Waternormal”. All other textures are meant for the first tutorial. “Reflec” will be the static reflection, “Waternormal” simply distorts everything, and in this case, didn’t necessarily had to be a normal map.
Besides that, the zip also includes a SimplePlaneMesh.ase. You could import this mesh as a Staticmesh if you wish to use it as the watersurface, this would automatically get you the intended texture scaling where as a BSP sheet would not, plus, a BSP sheet may cause issues with lighting and is therefore not advisable.
Also, it might be a good idea to not compress waternormal.tga. The texture will be used extensively, and when compressed compression artifacts may be very noticeable.
Importing a raw texture can be done by enabling these properties, both in the import window as once imported (rightclick – properties).

Update April 2011: You can no longer prevent a texture from being compressed in the newest versions of the UDK. You are going to have to go with a compressed texture, or add in the channels into alpha channels in Photoshop, given Alpha is near uncompressed.
You are about to create following setup:
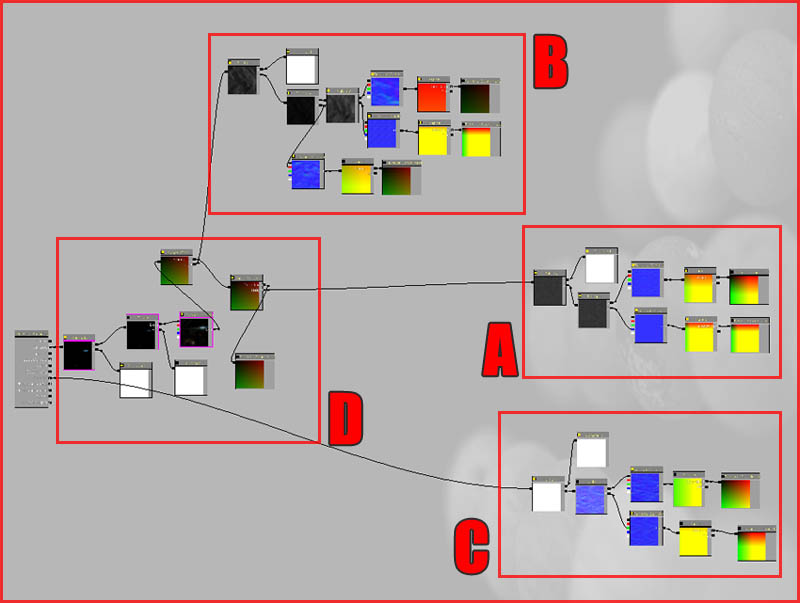
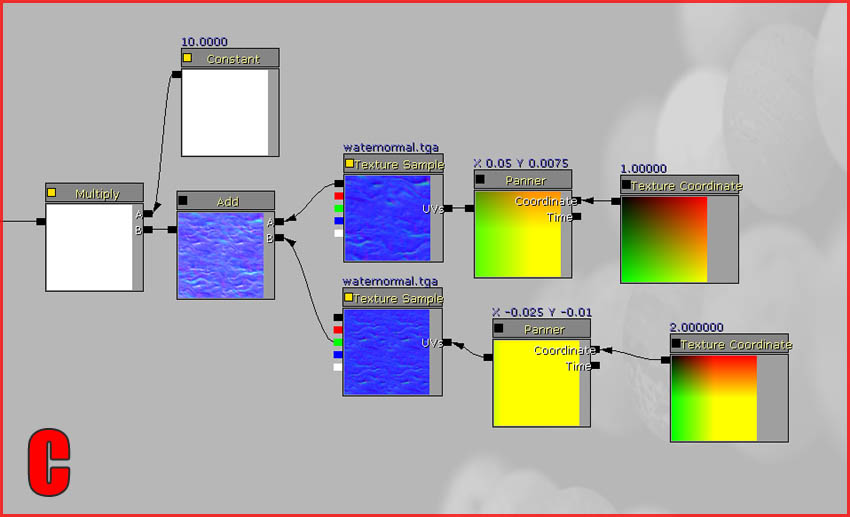
This material is made up of four important groups. Lets line those groups up:
A.) Creates the basic distortion by blending several panning “Waternormal” textures on top of each other.
B.) Similarly, B. also creates distortion by blending textures to further distort and randomize the result.
C.) Creates the distortion for what’s below the surface.
D.) Simply combines A and B on top of the reflection image.
Group A
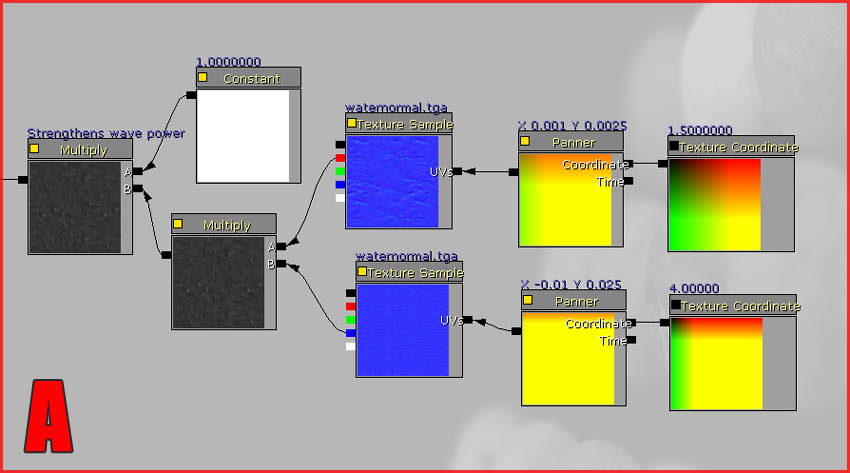
Recreate the entire group as shown, with the values as shown. This group uses the Waternormal.tga twice, each time with a different pan speed and scale, and then blends both of them together. The result is a random look. The final Multiply is used to increase or decrease the strength of the distortion, in this case untouched (1.00000 = no change)
Group B
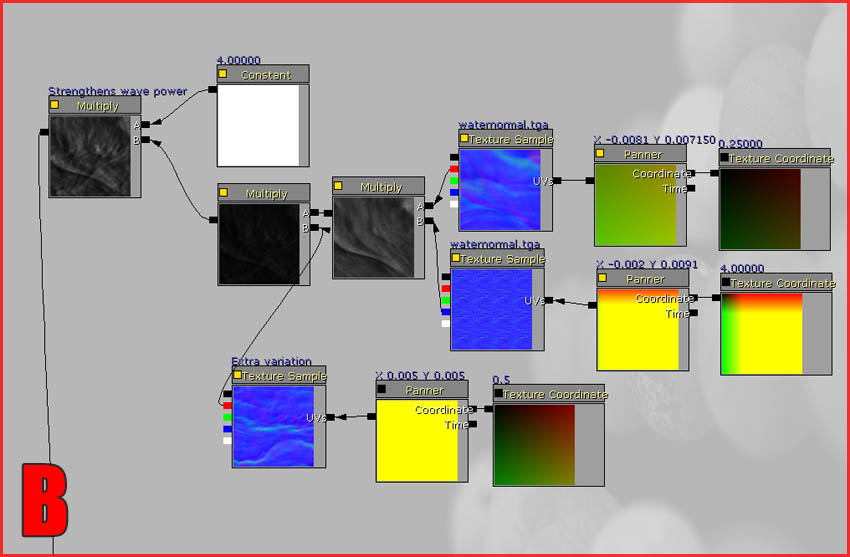
Leave Group A alone and continue to Group B, which does basically the same as A. It blends waternormal.tga twice, each at a different scale and speed, and then blends it again with a third waternormal.tga, again with a different scale and speed. Finally Group B too ends in a Multiply to alter its strength.
Be sure to notice how always only one color channel of waternormal.tga was used. It doesn’t really matter what channel is used, as long as you don’t use the full RGB output. The information will be used as Height input, which can only handle one bit of information, therefore, input/output just one channel.
Group C
Group C distorts whatever’s below the surface. It’s nearly identical to Group A, except this one uses an Add expression instead of a Multiply. Once set up, connect the final Multiply Expression directly to Distortion on the material itself.
Group D
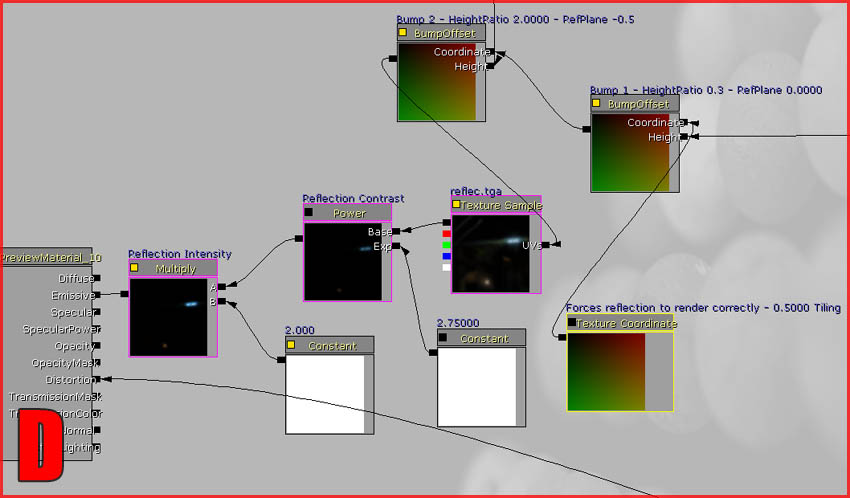
This final group blends A and B together on top of the reflection image. Add two BumpOffset’s and a TextureCoordinate. Connect the TextureCoordinate to the Coordinate input of BumpOffset 1, and connect the final Multiply expression of Group A to it’s Height input.
Connect BumpOffset 1 to the Coordinate input of BumpOffset 2, and connect the final Multiply expression of Group B to the Height input of BumpOffset 2. Finally, connect BumpOffset 2 to the UVs input of the reflec.tga TextureSample, and bump up the contrast and intensity through a Power and Multiply expression.
To finish the material, be sure to set the material itself to BLEND_Additive and MLM_Unlit. You may also want to enable TwoSided.
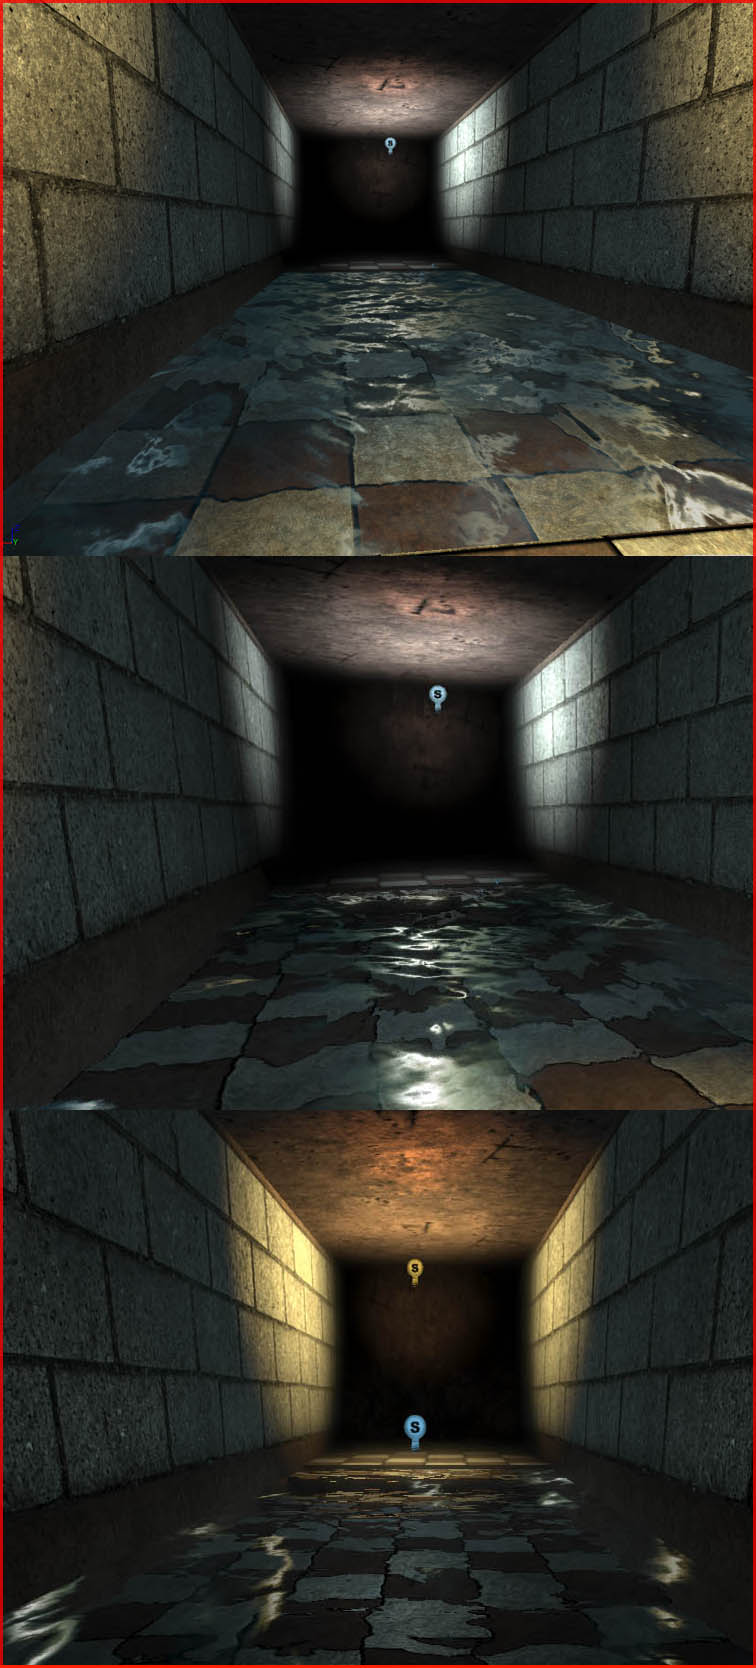
The Power and Multiply expressions at the end control the intensity and contrast of the reflection. Lowering the contrast (currently at 2.75) will cause the reflection to become more pronounced and less realistic, which may be more desirable for certain themes. Less contrast = brighter and more over the top water. Whereas, more contrast = the water is more transparent and only a few small areas are bright (reflecting light). In the three example screenshots, the first screenshot uses a lower than standard contrast.
By messing with the ReferencePlanes and the Tiling in the TextureCoordinates, you can bring the reflection image closer by or further off the camera. Tweaking those so it fits your needs might be desirable. The second example screenshot below, uses a reflection image that’s nearer by than in the third example screenshot.
The Result