


Tutorials – UE3 Triggering Materials
About : How to change a material in-game.
Target Audience : Unreal Engine users – Intermediates
Platform : Unreal Engine 3
Last Update : January 2008
Its use
The ability to change a material in real time can be used for a large number of situations:
- Setting a material to a damaged state.
- LOD’ing a complex material to a simpler one after a certain distance.
- Making a material more obvious when you get closer, for gameplay reasons.
- Activating or deactivating control panels and computers by setting their materials to another state.
- Likewise for real time video cameras, surfaces on fire, surfaces with electricity on, and so on.
- Modifying the material on an important enemy to visually represent its change in health, behavior, aggression, and so on.
This tutorial will quickly talk you through the process on how to set up an instanced material. For additional information you may also want to read the bit on Instanced Materials in my third material tutorial.
Setting it up
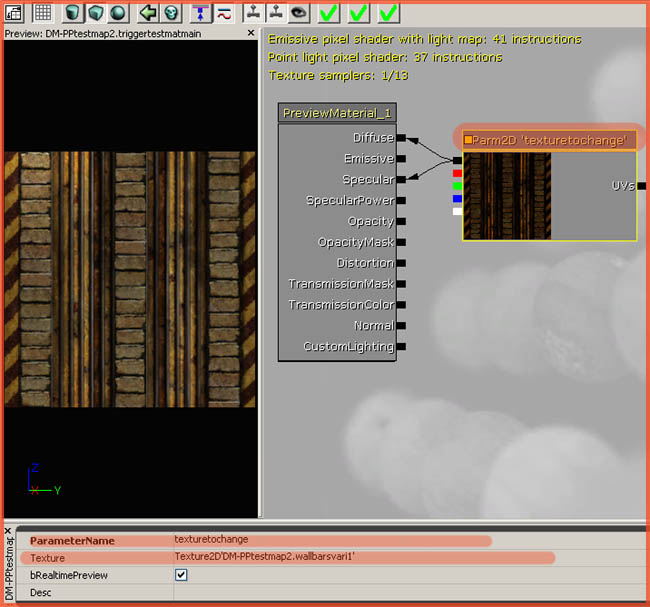
Create a new material, and add a TextureSampleParameter2D (=Parm2D) expression instead of a regular TextureSample. Fill in your texture into Parm2D expression, as if it were a regular TextureSample, and also be sure to set a ParameterName. The name will be used to identify all the expression in Kismet and the Material Instance later, so pick something descriptive.
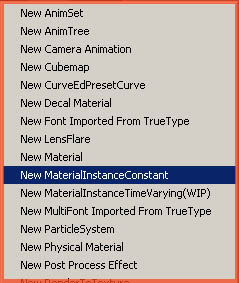
Next, create an Instanced Material, as only Instanced Materials can be accessed via Kismet. Rightclick an empty space in the Generic Browser, and pick New MaterialInstanceConstant.
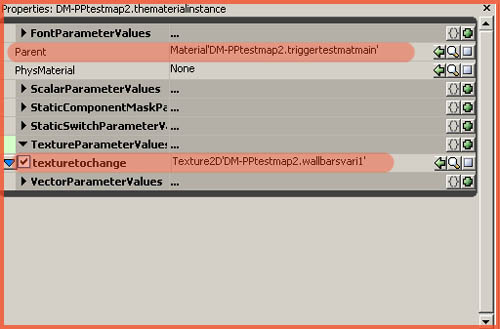
Once it has been created, open up its properties, and set the Parent property to the material you’ve just created, and enable the TextureParameterValue of choice (enable the tickbox), and enter the same texture again. In this tutorial example, both my original material as this instanced material use the Wallbarsvari1 texture. Visually this changes nothing at all, yet.
Apply the Instanced Material to the Staticmesh of choice (or any other actor: characters, vehicles, interface, lightfunctions, etc.)
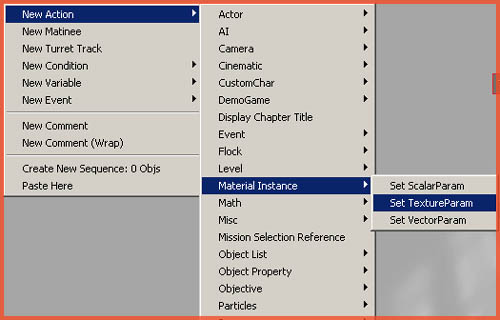
Open Kismet, and add two Set TextureParam’s.
Preferably also add a Trigger actor, or Triggervolume, to the level, and also add it to Kismet. Set the whole thing up like shown in following screenshot.
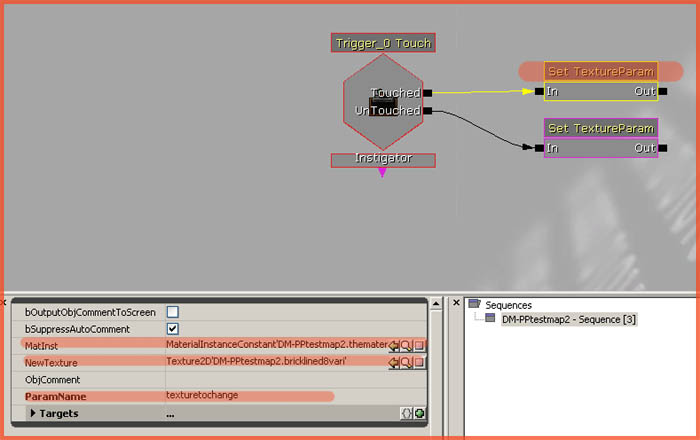
Be sure to set the Material Instance (MatInst), the NewTexture property (add a different texture than the original here), and the ParamName, so it knows which expression to change.
The second Set TextureParam is similar, but it uses the original texture as its NewTexture.
If you were walk into the trigger, the material would change to the new texture, and change back to the original as soon as you leave the trigger’s radius again.
The trigger should also have its MaxTriggerCount set to 0, so it is infinitive.
You can use this technique for just about anything. You could delete the second Set TextureParam so it only changes the texture just once. You could hook up a timer so you can time exactly when to change the texture. You could base the switch on whether or not the player is carrying the CTF flag. Etcetera.