


Tutorials – UE3 Terrain
About : This tutorial will explain the reader how to set up and modify a terrain in Unreal Engine 3.
Target Audience : Unreal Engine users – Beginners
Platform : Unreal Engine 3
Last Update : November 2007 – Update July 2011: Terrain is set to be removed later in 2011 and will be replaced by the new Landscape feature.
Introduction
Terrain creation in UE3 is a little different than it was in UE2. The process has been simplified and you do no longer create the alpha maps for the terrain manually. The Terrain Editing Mode interface has also been updated and now features a whole bunch of new tools. The terrain also supports decolayers with collision and lighting now, terrain LOD’ing, lightmapping, and automatic texturing based on the angle and height of the surface. For this tutorial we will only focus on the basic process of setting up a terrain and a bit of information on its lightmapping.
A second tutorial is available on how to set up vegetation for your terrain, to be found here
Your First Terrain
Before you add a terrain to a level, be sure to have saved the level at least once as the terrain will attempt to save itself within the level, for which the level has to "exist" in the first place.
Open the Generic Browser if it isn’t already, and go to the Actors tab. Expand the section Info and select the actor Terrain, as pictured.
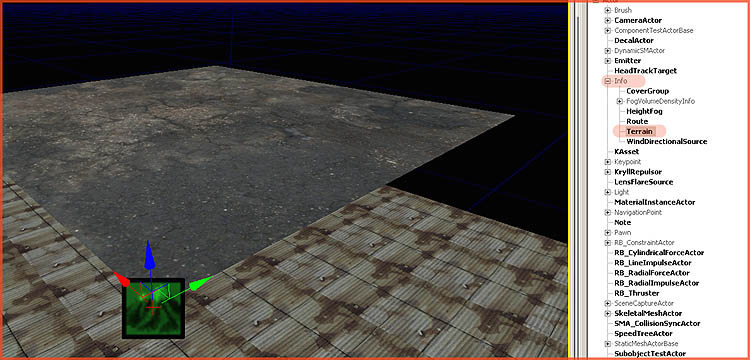
In the viewport, hold down "a" on your keyboard, and click a surface in your level to add the Terrain actor at that location. Your terrain should show up as pictured, tiny, and with a default texture applied.
Lets expand it! New for Unreal Engine 3 is the ability to expand a terrain whenever you want. You are no longer restricted to the original size as in you were in Unreal Engine 2. Double click the terrain in the viewport to have its properties pop up. You should preferably also set the viewport to wireframe to get a better view on what’s going on.
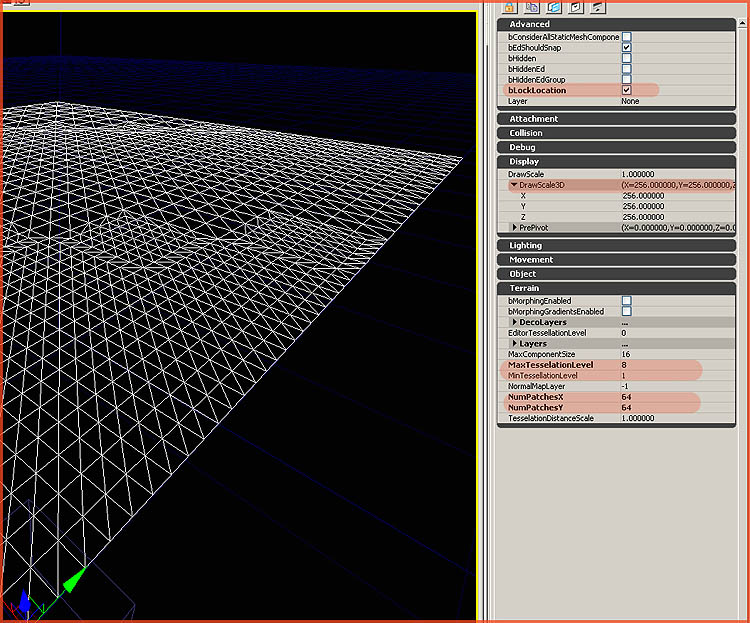
NumPatchesX and Y in the section Terrain, control the actual size of the terrain and changing those values will increase both the size as the complexity of the terrain. By default a terrain is 4×4 patches large/small, you want to increase those values to something like 64×64, or to 256×256 for large outdoor levels. You should consider modifying the drawscale of the terrain if you want to increase the terrain even further. Simply adding more patches to increase the size is usually a bad idea as it can have a significant impact on performance.
As you can see in my screenshot, my terrain also LOD’s itself. The LOD’ing strength is controlled by MaxTesselationLevel, MinTesselationLevel and TesselationDistanceScale. A higher Max means more aggressive LOD’ing where as the DistanceScale controls the…distance. A higher value in DistanceScale also means more aggressive LOD’ing.
Lastly you may also want to enable LockLocation under the section Advanced, so to not accidentally move the terrain while editing the level. This will color the Terrain Actor red.
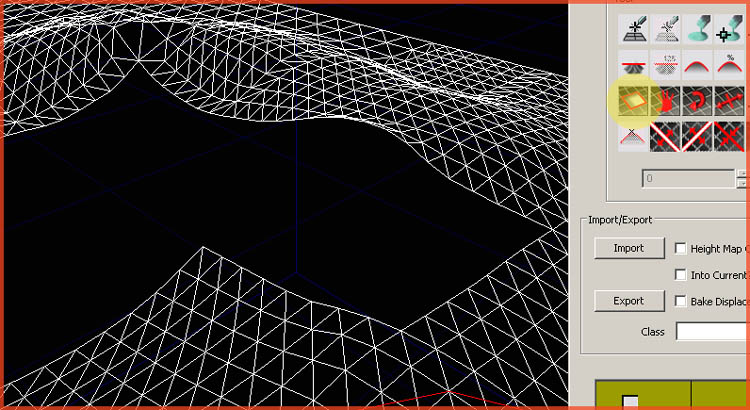
Next, open up the Terrain Editing Mode window. This is found on the left toolbar right below the standard camera button.
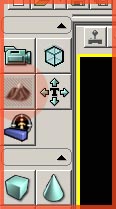
In the window that pops up you can find all the tools you need to modify the terrain. I have highlighted the six most important tools.

1. Lets you extend the edges of the terrain. Basically does the same as altering the NumPatches in the properties window.
2. The standard Paint tool. Raises or lowers the terrain and paints or unpaints texture and foliage layers.
3. Flattens the area based on the height of the vertex where the operation started. Everything is raised or lowered to the height of the vertex where you started dragging.
4. Smoothens the area. Also works for blurring texture layers.
5. Flattens an area using its average height.
6. Adds noise to either the geometry or texturing of the terrain.
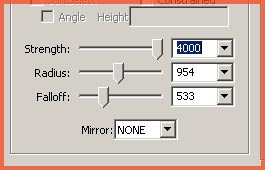
All of these are controlled by the Strength, Radius, and Falloff sliders. Presets are available right below in the Brush section, although I personally find those rather useless.
Any of these tools can be used by holding "Control" on your keyboard, and dragging the mouse over the terrain while holding the left or right mousebutton . A rightclick usually does the opposite of a Leftclick. For example, leftclicking will raise the terrain, rightclicking will lower the terrain again.
If the Strength, Radius, of Falloff sliders are not powerful enough for you, it is also possible to manually type in a value in the textfield next to the sliders, to further bump up their power. This is especially handy for huge terrains that require large brushes to get around.
Another handy tool is the Visibility tool, pictured below.
By dragging over the terrain, this tool lets you hide blocks of terrain. This is ideal if you want to get rid of the terrain in a specific location, for example because you want to add a basement to a building, or to optimize the terrain. Areas that can never be seen by the player, should preferably be hidden with this tool.
Applying Materials
Lets add textures/materials to the terrain. Switch the viewport back to a textured view and go to the Generic Browser. Find a material that you like, select it in the Generic Browser, and return to the Terrain Editing Mode window.
In the Terrain Editing Mode window, rightclick the big empty space at the bottom, below where it says HeightMap, and pick New Layer From Material (Auto-Create) and enter a name. Select another material in the Generic Browser, and do this another time so you have two layers as pictured below. If it asks for a package and layer name, as some versions do (UT3), be sure to enter exactly the same name as your package name as the name of your level to embed the material information inside the level itself. UT3 will ask for a name twice, one for the TerrainLayerSetup and one for the Terrain Material, enter two different names for the two, but the same package name. If your level is named Layouttest754 your package too should be named like that. The layer name itself doesn’t matter a lot. Pick anything but remember that names must be unique and without spaces and all..
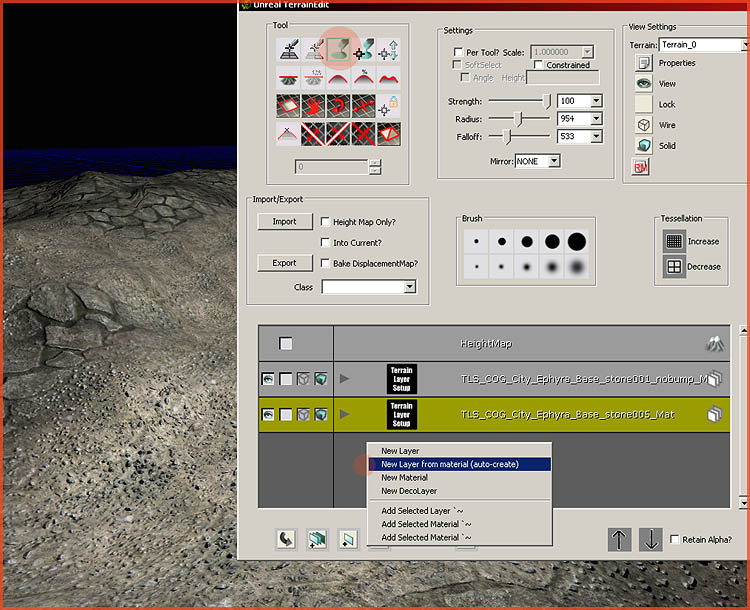
The first layer will automatically display on the terrain as it is the first, therefore always visible. The second layer however will remain invisible until you paint it. Select the second layer by clicking it (turns yellow – as pictured) and select the standard Paint tool with which you also modified the geometry of the terrain, and start painting away!
Update: If the editor refuses to let you paint materials on the terrain, it might help moving the entire terrain a bit, or expanding it, or restarting the editor. After you’ve moved it at least once, it seems to wake up and allow painting. You may need to temporarily disable LockLocation.
If your terrain turns funky after you’ve added several different layers, you need to replace the materials with simpler materials.
You can add as many materials as you want, but note that any additional layer will impact performance. Adding dozens layers is therefore not really advised. Four to six or so should do for most large and outdoor levels.
Additional materials options can be found in the properties of every layer. To get to these, go to the Generic Browser, and find the package that has the same name of your level. If you level is named DM-ForestFun, you should look for a package with that name. In my case my level was not saved yet, and it generated a Package_0 name. You should have a better name than my example! Also, be sure to have Show All Resource Types enabled at the top left.
In the package of your level, which is effectively your level itself (think of it as a package inside a level – Mylevel for those familiar with UE1 and 2), you should see all kinds of assets related to your terrain.

Open a Terrain Material asset by rightclicking – Properties, to get to the MappingScale option, which controls the scale of the material. Other neat options are PanU and V, which allow you to offset a material, and Rotation, allowing you to rotate-offset the material. MappingType allows you to change the axis of the mapping, you may need to change this if you have a very vertical terrain.
Terrain Layer Setup assets gives you options to enable automatic texturing, based on the angle and height of a surface.
If you want to change the material applied to a terrain later on, you can do so by altering the Material in a Terrain Material, or by rightclicking an expanded layer in the Terrain Editing Mode window, and picking "Use Selected". Note that your change may not show up immediately, and may require you to restart the editor, or use the RM button in the Terrain Editting Mode window (right side, below the "Wir"e and "Solid" buttons) to force the engine to reload the terrain.
Lighting
Unlike Unreal Engine 2, Terrain is lightmapped now. However, if the quality of the lightmap is not satisfactory enough it is possible to bump up its quality. To do so open up the properties of the terrain and expand the Lighting section. Enable bIsOverridingLightResolution, and enter a higher value under StaticLightingResolution. Note that this can have quite a performance impact, so again, use it wisely.
