


Tutorials – UE3 Streaming
About : This tutorial will explain how streaming can be used in Unreal Engine 3.
Target Audience : Intermediate.
Platform : Unreal Engine 3
Last Update : February 2007
Basics – The theory
Streaming means loading in content dynamically. For example: Instead of loading in the entire office building level at once the engine only loads in the first few rooms and will only load the other rooms as soon as the player comes close to them. It dynamically loads in (and unloads unused content) new content as the player travels through the world. This has obvious benefits for both the loading times and the memory usage. Loading only a few rooms is a lot faster than loading all of it at once plus, the engine only has to keep those few rooms in the memory.
The drawback is that dynamically loading in content can also slow down the game since the engine has to do two things at once: load stuff and render the game. Also, if done badly, players may be able to content popping up and disappearing during the game.
In Unreal Engine 3 every streamed area is a separate map file. A single level can thus be made up of a dozen different map files which are all loaded into one master map level, called the persistent level, that holds the info what to load and when to load it. Performance aside, this has several other advantages:
Singleplayer: Without streaming, if the player reaches the end of level 1 (for example a submarine dock) he will get a loading screen and spawn in the same submarine dock in level 2. With streaming you can make the submarine dock a separate file that is in neither of the two level files but exists as a separate map file. Any future modifications that are done to the room will only have be done once.
Skies: The entire sky can be a separate level that is streamed in. This allows you to have a set of sky files that levels can refer to. If any of the skies need to be adjusted, polished or fixed later on then the changes will only have to be applied once instead of a dozen of times.
Layers: Levels made up of multiple files allows you to have multiple people working on the same level since every area is a separate file or because every type of content is a separate layer. For example you can have a visuals map with all the geometry and lighting, a gameplay map with all the scripts and special actors, and a sound map with all the sound actors. This way the artist, gameplay designer and sound artist can all work on the level simultaneously.
Speed: Working on area per area requires less performance from your PC and makes rebuilding go faster. The editor only has to load in one room, and only one room has to be rebuilded at a time.
Basics – How-to
UE3 offers various types of streaming. This tutorial will only focus on the kismet type since it offers by far most control and is the most powerful variant.
For this tutorial I am going to stream in a sphere into my cube level. The first thing you need are obviously at the very least two different map files, once you have those you can either use the first level to stream other levels into or use a new and empty level for it.
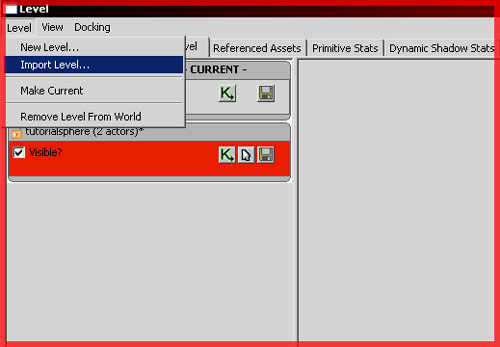
Next open the Content Browser and go to its “Level” tab, and in its top menu click Level->Import Level and select the file of choice. After you loaded the level it will ask you what method to use, select Kismet.
If all is well the other level should now show up in the viewport. In my example the sphere is streamed in. However, if you would test play the level in its current state the other level wouldn’t show up at all yet. The reason for that is because the engine does not know yet when it is suppose to load and show the level, you must set up a kismet action to give it that information.
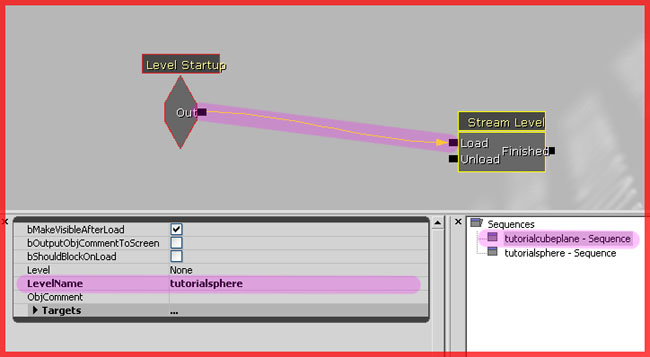
Open Kismet (be sure to open the kismet window of your master level and not the one streamed in), rightclick and add two nodes:
New Action -> Level -> Stream Level
New Event -> Level Startup
Then, connect the Level Startup event to the Load input of the Stream Level node and click on it. In its properties type the name of the file to load in the “LevelName” input field.
Update: Level Startup has been replaced by Level Loaded in newer versions of the engine
Start the game and you will see that the other level now shows up.
Continued – Triggers and Volumes
A setup like this would be ideal to stream in the sky since you don’t want to do anything special with it other than just loading it. However, if you wish to control when it starts to load you can also trigger the streaming.
Add a trigger somewhere in your level (such as in the corridor leading to the other area) and add it to Kismet (Rightclick a surface in the level -> Add trigger, open Kismet while having the trigger actor selected and rightclick in Kismet -> New Event Using Trigger_0 -> Touch) and then connect it to the Stream Level node you still have from previous example.
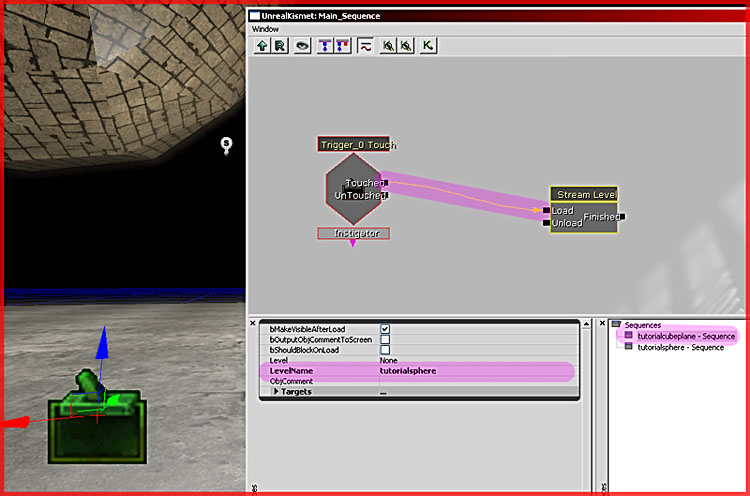
When you now touch the trigger ingame, the other level will pop up. Also note the property bShouldBlockOnLoad. If this is true then the screen will pause until everything is fully loaded. Without this the player may be able to see content pop up during gameplay.
You can obviously also unload things if you connect the trigger to the Unload input of the Stream Level node.
Now all that is very cool but triggers often don’t offer enough control and flexibility, that’s why there is also the possibility of using Volumes to determine what to stream in and out and when.
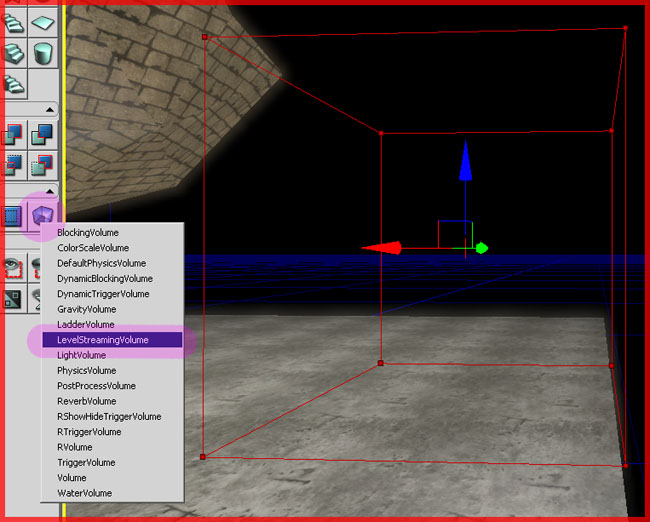
Make sure you have the master level selected and then move the (preferably rather large) builder brush (the red wireframe thing) to the desired area and rightclick the Volume button -> LevelStreamingVolume.
Next, select the volume you just made (move the red brush away if you can’t see the volume beneath) and open its properties. Here you can configure if you want the volume to only load a level, load and make it visible, or load it and freeze the game until it has been loaded entirely and then display it. Dependent on the engine version you are working with you might have more options. SVB_LoadingAndVisibility is the best choice for most scenarios.
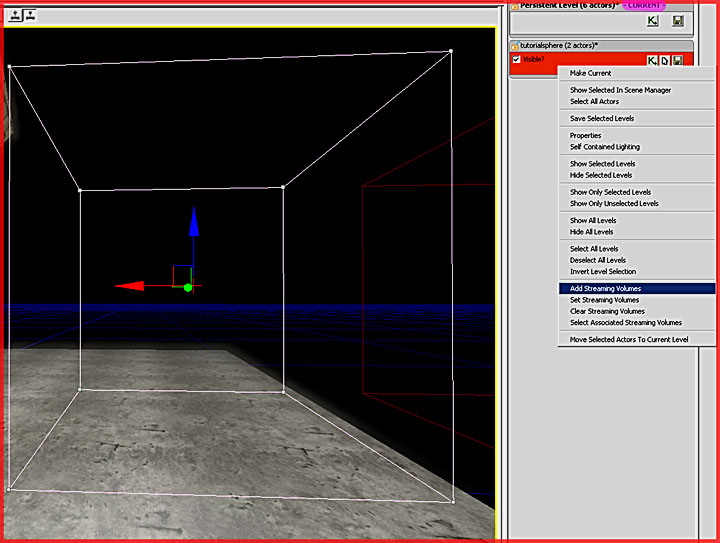
Once you did that close the properties window and make sure the volume is still selected in the viewport. If it is, rightclick the level you wish to assign the volume to in the Level Browser and go for “Add Streaming Volumes”.
If all went well the volume should now work. The level you assigned it to will only load and show up when a player enters the volume. If he then leaves the volume, the level will unload again.
Small Bits Of Additional Info
Double click a level in the Level tab to make it the active level.
Be sure to safe all levels you’ve modified. Only saving the master level will not save the others.
Do things that have a level wide influence in the persistent level, Kismet especially.
If you duplicate any actor from an inactive level then the duplicate will automatically be added to your current level. Practical example: You are currently actively working in Level B while Level A is also streamed in. If you were to select an actor of Level A and duplicate it it will become a Level B actor.
You can move actors by selecting them and rightclicking the level you wish to move them to and pick “Move selected to current level”