


Tutorials – UE3 Material Editor – Examples 1
About : This material tutorial contains a number of material examples. Learn by practical use rather than theoretical explanations.
Target Audience : Unreal Engine users – Beginners and Intermediate
Platform : Unreal Engine 3
Last Update : May 2011
The Examples
Basic Diffuse-Specular-Normal Map Material
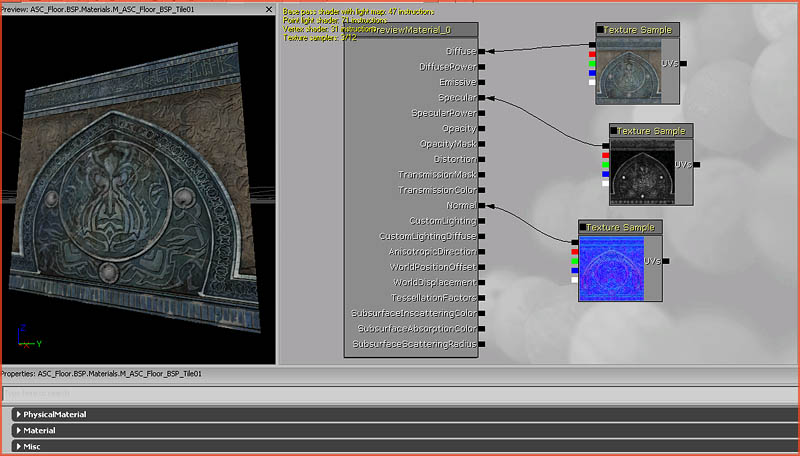
Three Texture Sample connected to Diffuse, Specular, and Normal. You can quickly add Texture Samples by holding “t” on the keyboard and clicking somewhere.
Specular Control
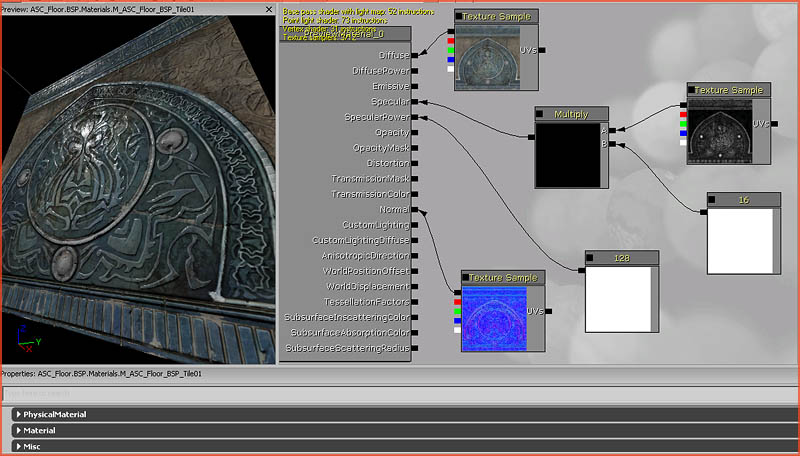
By hooking up a Constant to SpecularPower we gain control over the size of the specular reflection. A low number means a very wide reflection, a large number such as 200 means a very small and focused reflection. You can quickly add a Constant by holding “1″ on the keyboard and clicking somewhere. By multiplying the Specular with another Constant, we get control over the intensity of the specular. By raising the value the intensity of the specular increases. You can quickly add a Multiply by holding “m” on the keyboard by the way.
Brightness and Contrast
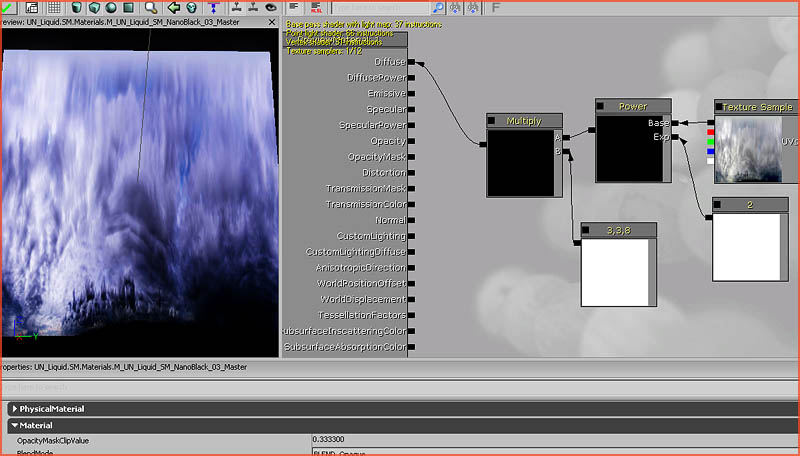
Multiplying a Texture Sample with a Constant3Vector gives you control over the color and the brightness of the Texture Sample. A Power expression can be used to alter the contrast. In this example the contrast was raised, the image was made more blue, and the brightness increased.
Transparent Material
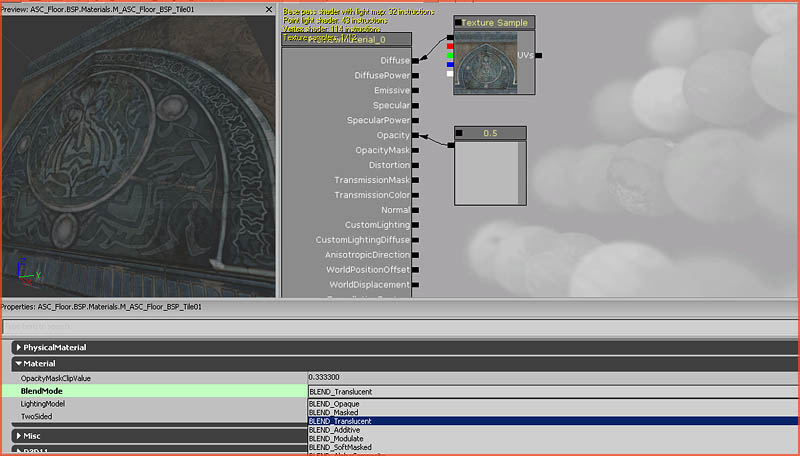
By connecting a Constant to Opacity and setting the Material to Translucent rendering mode (Blend Mode), we get a transparent material. The whiter the input of Opacity the more opaque the material will be. If you would hook up a black and white image to Opacity you would be able to control what parts of the image should be more or less transparent.
Masking
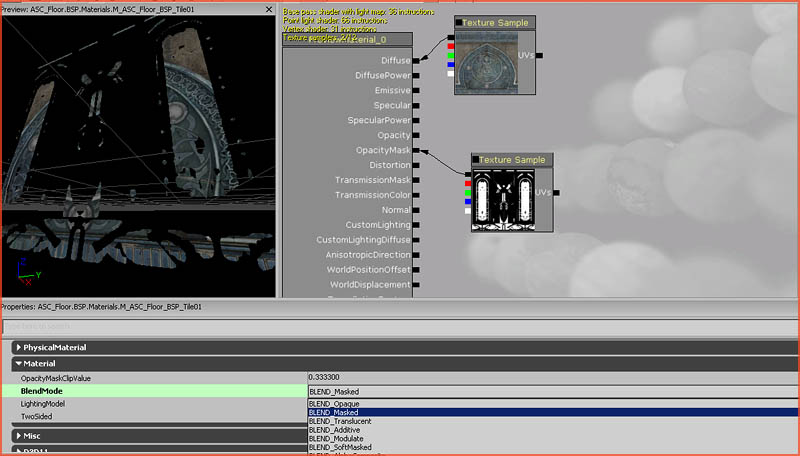
It it usually a much much better idea to mask things rather than render them as translucent. Translucency is heavy for the hardware and more error prone (sorting issues especially). Masking is like 1 bit alpha. Something is either 100% visible or 100% invisible. Ideal for things like fences. A fence should never use translucency. Connect a Texture Sample with an appropriate black and white image to OpacityMask and set Blend Mode to Masked.
Interpolation
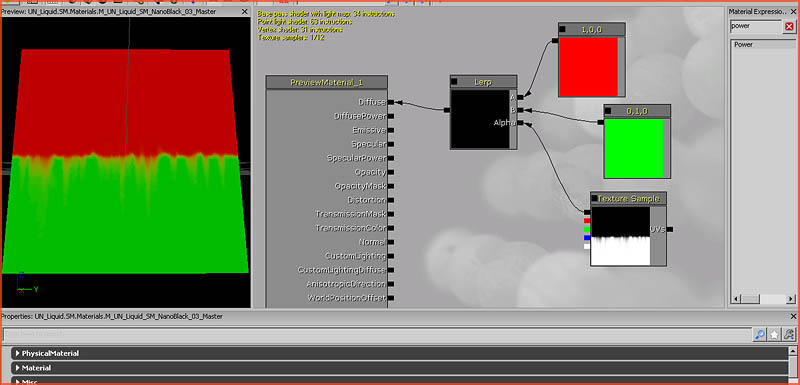
Combining two textures/inputs using a third texture. By using a LinearInterpolate (LERP) two inputs, in this case two different colors, are blended together using a black and white texture.
A Lamp
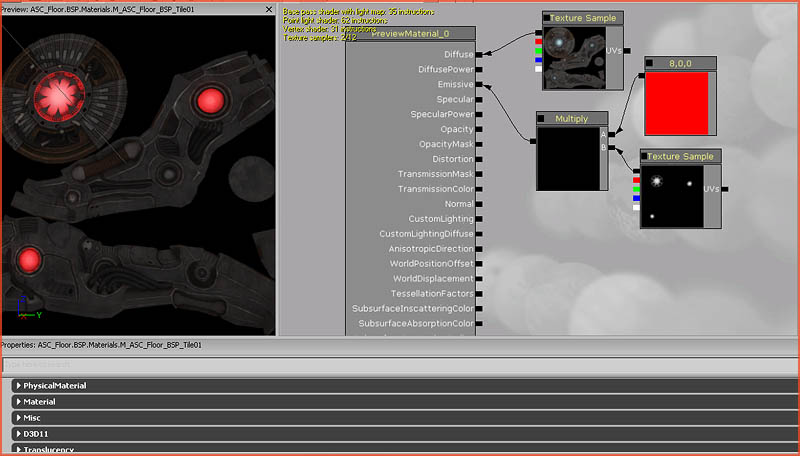
A Texture Sample mulitplied with a Constant3Vector, and connected to Emissive. The black and white texture identifies which part will need to glow, the Constant3Vector controls the color and brightness. Remember that 0 times something is still 0. So Red 8 multiplied by 0 is still 0. Thus the dark portions of the texture remain unchanged even after they were multiplied with Red 8. The white parts however became brighter and red.
A Flickering Lamp
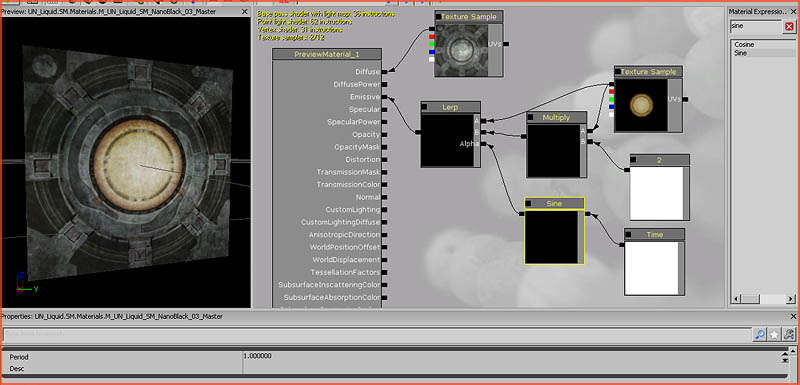
Using a Time and a Sine a continuous flickering can be accomplished. The Time and Sine combination raise and lower the Alpha value of the LERP continuously (it creates a wave – the speed of the wave can be set inside Sine), and because of that the LERP switches between the normal version of the Texture Sample and the twice as bright version all the time.
Basic Animation
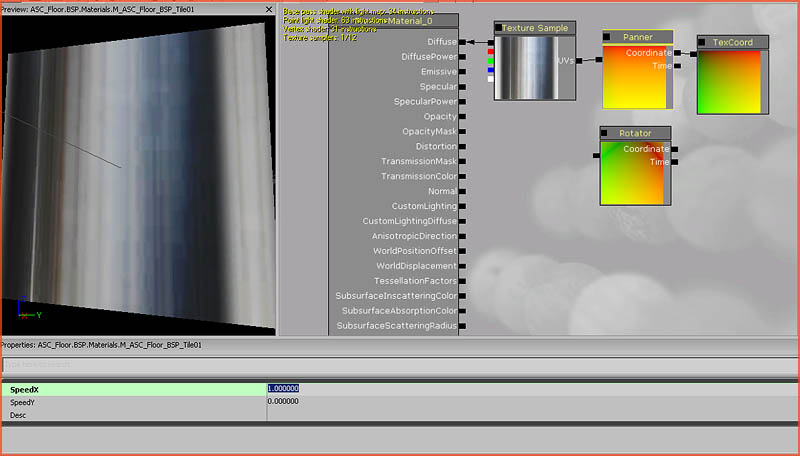
A Panner or Rotator will continuously rotate or pan a Texture Sample. Ideal for things like a river. Also, a Texture Coordinate can be used to control the size. The speed and sizes of these expressions can be set in the bottom panel. These connect to the UVs input of a Texture Sample because they modify the way the Texture Sample is projected onto geometry. Anything that alters the location and size of a texture should always connect to the UVs input (right side of the Texture Sample) and never to the left side.
Distortion – Background
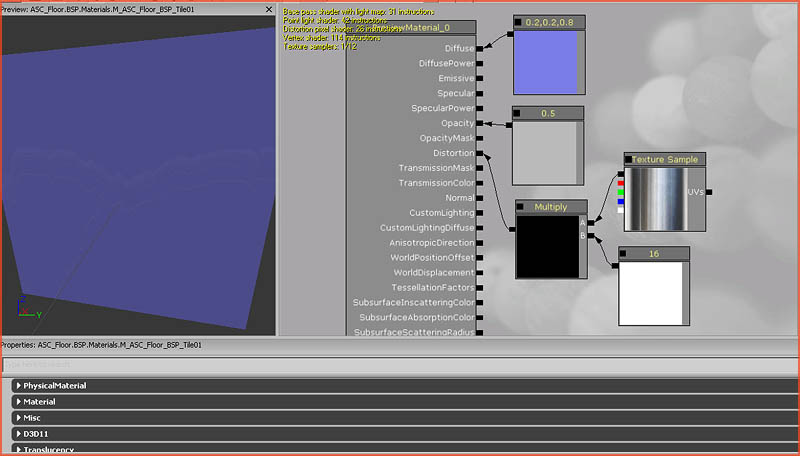
A translucent material. The Constant3Vector hooked into Diffuse controls the color. The Constant in Opacity the transparency. And then we have a Texture Sample that is multiplied with a Constant (to gain control over the distortion intensity) hooked into Distortion. This may be hard to see on the screenshot, but this setup distorts everything behind the window. The bright parts of the texture distort the background the most.
Distortion – Material Itself
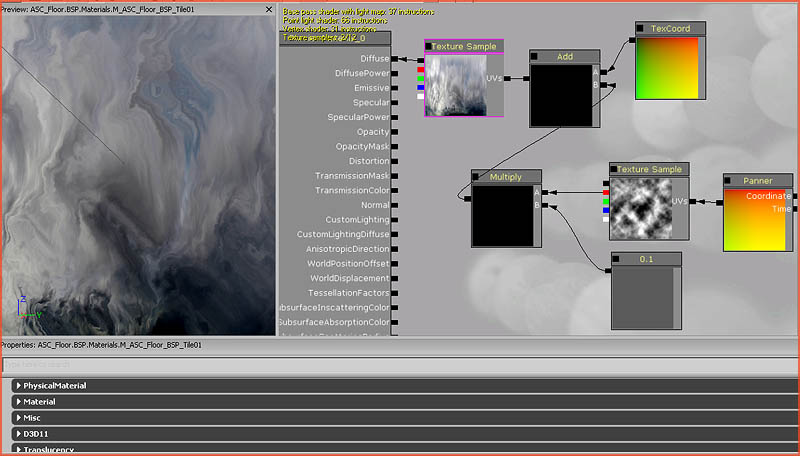
To distort the actual material itself you need the following setup. A black and white Texture Sample (notice how only the Red channel is used from this Texture Sample! Failure to use just one color channel will lead to an error – the error is caused by inputting more information than it expects – it expects 1 value so if you input RGB it receives 3 values and get confused) and a Multiply with a Constant1Vector controls the intensity of the distortion. A panner animates the distortion texture. And the whole thing is added with a Texture Coordinate (mandatory step).
Depth Illusion
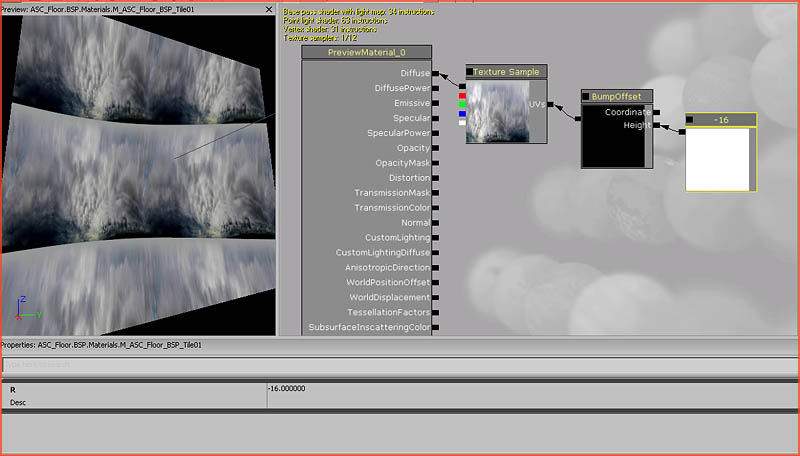
A BumpOffset can be used to fake an illusion of depth. Ideal for thick glass, ice, an old TV, simple reflections, and so on. Connect a Constant to Height, and connect BumpOffset to UVs of a Texture Sample. You can use both positive and negative numbers for the Height. Additional control can be found within the properties of the Bumpoffset.
Soft Edges
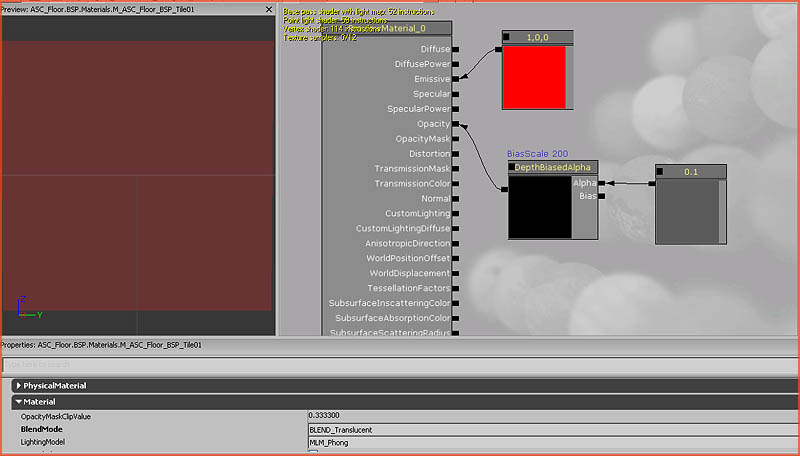
You can’t see this in the screenshot, but this translucent material automatically fades out as soon as it hits geometry. Try it in a level. Throw this material onto a mesh and make the mesh intersect with another object. The DepthBiasedAlpha (don’t forget to set the BiasScale inside its properties – use a large number like 200) will automatically detect intersections and reduce the opacity near those locations. Use DepthBiasedAlpha, not DepthBiasBlend or DepthBiasedBlend, those two are old and have much worse performance than DepthBiasedAlpha.
Rim Light
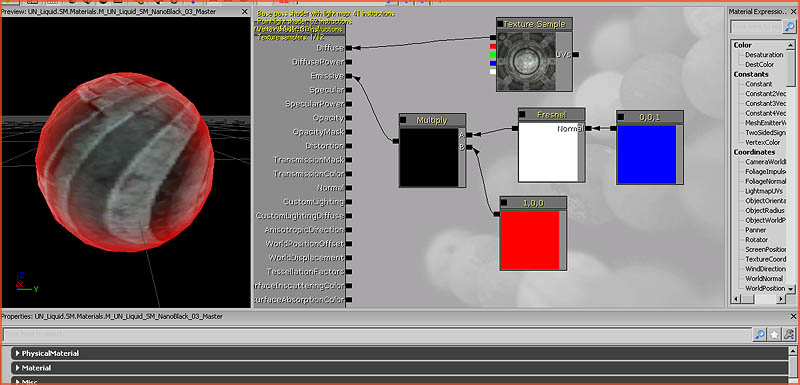
Fresnel can add Rim Lighting to a material. The Constant3Vector on the right of the Fresnel controls the direction. A value of Red 0 Green 0 Blue 1 will create proper rim lighting. The Multiply and Constant3Vector on the left of the Fresnel sets the color.