


Tutorials – UE3 Lightmapping
About : This tutorial will explain the reader how to get meshes lightmapped in an Unreal Engine 3 environment.
Target Audience : Unreal Engine users – intermediate skill required
Platform : Unreal Engine 3
Last Update : December 2010
The Basics
In UE3 meshes too can be lightmapped. While in the previous engines only brushes were lightmapped (=LM) now meshes too can be LM’ed. Lightmapping is a static lighting technique using colored bitmaps that are blended on top of the textures in order to make them appear lit. It can give great results but it is also quite heavy on the memory and it is of course very static. It is far better than vertex lighting though!
UE3 supports several types of dynamic light two types of static lighting: lightmaps and vertex lighting. Its vertex lighting is almost identical to UE2 titles such as UT2004. Information about vertex lighting can be found in my Vertex Lighting Tutorial.
Lets start this tutorial with a basic test setup.
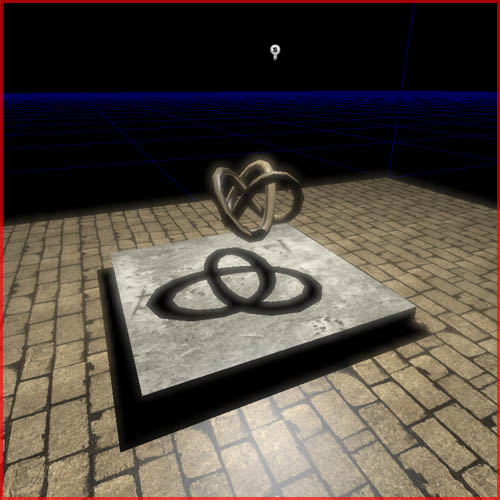
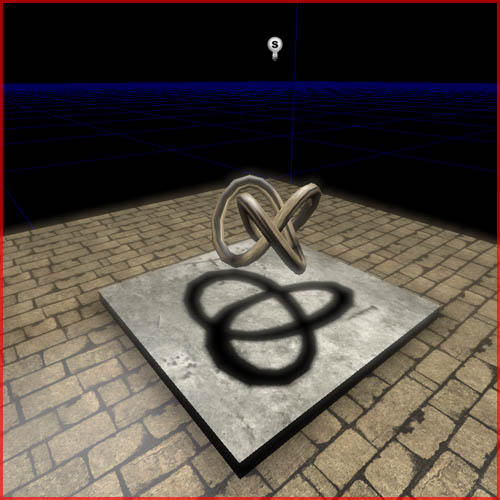
The test setup features mesh cube (the white thing) and a torus knot mesh above it. The torus knot will function as a cool shadow caster. The white mesh is the test subject.
As one can see the scene currently has a cool shadows. These are the dynamic stencil shadows used for previewing the lighting and shadows.
After rebuilding however it looks a lot less cool.
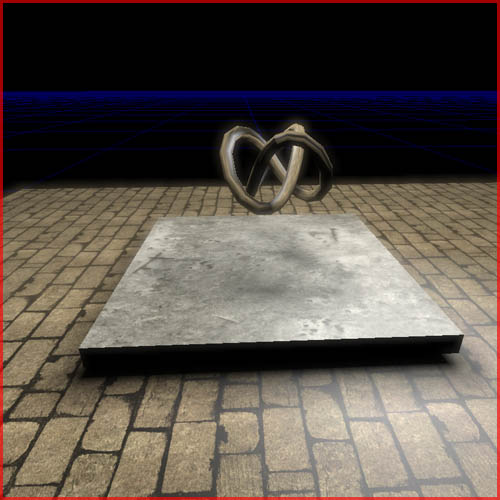
This is because whenever a light (whatever type it was) is changed it will become a dynamic light until the next lighting rebuild. Any shadow that looks cool before a rebuild might therefore not look so cool anymore after one.
The reason why the test mesh doesn’t seem to have any type of shadow anymore is because the static lighting was baked as vertex lighting. In a lighting only viewport mode one can clearly notice so.
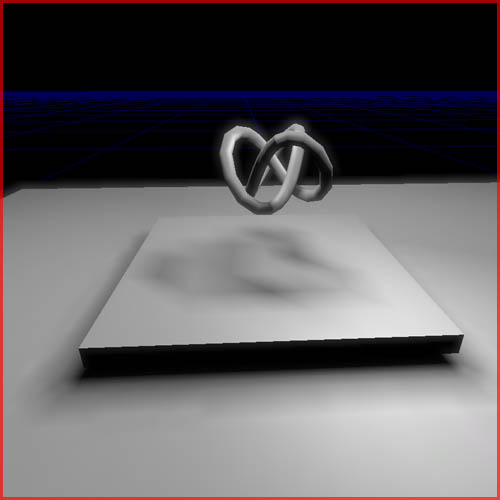
The mesh still has some shadows going on because it has several tesselations, but even with all of these tesselations, the lighting quality is still far from acceptable.
All meshes you import will always fall back to basic vertex lighting or alternatively appear black if the mesh was not properly configured for lightmapping. This test mesh was not properly configured for lightmapping and thus fell back on vertex lighting after rebuilding.
Lightmapping a mesh
A mesh will not be lightmapped in UE3 if it does not has a correct UV set available for the lightmapper. In other words. A mesh must have a second (or 3rd/4th etc. dependent on the mesh) UV set/channel/unwrap layer available.
That second UV set must be correctly unwrapped.
No faces may take up the same position. Every face needs a unique location.
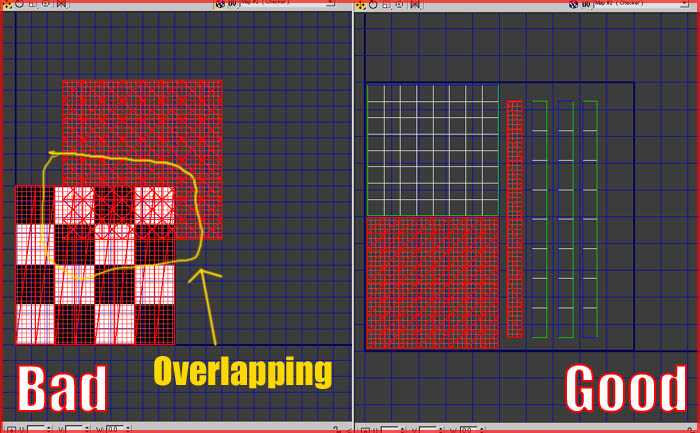
All faces must be in a single UV space.
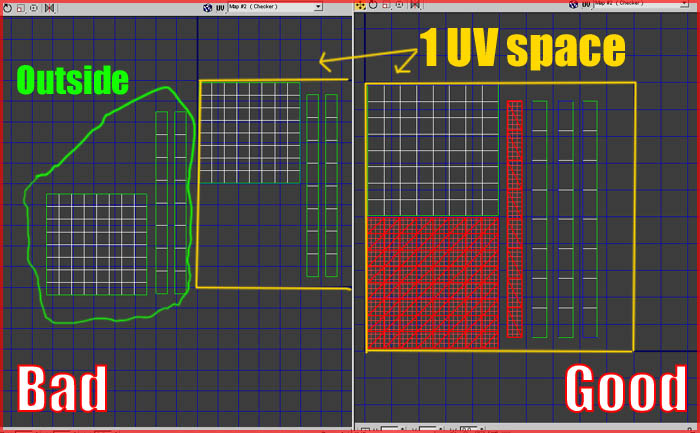
The diffuse unwrapping of most objects does not fit those requirements. Often faces share identical positions of a skin or texture and they often are also a lot larger than a single UV space. Therefore, to not having to adjust the basic diffuse UV set one must make a second UV set that will be used solely for the lightmap info and will have zero influence on the basic diffuse unwrap. The lightmap uses a different UV layout than the rest of the mesh.
In 3DsMax (similar in Maya and others) add a new Unwrap UVW modifier (a1) and be sure to set the Channel to 2 (a2). Next unwrap your mesh nicely according to the rules or, if you are too lazy, you can also let Max auto unwrap the mesh for you. To do so click on Mapping -> Flatten Mapping (a3).
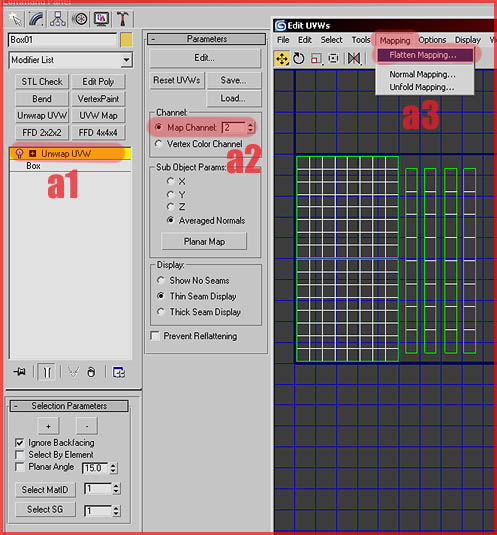
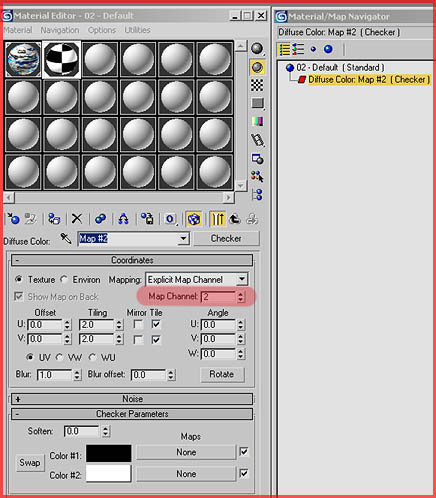
If you wish to preview how the unwrap looks in Max be sure to add a material to the mesh that has been set to channel 2.
Once done with all of that export the mesh the regular way and import it in UED, also the regular way.
Please note that the newer versions of Unreal Engine 3 (UT3 and up) now also support in-editor generation of lightmap UV’s, it is therefore not required to manually create the UV’s anymore, but it usually does gets you a cleaner result.
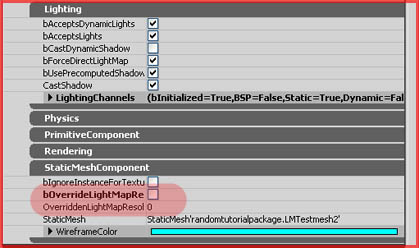
In UED you also need to set a couple of important options.
Once the mesh has been imported double click it in the generic browser and in its properties be sure to set its LightmapCoordinateIndex to 1 and the LightmapResolution to 512.
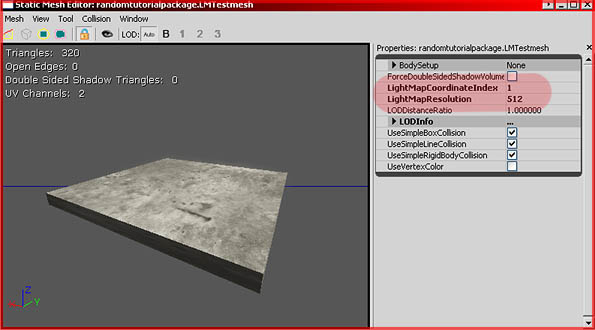
The CoordindateIndex is what UV set/channel it should use. The Unreal Engine, unlike 3DSMax or Maya, starts counting from 0. Therefore the second UV channel you made in your 3D program of choice is not number 2 but number 1 in UED.
The LightmapResolution determines how detailed the lighting information will be on that particular mesh. Obviously you only want to enter numbers like 8,16, 32, 64, 128, 256, 512, 1024, 2048. Do not go over the top with the number. Every single instance of the mesh will get a unique lightmap of the size you entered. Too many too large lightmaps will kill the engine and drive up the filesize. Don’t be afraid of using small lightmaps. Even a small lightmap can make things look great!
Once that’s done place the mesh in your level and be sure to go to its properties. In there go to StaticMeshActor -> Lighting and StaticMeshComponent. In those two sub sections be sure to check bForceDirectLightmap and especially bOverrideLightMapResolution. The latter is enabled by default and unless you turn it off or enter a valid lightmapresolution in the property below, your mesh will not be LM’ed correctly!!
Once you did all of that correctly the result will look really cool. Also be sure to rebuild lighting!
Second Generation UE3 – UDK
In the second generation UE3 staticmeshes are now automatically set to use lightmaps, and provided you did set up the correct lightmap UV set in the model any placed staticmesh will automatically receive a lightmap. It is now standard to lightmap most meshes, instead of the opposite approach of the first generation of UE3 (vertex light most, lightmap some). I usually lightmap anything over a 1000 poly regardless of size or purpose. In my tests it has shown that any mesh over a 1000 poly always runs faster with a lightmap than with vertex lighting. For meshes under a 1000 poly, I go on a case by case base, dependent on size, shape, and purpose of the mesh. I hear reports however that on consoles lightmapping is always faster, so if you are really serious about getting as much performance out as possible you may want to look deeper into this.
When you import and place a staticmesh in this generation of the engine, it will have already set most of the properties mentioned above, and it will assign a default lightmap resolution by itself. You can still change all of these properties later on if they are not what you want of course. The lightmap sizes can also be adjusted throughout the entire level with the resolution adjuster, found in the top menu. Because of the increased number of lightmaps it is important to really keep the size of the lightmaps as small as possible though. You can do surprisingly much with tiny lightmaps of just 32 or 64 pixels!
Newer UE3 builds now also allow you to generate Lightmap Coordinates in the editor, so you no longer need to use a 3D program to create the lightmap layouts, although it is advised that you still do for hard surface objects. The automatic unfolding Unreal does not always work as good as it should. It quickly breaks up or distort faces, which can be very noticable when you are dealing with things like buildings. It works pretty good with landscape meshes or low poly meshes.
Open the properties of a Static Mesh, and go to Mesh – Generate Unique UVs.
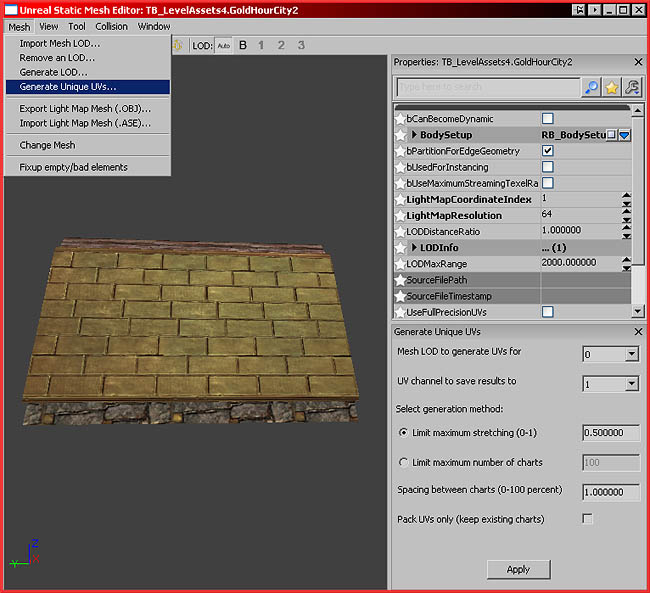
A panel pops up on the bottom right side. The default settings will do for most meshes so just press Apply right away. Next press the Show UV Overlay button to show the coordinates it has generated, and see if they look ok.

That’s it.
Another new thing is Lightmap Density view. It allows you to see the density of the lightmaps applied to the meshes in the level. This is to be used to check the consistency in size between the lightmaps. If one lightmap is really small, and the object next to it uses a really small lightmap, the player will notice an obvious difference in lighting quality between the two objects and that is bad. The view is called “Lighting Only with Texel Density” and can be activated in the viewports toolbar.
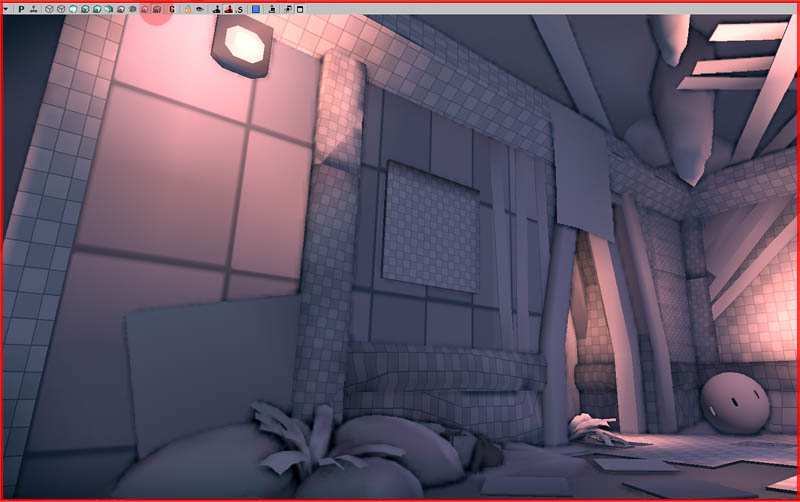
In this example you can see that the wall on the left uses a lot larger lightmap than the surrounding geometry. You want this to be as consistent as possible.