


Tutorials – UE3 Foliage
About : This tutorial will introduce the reader to the foliage volume/actor. A volume used to randomly scatter "something" over an area. Ideal for vegetation.
Target Audience : Unreal Engine 3 users – Beginners and Intermediates
Platform : Unreal Engine 3
Last Update : December 2007 – Foliage was removed in UDK November 2010!
Basics
First of all it should be noted that the foliage volume does not replace decolayers on terrain. They too still exist. Foliage volumes are especially handy when you wish to scatter around things on staticmesh and BSP surfaces, and/or when you only need to cover a small area. It also gives you greater control on what happens than the regular Decolayer does.
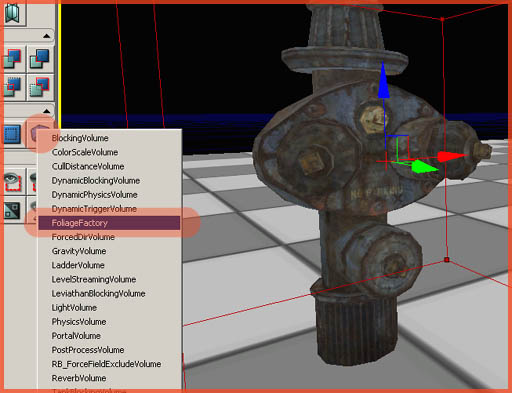
Size the red builder brush so that it covers the area you wish to affect. Anything inside the brush will be covered with whatever deco mesh you assign to it (flowers, grass, papers). Once your red builder brush covers everything you want, rightclick the volume button on the left, and pick FoliageFactory.
Move the red builder brush away, and a nice pink volume brush should appear. If it does not, you may have toggled volumes off with the ‘O’ key. Doubleclick the volume to get to its properties. Go to the section Foliage and Add an item to Meshes. Next, add your staticmesh of choice to the property InstanceStaticMesh.
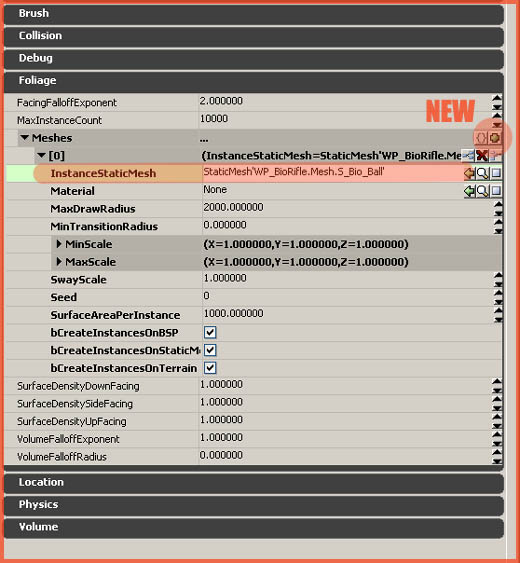
Other properties given are:
Material: Overrides the default material assigned to the staticmesh. This can be left empty if you do not wish to alter the material that is already on the mesh.
MaxRadius: The staticmesh will start to shrink if viewed from beyond this range.
Min and MaxScale: Rather obvious, the scale. Use different Max and Min values to get a random result.
Swayscale: How much the staticmeshes should be influenced by the Wind actor.
Seed: Alters the random locations of the staticmeshes.
SurfaceAreaPerInstance: How many staticmeshes there are spawned. The density. A lower number means more instances.
bCreateInstancesOnSomething: Again, obvious. Spawn instances on these type of surfaces or not.
SurfaceDensityDown/Side/Up: Allows you to control the density per axis. For example: a low number for SurfaceDensitySideFacing will prevent instances from being spawned on walls.
VolumeFallOff: These two properties control how much space around the volume should be used as a fall off area.
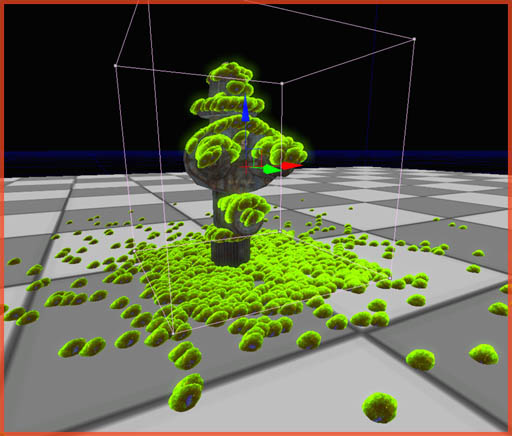
Following picture uses the bio gun blobs as meshes, has a VolumeFallOffExponent of 4.0000, a VolumeFalloffRadius of 512.0000, and 0.0000 on both SurfaceDensitySide and DownFacing.
Wind
Things get even more fun if you throw in some wind. Go to the Actor Browser – Info – WindDirectionalSource and add it anywhere to the level. The staticmesh instances spawned from the foliage volume should now start to sway in the wind if you toggle on real time preview.
In the properties of the WindDirectionalSource actor, in the section WindDirectionalSource, four properties are available to you. These are:
Frequency: How often a breeze of wind comes by.
Phase: Will stretch the instances. Might be useful for strong wind.
Speed: Funny enough, it controls the size of the breeze of wind, and not the speed. A low number will make the instances sway individually. It will randomize the swaying.
Strength: How much the instances move.