


Tutorials – UE3 Fog
About : How to use all kinds of different fog in UE3. Distance (Height) Fog, Fog Volumes, Fog Planes, and Animated Fog.
Target Audience : Unreal Engine users – Beginners
Platform : Unreal Engine 3
Last Update : November 2010
Introduction
There are several ways you can add fog to an environment in UE3. The most common type of fog is the regular Distance Fog, which now also takes the height into account. Fog Volumes are used little but really powerful, as they allow you to create a volume of fog in any shape. Fog Planes are used often, especially in door ways and other narrow places. And Animated Fog can be achieved by applying an animated material to Fog Volumes and Fog Planes.
This tutorial will cover all of those different types.
Distance Fog
Normal HeigthFog
To add regular Distance (Height) Fog, go to the Actor Browser, and expand Info. Select HeightFog, and add it to the level.
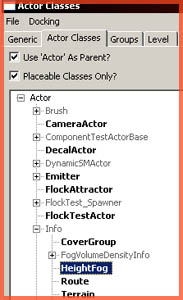
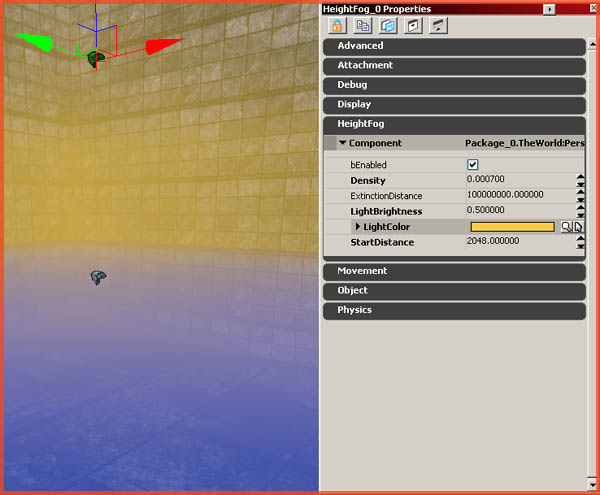
The actor may be added anywhere in the level, as it always influences the entire level. Once added, open up its properties, and expand the section HeightFog.
- bEnabled: Rather obvious.
Density: How thick the fog is, a higher number means thicker fog. A very high number will also make fog end more abruptly, which might be ideal for water and similar.
ExtintionDistance: A higher number will causes the fog to end more abruptly.
LightBrightness: The brightness of the fog. A higher number will make the fog more visible. It kind of controls how transparent the fog is.
LightColor: The color of the fog.
StartDistance: At what distance the fog should start. If the fog starts too close to the player, it might wash out the level by removing some of the contrast.
As you can see, you can also add two, or more, HeightFog actors to a level and they will nicely blend into each other. The lowest HeightFog actor always has the highest priority.
Exponential HeigthFog
Since the May build of the UDK there is a second and improved type of Heigth Fog available: Exponential Heigth Fog. Exponential Heigth Fog looks nice, and does not bug out on Geforce 6 and 7 series cards, like normal Heigth Fog does. Exponential Heigth Fog is thus usually the prefered fog to use. It is however twice as expensive as regular Heigth Fog but given the minor impact on perfomance you don’t really have to worry about that.
To add Exponential Heigth Fog go to the Actor Browser – Info – ExponentialHeigthFog. Add it to the level just like a normal HeigthFog.
Properties available.
- bEnabled: Rather obvious.
Fog Density: How thick the fog is, a higher number means thicker fog.
Fog Heigth FallOff: A higher number will causes the fog to end more abruptly. If this is 1, then it would look the same as regular Heigth Fog.
Fog Max Opacity: How much you can see through the fog, basically the same as Density.
Light Inscattering Brightness: The brightness of the main fog color.
Light Inscattering Color: The main fog color.
Light Terminator Angle: A higher number will causes the fog to end more abruptly.
Opposite Light Brightness: How bright the second color is.
Opposite Light Color: The color of the fog opposite to the light, the second color.
StartDistance: At what distance the fog should start. If the fog starts too close to the player, it might wash out the level by removing some of the contrast.
The advantage of Exponential Height Fog over regular Height Fog:
- Bug free: Does not bug out on GF 6 and 7 series cards.
Soft transition: Normal Heigth Fog cuts off in a very harsh and ugly manner.
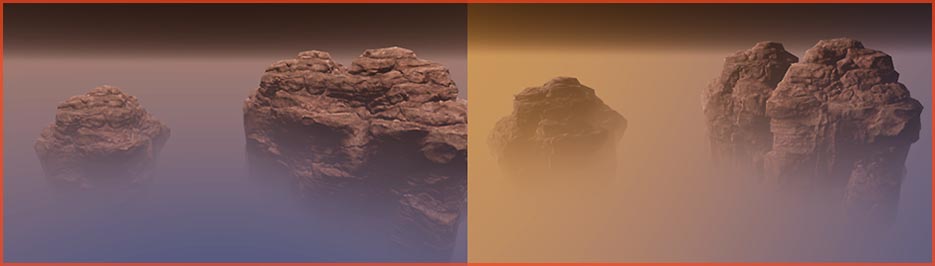
Uses two colors: Dependent on the position of the sun. The angle of the colors sticks to the main Dominant Directional Light in the scene. As demonstrated in the following image. In the first image the dominant light points down. In the second image it points to the right. The fog changes accordingly.
Fog Volumes
Fog Volumes are handy if you only want to display fog in a small area, without having it influence the entire level like the regular Distance Fog does. Fog Volumes are in a way very similar to the volumetric fog in UE1, although the process of creating them is completely different now.
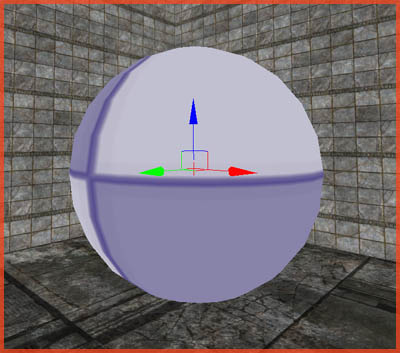
Fog Volumes use a Staticmesh to define its boundaries. Find yourself a nice staticmesh you wish to use but note that it should be a closed mesh with no open edges. For this tutorial I went for the sphere mesh in the package UN_SimpleMeshes. Place the Staticmesh of choice in the level, and scale it up a little if required.
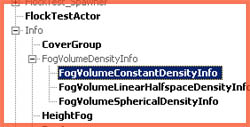
Then, go to the Actor Browser, expand Info, expand FogVolumeDensityInfo, and add FogVolumeConstantDensityInfo to the level.
Open up the properties of that actor, and expand the section FogVolumeDensityInfo. Add an item to FogVolumeActors. Then, fill in the name of the staticmesh you wish to use and hit enter. In the case of the tutorial, the sphere was named StaticMeshActor_0, so I entered that as the name. It automatically adds the rest of the path as displayed in the image.
You can discover the name of an actor by opening up its properties, and looking at the titlebar of the properties window.
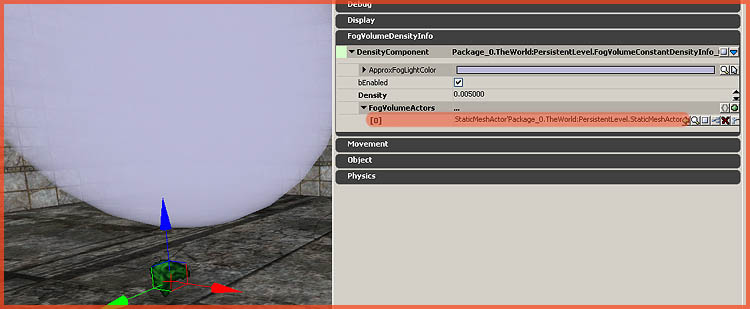
- ApproxFogLightColor: This doesn’t seem to do anything.
bEnabled: Enabled or not.
Density: How thick the fog is.
A single FogVolumeDensityInfo actor can control several Staticmeshes/Fog Volumes. You don’t need to create a FogVolumeDensityInfo actors for every new Fog Volume.
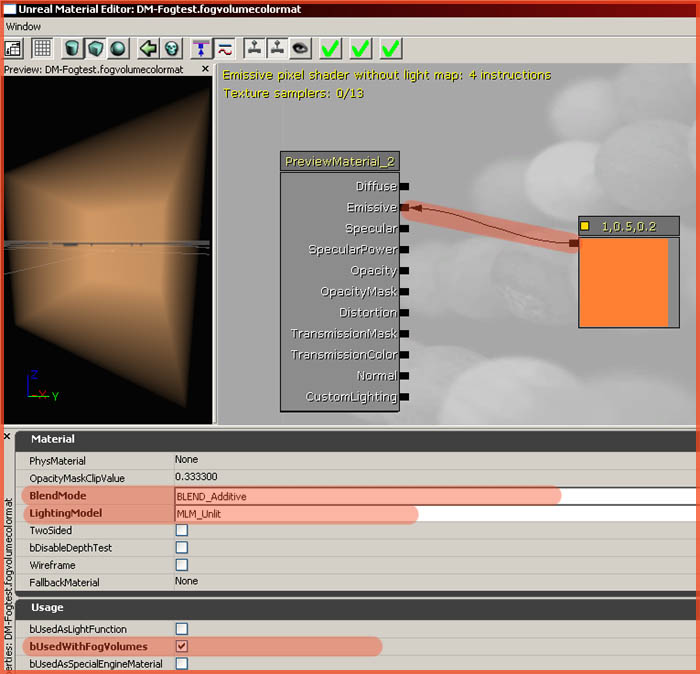
The color of the fog is actually configured through a material. To alter the color of the fog, create a new and standard Material in a package of choice, and add a Constant3Vector to Emissive, set it to Additive and Unlit, and enable the property bUsedWithFogVolumes. All of these properties are marked in the screenshot. The color is defined by the Constant3Vector.
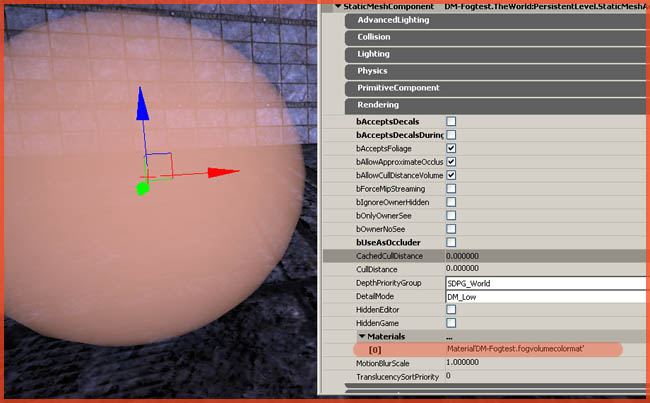
When you got the material, select the staticmesh that is used as a Fog Volume, and open its properties. Browse to the Materials section under Rendering, and add your material to slot 0 (overwrite the one already there).
Fog Volumes Continued
As you can see in the actor browser, two other types of Fog Volumes exist.
FogVolumeLinearHalfSpaceDensityInfo
Works the same way, except the position of the actor sets the height of the fog in the Fog Volumes assigned to it. This is similar to what the HeightFog actor does, it fades out near the top. PlaneDistanceFactor controls how quickly it fades. A lower number means a longer fade.
The sphere from the previous example is now only half filled with fog, because the FogVolumeLinearHalfSpaceDensityInfo actor is positioned halfway.
FogVolumeSphericalDensityInfo
The FogVolumeSphereicalDensityInfo has a radius, fog is only displayed within its radius. The actor will only display fog in the associated Fog Volumes, if those Fog Volumes are inside its radius. In following picture, only a quarter of the sphere mesh is filled with fog.

Fog Planes
Fog Planes are nothing more than Staticmesh planes with a nifty material applied to them. The material becomes more opaque the closer you get, so it kind of simulates real distance fog.
Fog Planes should preferably only be used in narrow spaces as the plane has to cut through the entire space. If the space would be too large, you’d need a massive plane. That is perfectly possible, but usually it is a better to idea to try and preserve them for narrow spaces such as doors, windows, and corridors. Also for perfomance reasons.
Add a simple plane Staticmesh to the level. I found one in the UN_SimpleMeshes package. Be sure to disable its collision and turn off anything to do with lighting. Similar to everything you did to a water plane (see the swimmable water tutorial).
Once added, create a new Material in a package of choice, and set the material up like this.
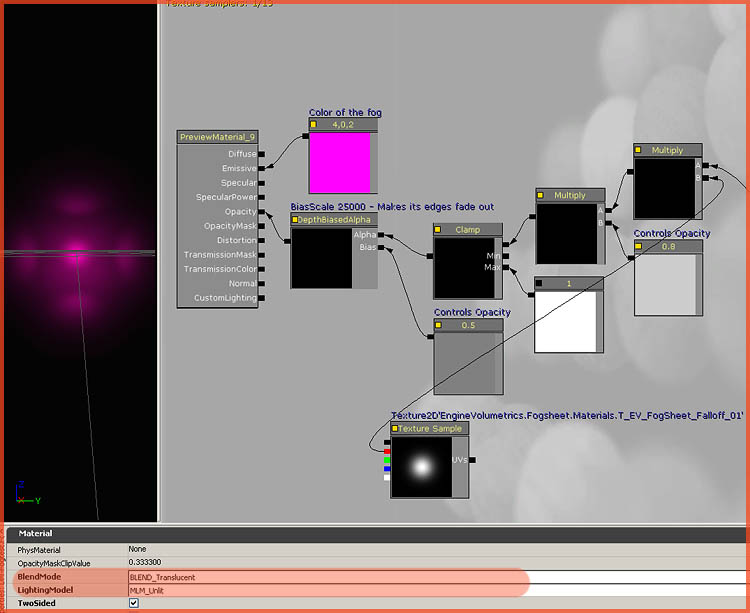
In the package UN_Volumetrics, premade materials like the one above are available if you don’t feel like remaking the material.
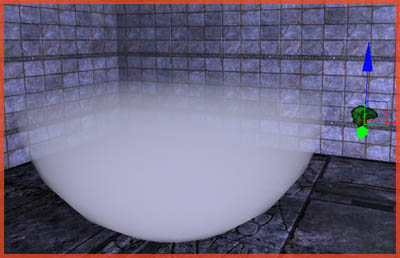
Assign the material to the Staticmesh the regular way, by adding a slot to Materials, found within the properties of the Staticmesh – Rendering section. Again, similar to how the water plane was set up. Scale up the plane a lot so that the dot in the material easily covers the whole passage.
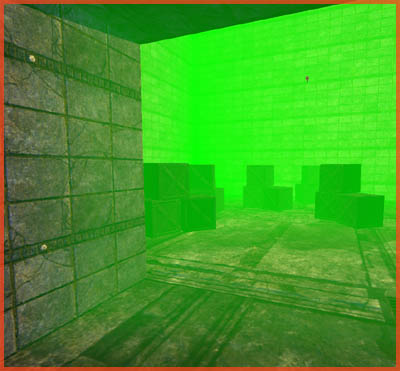
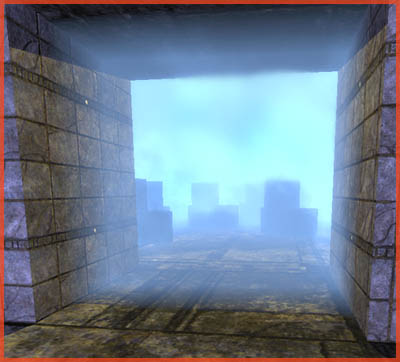
The result looks like the following screenshot.

Fog Planes Continued
DestDepth Fog Plane
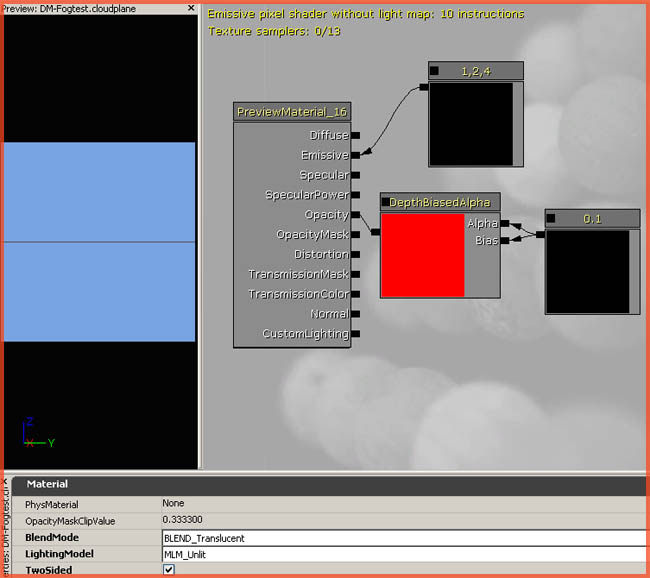
The first Fog Plane setup is the Epic way and ideal for all scenarios where the player can walk through the Fog Plane. For those scenarios where the player will never be able to walk through and get to the other side of the plane, such as distant doors and windows, it is easier to simply use a DestDepth and a DepthBiasedAlpha for the setup. Set up the material as shown below, and assign it to the plane.
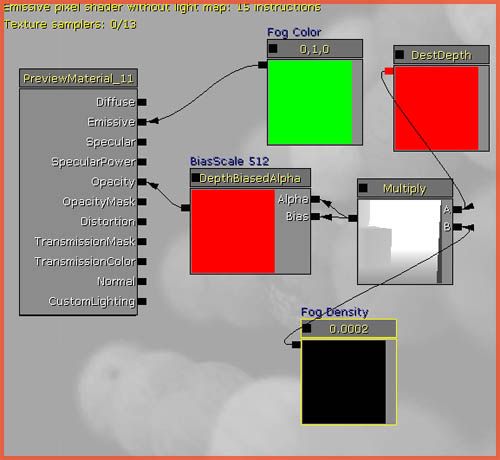
Set
BlendMode to Translucent and LightingModel to Unlit.
Horziontal Fog Plane
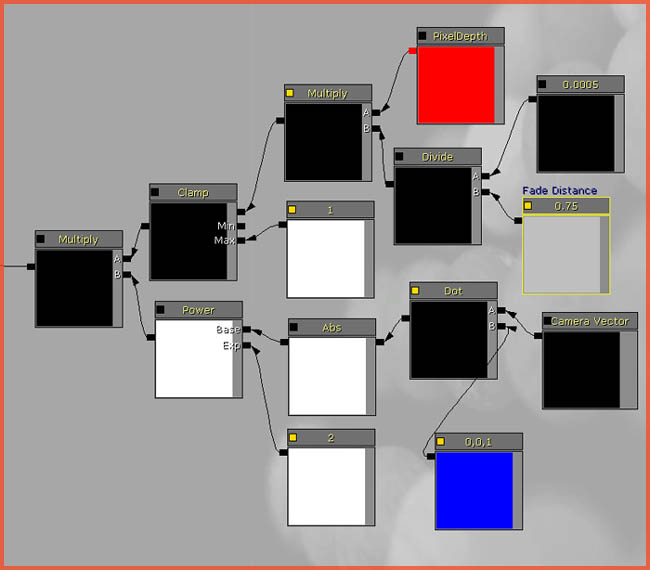
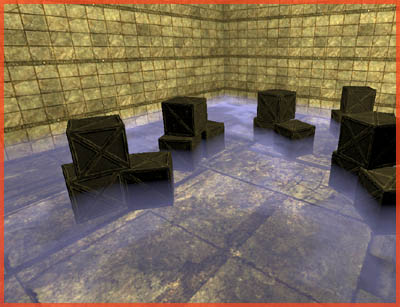
A horziontal Fog Plane is ideal for ground fog. It is simply a Staticmesh plane that sticks through the entire room/area, with a very simple material assigned to it.
Assign the material to the plane.

Animated Fog
As you may have noticed, most of these effects are accomplished by using the Material Editor. That also means that you enhance all of these effects by messing with the Material Editor. You could, for example, animate these materials, or add a texture on top for additional variation and coolness.
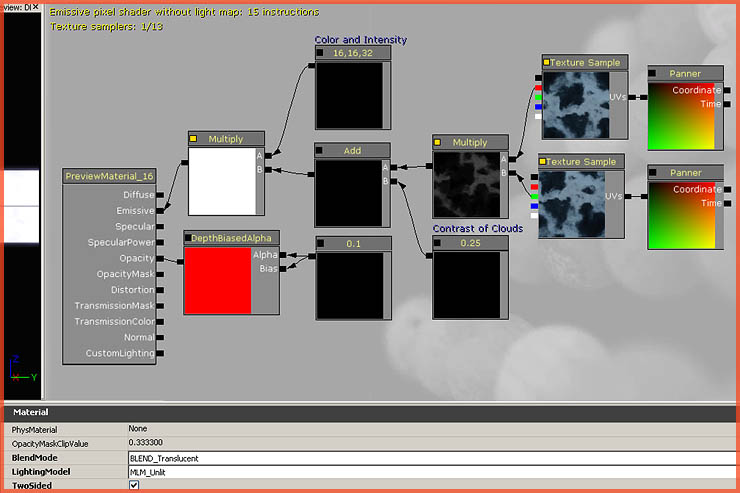
Horziontal Fog Plane
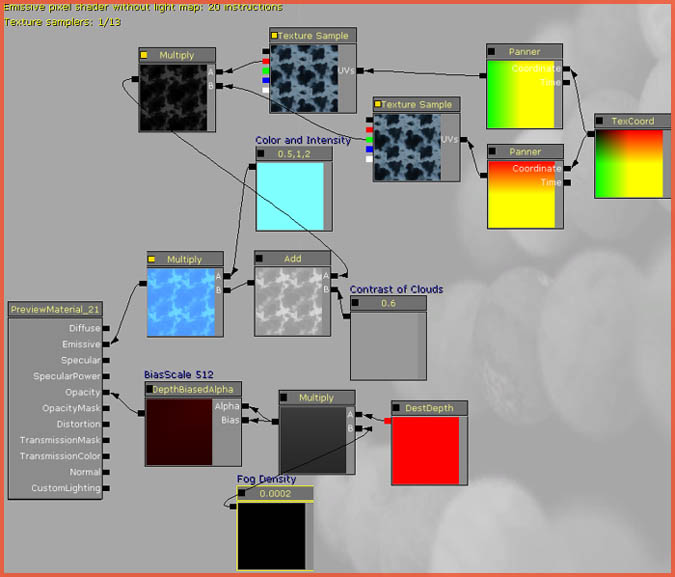
By adding two panning cloud textures to the Emissive input of the material, a more varied and animated result is achieved.
Fog Plane
This same trick can be applied to the regular (vertical) Fog Plane.
Fog Volumes
Another thing you could do, is adding distortion to the fog. That might be desirable for fog around hot substances such as lava. I’ve used a Fog Volume for this setup, but a Horizontal Fog Plane would probably be better suited for this.
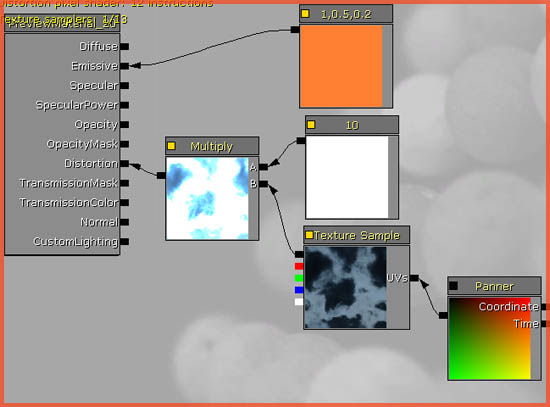
Bottom line is, you can go as far as you want with these setups.