


Tutorials – Vertex Blending
About : This tutorial will explain the technique of blending two textures using the intensity of the vertex colors. This technique is ideal for making cool looking terrain and rocks.
Target Audience : Everyone – intermediate skill required
Platform :3DSMax/Unreal Engine 2.
Last Update : August 2006
The Basics
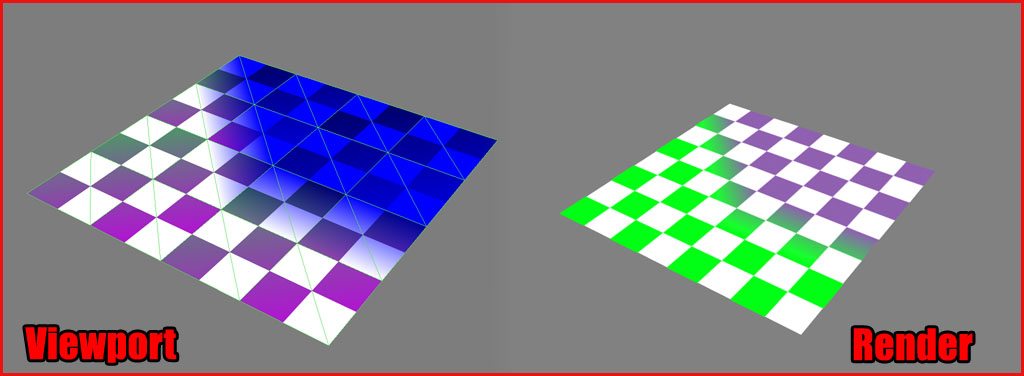
Blending textures by the vertexcolors is a really neat and simple way of blending. While vertex colors are far faster than the standard method of painting alpha maps for every texture layer it also has drawbacks. The biggest drawback is that unless you apply workarounds it will only be able to blend over two textures. In both the Unreal Engine and in 3DSMax it is not possible to have spots where three or more textures blend over. Here is a simple example of a plane with vertex colors applied to enable the grass-sand texture blend.
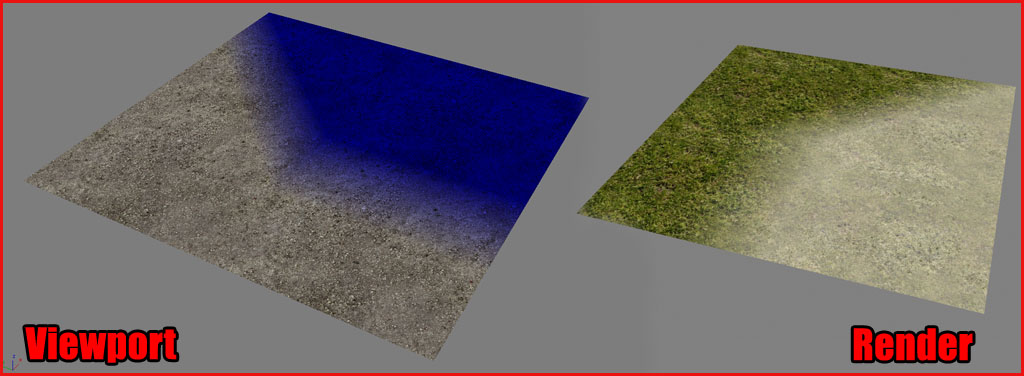
Half the side of the plane in the first picture is painted blue with vertex colors. After the plane is rendered however you can see that the blue vertex color is replaced with a grass texture.
This whole technique allows you to do really cool things. For example you could model a cave or a canyon and paint the floor blue to get a nice fade over from sand to rock without a lot of work.
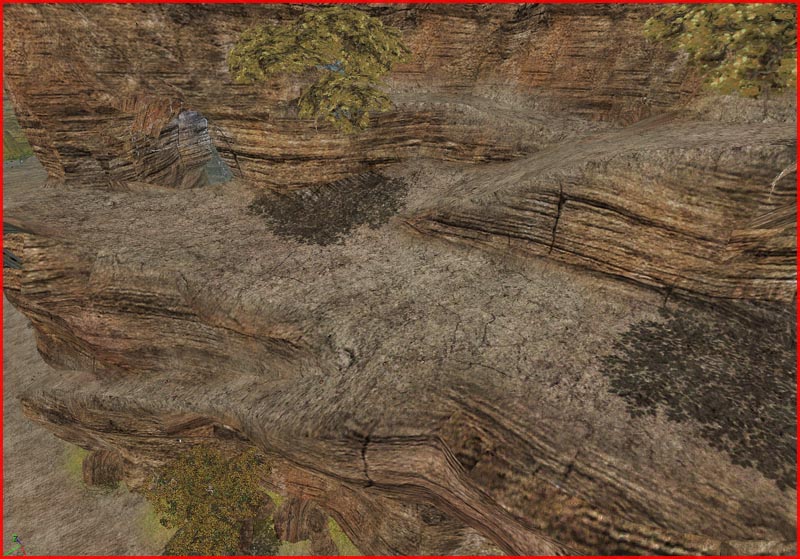
You could also use it to bring variation to your rocks by painting certain areas of your rocks blue to make the rock end up using two types of rock textures to bring some variation to the wall.
3DSMax
This tutorial is not really aimed at explaining HOW to apply vertex colors to your mesh. There are far better tutorials out there. It is however aimed at explaining what you can do with those vertex colors! I am only going to give you a short walkthrough to the settings and tools you have to use in 3DSMax.
By default you will not be able to see the vertex blend in 3DSMax and you don’t really have to. I painted all of my in game meshes without previewing it in 3DSMax. However if you do want to preview it there are two methods, one method to make it show up in the viewport and one to make it show up in the render. This part of the tutorial will focus on the render support.
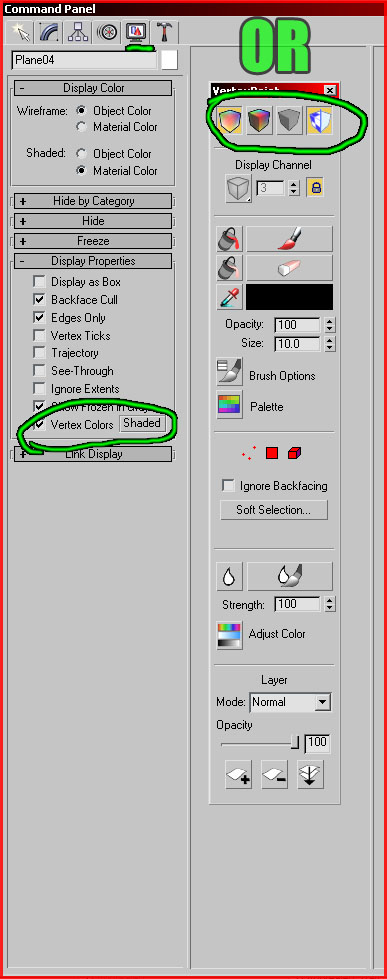
Take a model of choice and apply a VertexPaint Modifier to it . Next set set the viewport to show vertexcolors (by using the Display panel on your right or by using one of the four big buttons at the top of the VertexPaint Modifier window. Once done start painting away! Dependent on your version of 3DSMax you can change the brush size and fall off/hotspot size. It is advised to configure the brush so you do not have a fall off or hotspot but a hard edge to improve the accuracy.
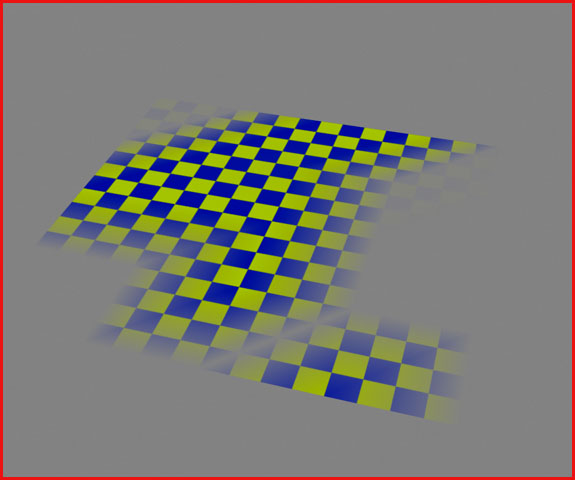
Once your model is painted you must assign a special material to it or you will not being able to see the vertex blend in a render. Open the material Editor and apply a Mix material to the diffuse. In the Mix material you can add two bitmaps or whatever else you wish for. You must also assign a vertex color material to the Mix amount.
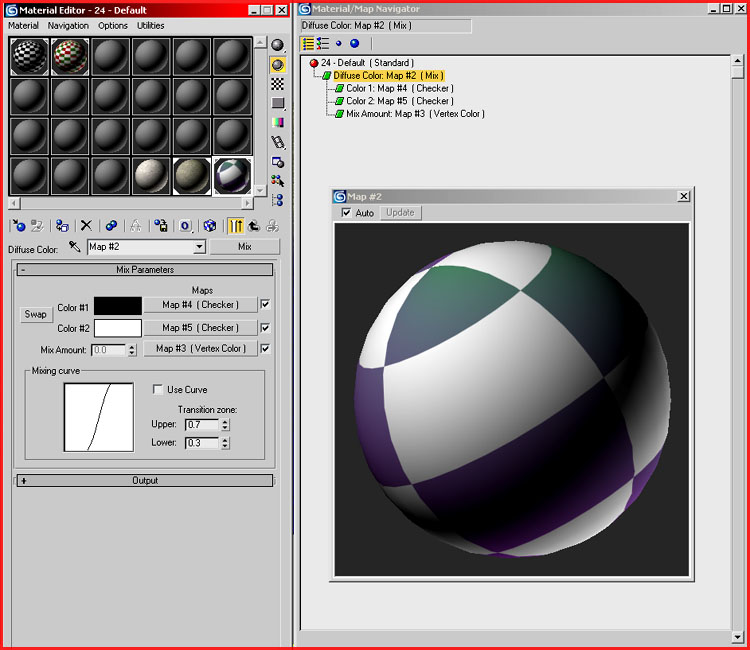
Apply the whole shader to the model and push render. You’re done!
The left plane has blue vertex paint applied. The right plane shows a nice purple checker blending over in a green checker once rendered.
Unreal Engine 2
First of all export your mesh out of 3DSMax the regular way (do make sure you enable Export Vertex Colors in the export window!) and simply import it the regular way into UnrealEd. If the vertexcolors refuse to be imported in UnrealED you might want to add another Edit Mesh/Poly on top of the mesh in 3DSMax or simply collapse the modifier stack before exporting. Note that you do not need to apply a Mix material to the mesh. A very simple single bitmap is enough to export with.
Another note on colors: UnrealED does not like every vertex color therefore only use a select set of colors. The two most used combinations are white + blue and black + red. Stick to those colors if possible or UnrealED might not blend the textures correctly.
You are by the way not suppose to see the vertexcolors in the Staticmesh browser. They will only show up if you set bUseVertexColors True at the bottom of the mesh browser. However, ONLY enable this for testing purposes. It MUST be disabled later on.
Just like in 3DSMax you need a number of materials to enable vertex blending in Unreal Engine 2.
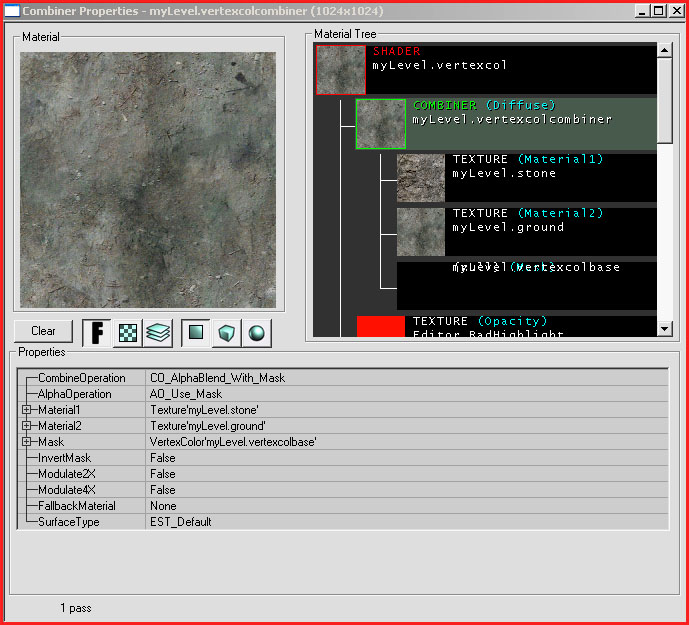
First of all make a Shader and even while the shader might look useless as it will only contain the combiner it is absolutely essential to have a shader! Without a shader the model will not accept lighting. In the Diffuse slot add a Combiner material. In the combiner add the two textures of choice to the Material1 and Material2 slots. After that be sure to create a VertexColor material and add it to the Mask slot. Lastly set CombineOperation to CO_Alphablend_With_Mask.
Now apply this shader to the model and the blend should show up!
Two extra settings to keep in mind: Unlike some people assume you do not need to enable UseVertexcolors True in the Staticmesh Browser. This has nothing to do with the blending! Secondly you MUST disable dynamic lighting on any vertexblended mesh. Select the mesh once it is placed in a level and go to its properties -> Display -> bUseDynamicLight=False.
There is also a little part on vertexblending on UDN
Tips and Tricks
Vertexcolors for Opacity
Both in the Unreal Engine as in 3DSMax it is possible to use vertexcolors as alpha to determine the opacity of certain pieces. Simply color elements black or gray and in both 3DSMax as in UnrealED apply a VertexColor material to Opacity.
UV Channels/Sets and Vertex Colors
A technique I personally use often is to use multiple uv channels/sets in combination with vertex blending. This allows me to nicely unwrap the rocks using the default first UV channel while the sand uses a planar Z map on the second UV channel. This method works for both 3DSMax as for the Unreal Engine. Simply vertexpaint the object as usual and then add a second UVW modifier to it and set its channel to 2. Once imported in UnrealED you must add an extra TextureCoordSource material in the combiner Material1 or Material2. Then fill in your real texture in the TexCoordSource and type set the TexCoordSource to channel 1. Channel 1 while you want the second channel!. UnrealEd starts counting at 0 while 3DSMax starts at 1. 2 In 3DSMax means 1 in UnrealED.
Blending three or more textures
It is possible to use more than one texture blend on a mesh. Due to the restrictions of the Combiner/Mix materials you normally can only mix two materials. However if you add a second material to the mesh using a Multi Subobject you can make three blends or even four, five, six or more blends! This works for both 3DSMax as for the Unreal Engine.
Setup your mesh and material as shown in this picture:
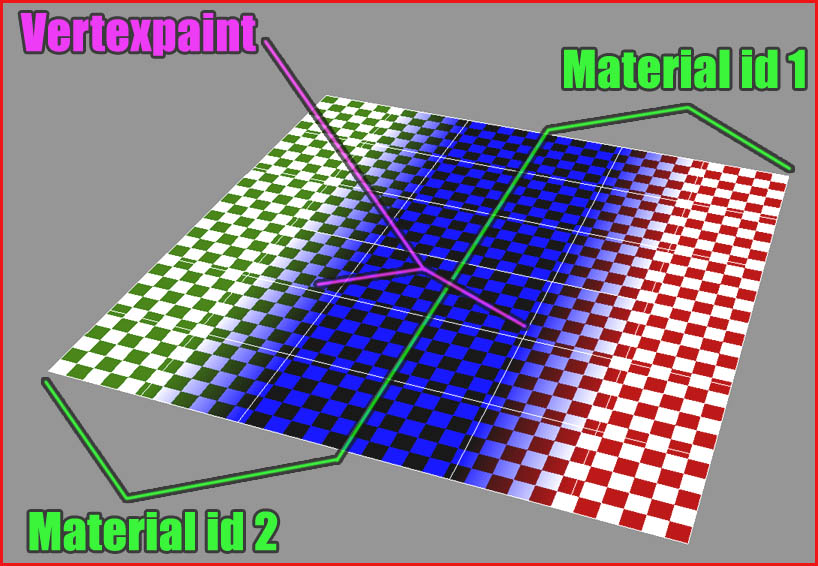
Create a Multi Sub Object material with 2 materials inside and apply them to your mesh. Give half of the mesh material id 1 and the other half material id 2 and then paint the edge between the two with a vertex color. Next create two Mix materials or Shaders and assign them to both material id’s.
Your first Shader or Mix might contain a grass and sand texture while your second Mix of Shader might contain a sand and a rock texture. They must always share a texture.
You can repeat these steps several times to blend even more textures but you may never have a spot where three textures touch each other. The area between two material Id and thus two different blends must always be made up of one single shared texture. In this example that was the sand texture.
If you do all of this correctly you can get three or more textures to blend over in to each other, as shown in this picture:
