


Tutorials UE1/UE2 BSP
About : This tutorial aims at providing info and insight into BSP and brushwork in the Unreal Engine. Although it focusses on Engine 1 it also contains lots of info for Engine 2.
Why a tutorial on BSP? Because a lot of people seem to have problems with the BSP errors. While every mapper faces BSP issues at one point in their mapping carrier there are very few tutorials online that help them dealing with the issue.
It takes some time and experience to see the solution to BSP errors but I hope these guidelines, techniques and insights will help you a lot.
Note that for the love of whoever, if your brushes are not clean don’t even bother reading sections like the Advanced Solutions. Most BSP problems are caused by messy building methods. Get that stuff straight first or don’t be surprised it goes wrong.
BSP is a rather complex and weird. You may have personal methods to fix bugs but in any way this is how I have been doing it for years now and it works well for me. Almost every type of BSP bug is fixable although you might need to go great lengths for it sometimes. I also really hope the tracking and fixing aspect is understandable as described below, it’s rather hard to explain such method with text.
Target Audience : Unreal Engine users
Platform :Unreal Engine 1 and 2
Last Update : August 2006
Index :
Introduction
Types of BSP Error
Understanding
Solutions – Basics
Solutions – Advanced – Tracking the cause and fixing it
Solutions – Examples
Solutions – Last Resort – If all else fails
Solutions – Final remark
BSP stands for Binary Space Partitioning. In simpler words BSP simply stands for all your brushes. Your brushwork is the BSP.
BSP has been around for quite some time and it’s currently loosing popularity because of Meshes and other things but it will still be around for quite a few years. All three big engines still use it: Quake/Doom, Source and the new Unreal engine.
On the contrary to what some people think not all games out there use some kind of BSP. BSP is not an absolute requirement to have when making a game but it has its advantages. Years ago in the Unreal/UT1/Quake1-3/HL/etc. age up to 90 percent of everything in a level was made up of BSP. All geometry and even things like water surfaces were made with them. In the current more modern times however more powerful things like meshes took over and the use of BSP is mainly restricted to the basic layouts of levels. They form the skeleton the level runs on.
BSP is cool and flexible but it can also be buggy and few people really understand how to solve bugs.. That’s what this tutorial is about.
This tutorial is for various versions of the engine. The BSP systems of Unreal Engine 1 and Unreal Engine 2 are pretty much the same but they do have differences. One of the biggest differences is the fact that UE2 BSP does not occlude anymore. It does not hide things behind a wall anymore, you need to zone areas to make it do that or use anti portals.
Lets start with an overview of all the things that can go wrong.
A.) HOM’s and Disappearing faces in general (UE 1 and UE 2)

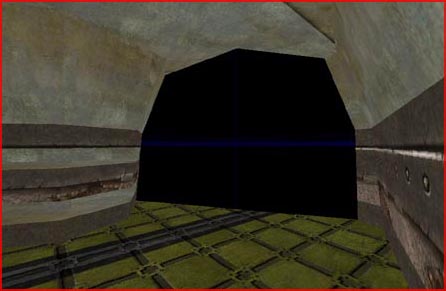
HOM stands for Hall Of Mirror. What happens is that for some reason a poly is not rendered anymore and thereby you can look straight in to the black void surrounding a level. Since the void is pure “nothing” the PC can’t draw anything so it keeps repeating the last info it had. It keeps repeating the last frame it had in memory resulting in a weird mirror Basically the HOM itself is not the problem but a result of a problem. The actual cause and the error itself is a disappearing face, which might not always result in a HOM..
To make things even more complicated, HOM’s are NOT always caused by disappearing faces. In fact they might even be created by a texture fault from the designer’s side. For example setting a masked or alpha texture on an outer wall will also make you see in to the void and cause a HOM yet the BSP has zero to do with this. Its your own fault.
B.) Convex Errors: The Endless Texture Flat and The Moving Face (Mainly UE 1)
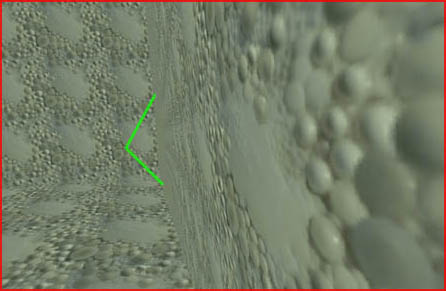
A problem that does not occur often but nonetheless should never occur. This error is almost always the cause of bad brush building.
In UnrealEd you will mostly have The Endless Texture Flat as seen on the picture while in game you will most likely have a wall that seems to move when you look at it. The Endless Texture Flat looks like the texture is forming the floor of a gigantic endless room. It might also display as a super colored texture, rainbow effect.
They are most likely caused by non convex brushes. More on that in the Solution section.
C.) Shaky Surfaces (UE1 and UE2)
Impossible to show on a picture but what happens is that surfaces and especially floors seem to shake. This happens very rarely because it has a very specific cause. Your brush is too big. And with big I mean BIG, several ten thousands at the very least. Make them smaller or use several separate brushes to form a bigger room.
D.) Instant Death Spots (Mainly UE1)
Symptoms are dying by walking over a specific spot in a level without noticing any visual differences. The players simply die when they touch “it”. The “it” is a piece of void. Because of a BSP error the engine thinks the player touches the void surrounding the level which always results in instant death. This is a serious BSP error that does not happen much.
E.) Collision In The Middle of Nowhere (Mainly UE1)
Invisible objects the player can walk against or over. Walk through a corridor and BAM, you hit something that is not there nor is visible in the editor. Same as D. A serious error which doesn’t happen a lot. This problem is most likely caused by bad brush building habits or complex and random shapes nearby such as caves and rocks.
Movers in UE1 have A LOT of chance on getting this problem, especially when they have weird shapes with too many holes or are too complex in general.
F.) Non Solid Areas (UE 1 and UE 2)
Some areas or objects are non solid, the player can walk or fall through them.
G.) Occasional disappearing faces (UE 1 Only)
This is a direct cause of Unreal Engine 1′s ability to occlude itself. Brushes in the first engine auto occlude stuff. However, sometimes that process messes up and hide parts that are still in view. Most of the time near the edges of the screen and only in certain camera angles. The result is always a HOM or missing surfaces.
If this happens in the middle of the screen you better go back to error A. Near the edges it is not as bad plus it is near impossible to fix. You might be able to fix such a problem but most likely it will simply create another one somewhere else at the same time. The engine was never meant for too many poly’s and thus having too much detail and brushes around almost always creates spots like these somewhere. Live with it unless its REALLY bad.
Theoretically it is possible to get combinations of these types, creating a single super error. My weirdest ever was this one :
On the water surface was a face that the engine did not manage to draw. You looked in to the void yet it did not cause a HOM, it did not kill you but it did cast a shadow on the bottom of the lake (!) plus it had collision so you could stand on it and if that wasn’t weird enough yet the face was part of the water sheet yet the water texture still managed to blend over the actual void! I forgot how I eventually fixed it but was likely by moving a couple of brushes. See the solution section for more info.
In UED you have two viewport modes for viewing BSP info. Those are BSP Cut view and Zone portal view. Unfortunately in Unreal Engine 2 only Zone Portal view seems to work well. Unlike what you may think Zone Portal view is the REAL BSP cut view mode. The viewport mode “BSP Cuts” only displays Super Cuts (more on that later) and not the regular ones Zone Portal view displays. All the little slightly different colored squares and shapes you see in Zone Portal view are the BSP Cuts. Every face will later on be triangulated.
Every time you add a brush on top of another one it will split up that surface and create cuts so it can match the surface to the brush that hits it.
It are those cuts where it goes wrong. The more square, simple and bigger the the surfaces are the better. The smaller and weirder shaped they are the worse.
Having weird cuts does not necessarily mean your brushes suck. When you are using complex shapes you will always end up with weird cuts no matter how clean you build it.
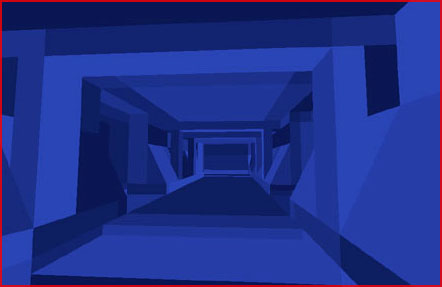
Using lots of cubic brushes will give you a very clean result :
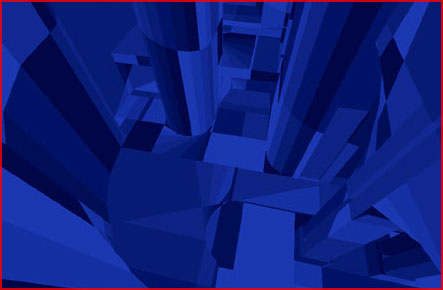
While when you use a lot of curved brushes one quickly ends up with messy surfaces..
While you will never be able to eliminate all strange surfaces you can reduce the number of them. The best method is to make as many brushes as possible semi solids. Semi solids only receive BSP cuts and do not make new ones. More info can be found in my semi solid tutorial.
Another method is to stop the cuts from “traveling” too far by manually adding a brush around the curve with the brush sinking technique.
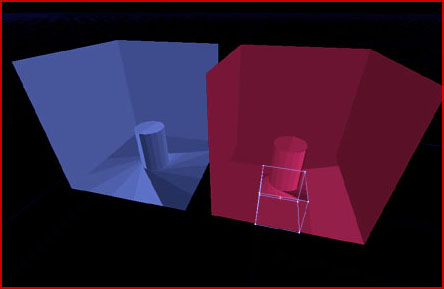
The cube prevents the cuts of the cylinder from reaching the walls of the big cube. It prevents the cuts from mixing up with any other geometry in the room which can dramatically improve the polycount..
Another method is to make brushes float. If something can’t touch the floor or the wall it won’t be able to create cuts in it either. Players won’t notice the few units offset but it can help the polycount and decrease the chance of BSP issues.
By staying on the grid you will have less chance of getting BSP errors. The bigger the grid the better in general because it can help to have multiple cuts end up on the same location which in turn reduces the number of cuts. A couple of cubes that are lined up on the X axis will only create a single cut on the X axis.
Make sure your brushes are all convex. Under no condition use conclave polygons !
In UnrealEd that translates to something like this:
Both examples are non convex and thus bad.
Try not to make such brushes unless you know what you are doing. Although hard to see the first example is a cube that has an edge that has been placed “inside” a wall with vertex edit. It has four corners yet it looks like it has only three. The second example is a sheet that has been vertex edited into multiple directions. The poly is not “flat” anymore but transformed from a 2D flat brush into a 3D brush. Not possible.
What does this mean for mapping ? Well it means you can’t for example make 2D surfaces in to a 3D thing. A wall for example is a 2D surface. A room is made up of multiple 2D and flat surfaces. Those surfaces may not be modified in such way they become a 3D object.
If you need such a shape you must first triangulate it. Unfortunately only a cube has such an option available. They can be triangulated by setting bTesselated to true when you rightclick the Cube button on the left menu.
Rotating brushes will create more dangerous BSP cuts. Only rotations of 90 degree are truly clean. Try to make rotated brushes semi solid if possible.
Caves, rocks and all kinds of natural other stuff are very BSP intensive because they are so random. This also is the case for cylinders, pipes, barrels etc. One way to minimize the impact of cylinders is to make the cylinders with the 2D shape editor. This will end you up with cylinders that are snapped to the grid, unlike the default cylinder brush builder.
In case of caves and other stuff you want to snap them to the grid. If you make caves with 3DSMax like I do you REALLY want to do this. Simply select the brush and type “Actor Align” at the bottom of UED to make it snap itself.
I general never intersect/desintersect anything and I advice you to avoid it as well. There are people who intersect everything they come across. Don’t copy those people, especially when you don’t know how intersecting exactly works. Intersecting too many brushes will make it very hard to adjust and fix an area later on since all the brushes are combined in to a bigger brush. Intersecting brushes takes away the possibility of moving brushes or details around.
Wrongly intersecting stuff can also cause a lot of trouble. If I look on how the brush of following picture was intersected I don’t find it surprising at all that there is a big fat BSP error.
This wall could have just as well been made with a simple cube, preventing unnecessary complexity. I do have to note though that in a rare case intersecting a problem can actually fix it.
Scaling brushes is pretty bad, if you do scale you REALLY have to use transform permanently afterwards. Using the option “Transform Permanently” will make your brushes cleaner. In UT1 this also resets texture coordinates though.
Solutions – Advanced – Tracking The cause and fixing it
Lets say you did everything correct and everything was build as clean as you could but it still goes wrong and you still have one or multiple BSP errors around.
First of all you need to track it, for as good as you can. Why does it go wrong ? What brush is causing the problem ?
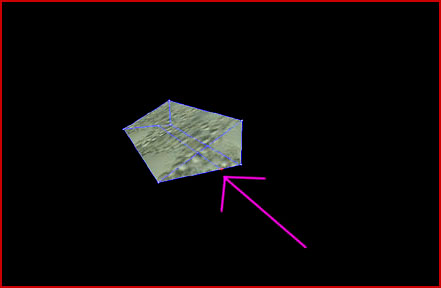
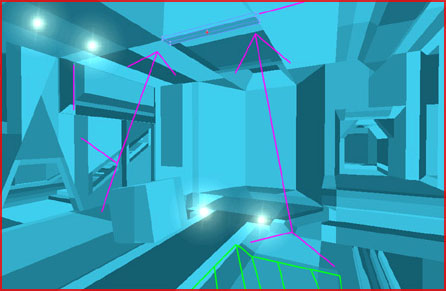
Simple example. Lets say there would be a problem in the red area and you would want to know the cause. All you would have to do is take one of the bordering edges of the problem (for example the cut with the purple arrow) and follow it. Find out where it leads to and what brush seems to create it. In this case it’s the big vertex edited pillar. Editing that brush will give a reasonable chance on fixing a problem in the red area.
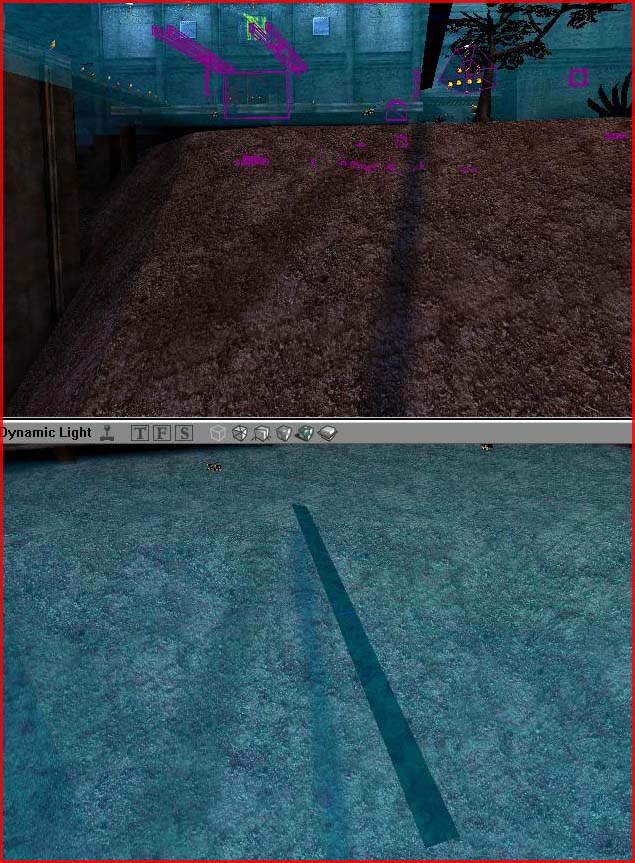
Another one.
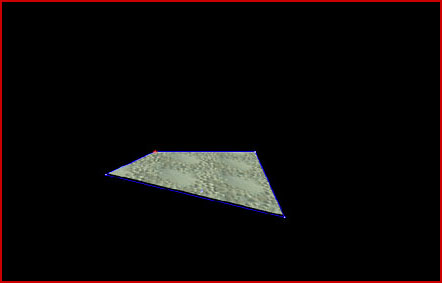
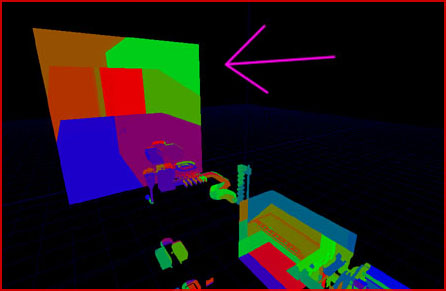
Lets assume the green area in the floor is a HOM. First of all check where it ends. In this case it ends at the horizontal line that’s cutting through the floor so you want to know where that line is coming from. Normally you can follow it and see if there is a door, a crate or other such thing but in this case it was a little harder. In the ceiling there is a solid brush and the cut in the floor is exactly below the brush in the ceiling. The cut is exactly following one of the sides of that brush in the ceiling. So in other words, the brush in the ceiling creates the cut in the floor and thereby doing something with that brush might fix the HOM in the green area.
What did we learn from this example ? That the cause of a cut might not always be nearby or touching the cut.
The same method you can use for Super Cuts. This mainly applies for UE 1 though.
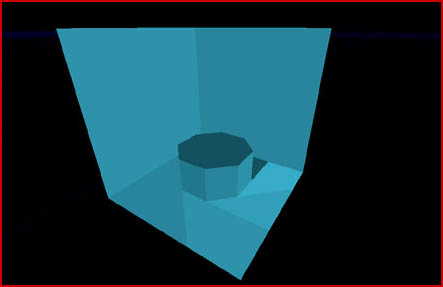
What are Super Cuts ? Super Cuts are regular BSP cuts that do not stop at a wall or ceiling but continue after that area and thus possible cut through the entire level. Most of them, not all, but most of them are visible in the BSP Cut view of UE 1.
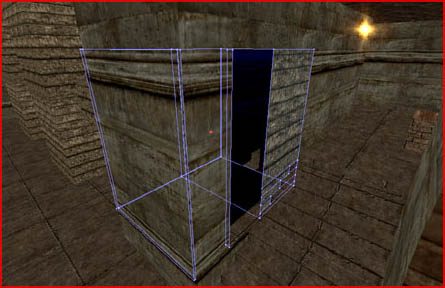
Normally a cut should stop when it reaches a wall. However it sometimes runs on like here. The big box (the box is empty!) is being cut up by brushes that don’t touch it at all, in fact they aren’t even nearby:
Not all the Super Cuts cause problems. Most of the times you won’t even notice they are there but sometimes they can go horribly wrong. And when they go wrong it is most of the time serious. They can make half a level simply disappear. Fix them on the same way as you fix regular BSP problems. Check the BSP Cut view and see if the problem area is bordered by a super cut. If does follow he cut to see where it goes to. This might be the other side of the level so really do look far enough.
When you find the brush that seems to be creating the cut slightly move it, delete it, vertex edit its shape or anything else.
Another example. The corridor in the picture above has huge HOM. The corridor simply disappeared in to the void. The HOM occurred EXACTLY on the border of a super cut so the cause was clear. The only remaining question then was: which brush was causing that super cut ? My first thought was that the two substracted cylinders on the corner caused it but that proved not be true. As you can see in this picture the massive cut line completely ignores the two cylinder brushes. It cuts right through polys instead of running parallel with them so they clearly were not the cause.

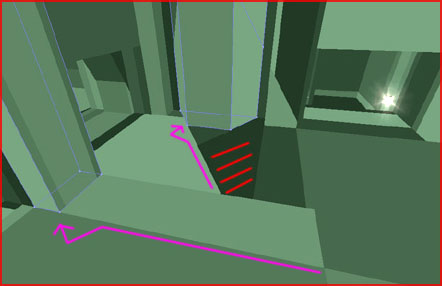
However when looking further I saw that one of the edges of the same corridor a little bit further seemed to be pointing in the exact same direction as the super cut. If you were the put a line (the pink one) against the edge of the corridor you would see the edge runs 100 percent “parallel” with the big BSP cut. That brush was the problem. I transform permanently’fied that brush, rebuilded and the problem was fixed.
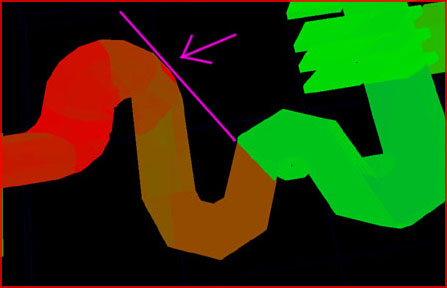
The HOM occurred on the border between orange and green for your information.
This tracking takes some time to master but it’s real simple once you understand it and it helps greatly.
What are the things you can do when you got a BSP error and you located the offending brush or problem area? Well, you can start by slightly moving the brush. That will move the cut as well which will likely fix the problem.
If moving is not an option or doesn’t work you can try to make the brush semi solid. Keep in mind the rules for Semi Solid brushes though, as described in my Semi Solid Tutorial.
Still no result? Delete it and build it again but slightly difference. Try to make it less complex too. Also try splitting it in various smaller brushes or intersecting it if simply re-building it doesn’t work. This fixes almost anything.
If you can’t find the brush that is causing the problem move around stuff that MIGHT be it and especially look for areas that have a lot of Semi Solids or complex shapes and try to remove or move those. Move what is closest or has the most weird shape.

There was a small invisible face on the left wall and it was running exactly along the border of two zones. It was safe to assume the zone portal created that problem so I moved the portal several times but that didn’t fixed the problem. I then simply deleted the portal and copied another zone portal from somewhere else in the level and placed it in this doorway to fix it. The original Zone Portal brush appeared to have been corrupted.
A well known problem in the map Orbital LE102, this is a G. error. The faces only disappear sometimes but since the location is quite in your face it had to receive a fix. This one was easy since you don’t even need look at the BSP Cuts to see that the BSP Error stopped at the edge of the lamp in the wall. That lamp was the cause.. I moved the lamp thing a little to the right, rebuilded and it was fixed.
Solutions – Last Resort – If all else fails
There is a big difference between running separate rebuilds (First run Geometry, then lighting and then Pathing by hand) or using Build All. Build All includes an optimize BSP Cut step and exactly that optimize step sometimes optimizes too much. You might fix your problem by A.) messing with the sliders found in the Build Options window or B.) simply do not run the optimization process.
I always choose B. The difference between optimizing or not is pretty small FPS-wise but bug wise it can matter a lot BSP error-wise. The optimization process is a remnant of Unreal 1 when 20 poly mattered a lot but nowadays who cares if your room has 20 poly’s more or less. The difference is too small.

BSP Sheets are a bit buggy sometimes. Sheets are always non solid even when you set them to “solid”. You can use this “feature” as emergency workaround. If a sheet really seems to cause the problem and moving it is not possible or does not work you can try making it Semi Solid or even Solid. The player won’t notice a difference but you have a good chance it will fix your problem
If nothing seems to help you can try an export. Export the entire level as t3d and import it again into a new file. Important: do not close UED after you exported the level. UED must stay open or you will erase stuff upon import.
Exporting cleans up everything a little BSP wise so it might help but it is quite extreme to do.
Another thing you could do is copy paste everything in to a new file but if exporting didn’t fix your problem this likely wont either. Copy pasting is basically the same as exporting. Both mean the content gets converted to pure text.
Rotating around an entire level 90 or 180 degrees might also help.
You might also be able of fixing any problems by simply moving the entire level away from its current position.
Solutions – Final Remark – One Last type of Error
There is one error I did not mention at the start. It’s the Massive UnrealEd Occlusion Error. This only occurs in Unreal Engine 1 for the same reason mentioned earlier. UE 1 supports automatic occlusion and it is that feature that causes this error. It also only happens in UnrealEd to my knowledge but even so, when it doesn’t even run in UED don’t expect the game to work either…
Here’s what happens: While moving around your 3d viewport suddenly becomes completely empty and black and the only things still visible are the purple mover brushes. You cannot move anymore and you have to ctrl-alt-del UED or crash out with a General Protection Error. Even worse, after reopening the level the same might happen again within a few minutes or you might not be able to open your level anymore at all.
I am not 100 percent certain about the cause but it is likely a brush somewhere that goes completely wrong and thereby completely screws up the occlusion calculations resulting in having the engine not render anything anymore and crash. That brush is still there after you reopen the map so for obviously it’s bound to happen again. However, this also seems happen if you have a slow PC and a too complex level.
In general if it only happens once, do not care about it. Else fix it by doing this – First of all open your level but make sure all viewports are set to a 2D view before opening the file. Then try to see if you can find the brush that causes the problem. Complex brushes, or stuff that just looks wrong, non convex etc. might all the the cause. Also try to rebuild again + try not to run the optimization process. If that still doesn’t fix it, and it likely won’t actually, you will need to export-import the level from a t3d format .